The homepage of this Travelify theme is at [https://themes.gohugo.io/hugo-travelify-theme/](https://themes.gohugo.io/hugo-travelify-theme/).
Some of the important features of Hugo-Travelify-Theme are:
- Automatic slider generation with banner images
- Subscribe via Email through Mailchimp integration (You have to sign up and generate the HTML code)
- Multiple author support (Included in the taxonomy)
- i10n data
- Disqus integration
- logo (with option to switch on or off the title)
- Social media sharing options
- Google Analytics
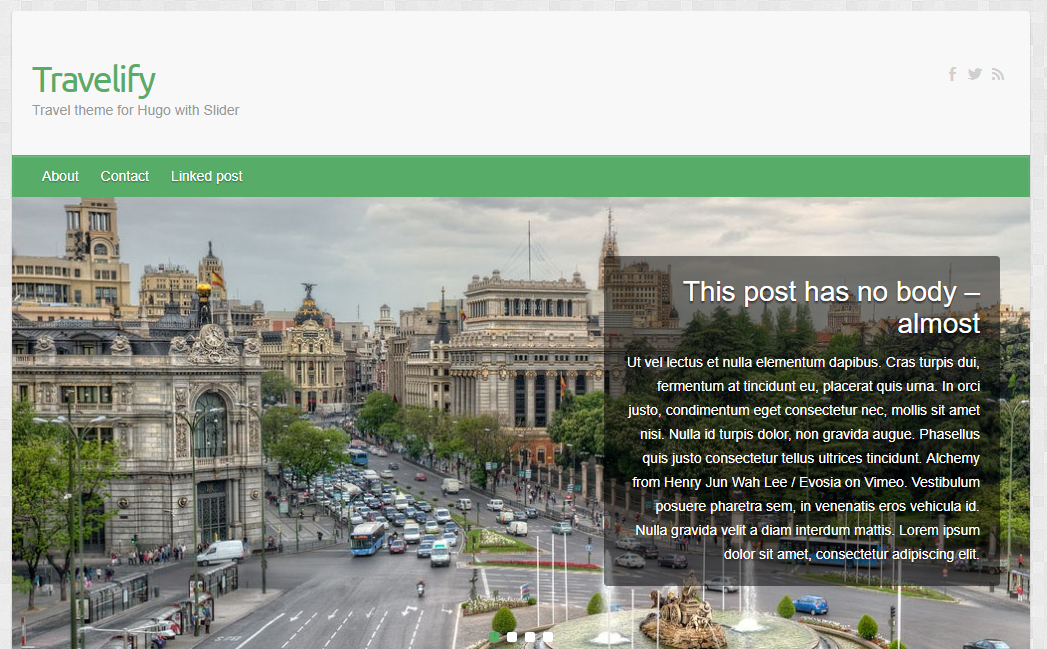
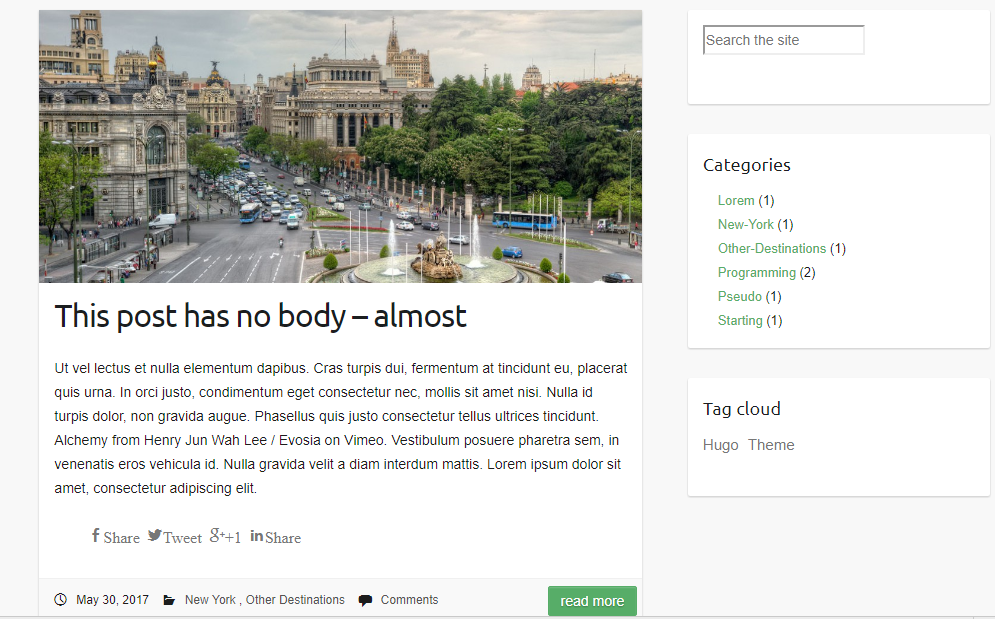
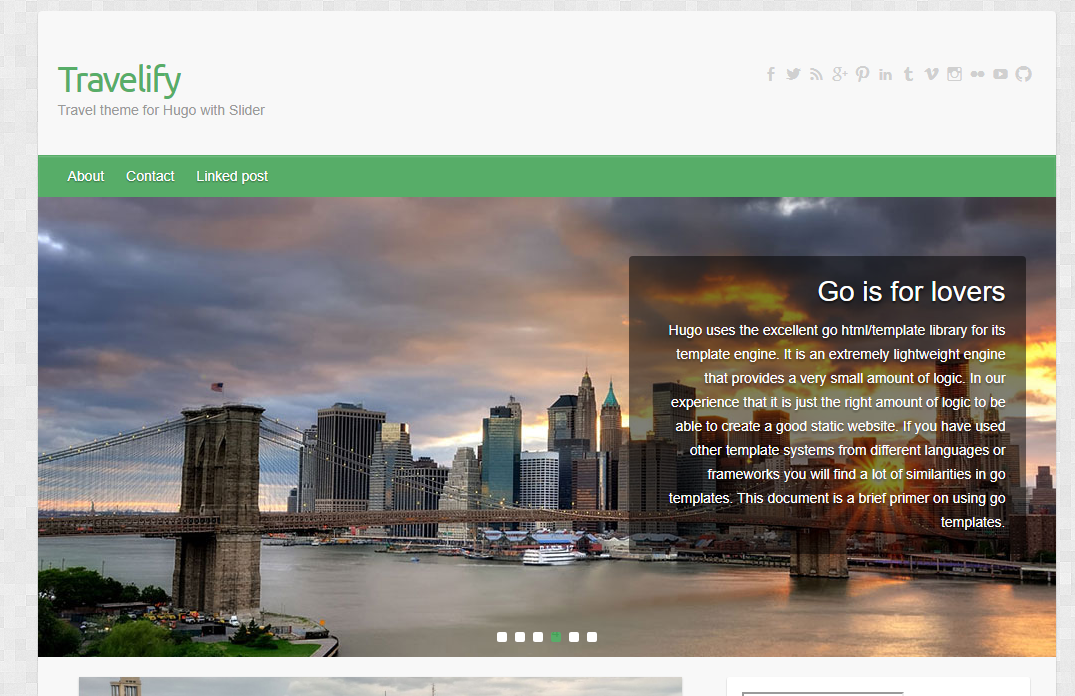
Here are some screenshots of the theme:
 ## Get the theme
If you have `git` installed, you can do the following at the command-line-interface within the Hugo directory:
```
$ cd themes
$ git clone https://github.com/balaramadurai/hugo-travelify-theme.git
```
You should see a folder called `hugo-travelify-theme` inside the `themes` directory that we created a few moments ago. For more information read the official [setup guide](https://gohugo.io/overview/installing/) of Hugo.
## Setup
In the next step navigate to the `exampleSite` folder at `themes/hugo-travelify-theme/exampleSite/`. Its structure should look similar to this:
```
exampleSite
| config.toml
+---content
| | about.md
| | contact.md
| \---post
| creating-a-new-theme.md
| go-is-for-lovers.md
| hugo-is-for-lovers.md
| linked-post.md
| migrate-from-jekyll.md
| this-post-has-no-body.md
+---data
| l10n.toml
\---static
| new-york-featured.jpg
\---banners
7148951717_9bbf185db3_h-1018x460.jpg
featured-4.jpg
featured-5.jpg
new-york-featured.jpg
placeholder.png
Spain-Plaza-de-Cibeles-Madrid-1018x460.jpg
Spain-Plaza-de-Cibeles-Madrid-670x300.jpg
spain6-1018x460.jpg
```
To get your site running, copy the entire contents of the example site using `cp -r themes/hugo-travelify-theme/exampleSite/* .` into the root folder. (Please refer to http://gohugo.io/overview/quickstart/ for installing a Hugo theme.)
## The `config` file
Now, let us take a look at `config.toml`. Let's take a look at some of the settings.
### 1. Automatic or Manual slider
Using the parameters in the config, the slider can be switched on and off at will and the number of banner images on the carousel can be customized.
```
[params.slider]
enable = true
manual = false
num_features = 4 # The slider picks up the banner images from the N most recent posts, where num_features is N.
```
The slider can be made `manual = true` and in each of the posts you want highlighted on the slider, include `slider = true` in the frontmatter. Another way to add a slideshow to the slider is by creating YAML files in the `data/slider` folder. Check the `exampleSite` for example.
#### Videos in slider
You can now add a video (from YouTube or Vimeo or Dailymotion or your own mp4/webm file) in the slider. (Thanks to [https://github.com/balaramadurai/hugo-travelify-theme/issues/32](Issue #32) for the idea)
*Tip* - For best results in the slider, use **1018x460** resolution for the banner images.
### 2. Google Analytics
```
GoogleAnalytics = ""
```
### 3. Comments
The comment system is an optional feature powered by Disqus. Enter your *shortname* to enable the comments section under your posts.
```
disqusShortname = ""
```
*Tip* - You can disable the comments section for a single page in its `frontmatter`:
```toml
+++
disable_comments = true
+++
```
### 4. Menu & Nested Menus
The entries in the items menu can be customized. First, let us link a post that you've written. We can do this in the `frontmatter` of the post's content file by setting `menu` to `main`.
```
+++
menu = "main"
+++
```
Further, we can add entries that don't link to posts. Back in the `config.toml` you'll find a section for the menus:
```
[[menu.main]]
name = "Contact"
url = "/contact/"
weight = 20
```
Define a label and enter the URL of the resource you want to link. With `before` you can decide whether the link should appear before **or** after all linked posts in the menu. Therefore, `Home` appears before the linked post.
For nested menus, you can use the following format:
```
[[menu.main]]
name = "Contact2"
url = "/contact/"
parent = "Contact"
[[menu.main]]
name = "Contact21"
url = "/contact/"
parent = "Contact2"
weight = 20
[[menu.main]]
name = "Contact22"
url = "/contact/"
parent = "Contact2"
weight = 10
[[menu.main]]
name = "Contact3"
url = "/contact/"
parent = "Contact"
```
### 5. Sidebars
To use the full width of the website you can disable the profile on the left and / or the widgets on the right for a single page in the `frontmatter`:
```toml
+++
disable_profile = true
disable_widgets = true
+++
```
### 6. Tell me who you are
This theme also provides a profile section. Add your social network accounts to the profile section by entering your user name under `social`. The links to your accounts will be created automatically.
### 7. Widgets
You can add widgets to the right sidebar. The following widgets are available:
- recent articles
- Multiple author support
- category list
- tag list
- tag cloud
- Duckduckgo search enabled on your website
You can deactivate them under `params.widgets`:
```
# Enable and disable widgets for the right sidebar
[params.widgets]
recent_articles = true
categories = true
tags = true
tag_cloud = true
archives = false # This feature is yet to be implemented because of limitations in Hugo's way of working.
search = true
author = true
mailchimp = true
mailchimpform = "//mailchimp/url/goes/here"
# grab the mailchimpform value by following instructions here - https://mailchimp.com/help/add-a-signup-form-to-your-website/
# Copy the URL in the action parameter inside the form
#
## Get the theme
If you have `git` installed, you can do the following at the command-line-interface within the Hugo directory:
```
$ cd themes
$ git clone https://github.com/balaramadurai/hugo-travelify-theme.git
```
You should see a folder called `hugo-travelify-theme` inside the `themes` directory that we created a few moments ago. For more information read the official [setup guide](https://gohugo.io/overview/installing/) of Hugo.
## Setup
In the next step navigate to the `exampleSite` folder at `themes/hugo-travelify-theme/exampleSite/`. Its structure should look similar to this:
```
exampleSite
| config.toml
+---content
| | about.md
| | contact.md
| \---post
| creating-a-new-theme.md
| go-is-for-lovers.md
| hugo-is-for-lovers.md
| linked-post.md
| migrate-from-jekyll.md
| this-post-has-no-body.md
+---data
| l10n.toml
\---static
| new-york-featured.jpg
\---banners
7148951717_9bbf185db3_h-1018x460.jpg
featured-4.jpg
featured-5.jpg
new-york-featured.jpg
placeholder.png
Spain-Plaza-de-Cibeles-Madrid-1018x460.jpg
Spain-Plaza-de-Cibeles-Madrid-670x300.jpg
spain6-1018x460.jpg
```
To get your site running, copy the entire contents of the example site using `cp -r themes/hugo-travelify-theme/exampleSite/* .` into the root folder. (Please refer to http://gohugo.io/overview/quickstart/ for installing a Hugo theme.)
## The `config` file
Now, let us take a look at `config.toml`. Let's take a look at some of the settings.
### 1. Automatic or Manual slider
Using the parameters in the config, the slider can be switched on and off at will and the number of banner images on the carousel can be customized.
```
[params.slider]
enable = true
manual = false
num_features = 4 # The slider picks up the banner images from the N most recent posts, where num_features is N.
```
The slider can be made `manual = true` and in each of the posts you want highlighted on the slider, include `slider = true` in the frontmatter. Another way to add a slideshow to the slider is by creating YAML files in the `data/slider` folder. Check the `exampleSite` for example.
#### Videos in slider
You can now add a video (from YouTube or Vimeo or Dailymotion or your own mp4/webm file) in the slider. (Thanks to [https://github.com/balaramadurai/hugo-travelify-theme/issues/32](Issue #32) for the idea)
*Tip* - For best results in the slider, use **1018x460** resolution for the banner images.
### 2. Google Analytics
```
GoogleAnalytics = ""
```
### 3. Comments
The comment system is an optional feature powered by Disqus. Enter your *shortname* to enable the comments section under your posts.
```
disqusShortname = ""
```
*Tip* - You can disable the comments section for a single page in its `frontmatter`:
```toml
+++
disable_comments = true
+++
```
### 4. Menu & Nested Menus
The entries in the items menu can be customized. First, let us link a post that you've written. We can do this in the `frontmatter` of the post's content file by setting `menu` to `main`.
```
+++
menu = "main"
+++
```
Further, we can add entries that don't link to posts. Back in the `config.toml` you'll find a section for the menus:
```
[[menu.main]]
name = "Contact"
url = "/contact/"
weight = 20
```
Define a label and enter the URL of the resource you want to link. With `before` you can decide whether the link should appear before **or** after all linked posts in the menu. Therefore, `Home` appears before the linked post.
For nested menus, you can use the following format:
```
[[menu.main]]
name = "Contact2"
url = "/contact/"
parent = "Contact"
[[menu.main]]
name = "Contact21"
url = "/contact/"
parent = "Contact2"
weight = 20
[[menu.main]]
name = "Contact22"
url = "/contact/"
parent = "Contact2"
weight = 10
[[menu.main]]
name = "Contact3"
url = "/contact/"
parent = "Contact"
```
### 5. Sidebars
To use the full width of the website you can disable the profile on the left and / or the widgets on the right for a single page in the `frontmatter`:
```toml
+++
disable_profile = true
disable_widgets = true
+++
```
### 6. Tell me who you are
This theme also provides a profile section. Add your social network accounts to the profile section by entering your user name under `social`. The links to your accounts will be created automatically.
### 7. Widgets
You can add widgets to the right sidebar. The following widgets are available:
- recent articles
- Multiple author support
- category list
- tag list
- tag cloud
- Duckduckgo search enabled on your website
You can deactivate them under `params.widgets`:
```
# Enable and disable widgets for the right sidebar
[params.widgets]
recent_articles = true
categories = true
tags = true
tag_cloud = true
archives = false # This feature is yet to be implemented because of limitations in Hugo's way of working.
search = true
author = true
mailchimp = true
mailchimpform = "//mailchimp/url/goes/here"
# grab the mailchimpform value by following instructions here - https://mailchimp.com/help/add-a-signup-form-to-your-website/
# Copy the URL in the action parameter inside the form
#