1
2
3
4
5
6
7
8
9
10
11
12
13
14
15
16
17
18
19
20
21
22
23
24
25
26
27
28
29
30
31
32
33
34
35
36
37
38
39
40
41
42
43
44
45
46
47
48
49
50
51
52
53
54
55
56
57
58
59
60
61
62
63
64
65
66
67
68
69
70
71
72
73
74
75
76
77
78
79
80
81
82
83
84
85
86
87
88
89
90
91
92
93
94
95
96
97
98
99
100
101
102
103
104
105
106
107
108
109
110
111
112
113
114
115
116
117
118
119
120
121
122
123
124
125
126
127
128
129
130
131
132
133
134
135
136
137
138
139
140
141
142
143
144
145
146
147
148
149
150
151
152
153
154
155
156
157
158
159
160
161
162
163
164
165
166
167
168
169
170
171
172
173
174
175
|
# COOLBOY Multirom Builder
[](https://github.com/ClusterM/coolboy-multirom-builder/actions/workflows/build.yaml)
This is a toolset that allows you to create multirom images for the **AA6023** ASICs mapper (usually labelled **SMD132**/**SMD133**) which used in a cheap **COOLBOY**/**MINDKIDS** (and clones) Famicom cartridges (mappers 268.0 and 268.1). This ROM can be run on a emulator or written to a real hardware.
It can:
* Automatically combine up to 1536 games into single binary which can be written to a cheap COOLBOY cartridge
* Create nice menu where you can easily select a game
* Alphabetically sort games if need
* Use your own image for the menu header and other customizations
* Remember last played game and keep up to 15 saves for "battery-backed" games into flash memory on a self-writable cartridges with PRG-RAM
* Run a built-in hardware tests
* Show build and hardware info
* Add up to three hidden ROMs
* Run on Windows (x64), Linux (x64, ARM, ARM64) and macOS (x64)
.NET 6.0 is required. You need to either install the [.NET 6.0 Runtime](https://dotnet.microsoft.com/en-us/download/dotnet/6.0) or to use the self-contained version.
## How to build a ROM
This package contains multiple tools which need to run sequentially. There is Makefile, so you can use [Make](https://www.gnu.org/software/make/) tool to automatize the whole process. This is the most simple way. Windows users can use [msys2](https://www.msys2.org/) to install and run Make or just run build.bat (not customizable, not recommended).
But you need to create game list and save it in the "configs" directory first.
### Game list format
It's just a text file. Lines started with semicolon are comments. Other lines has format:
<path_to_filename> [| <menu name>]
So each line is a path to a ROM with optional name which will be used in the menu. Example:
roms/Adventure Island (U) [!].nes | ADVENTURE ISLAND
roms/Adventure Island II (U) [!].nes | ADVENTURE ISLAND 2
roms/Adventure Island III (U) [!].nes | ADVENTURE ISLAND 3
Use a trailing "/" to add a whole directory:
roms/
If menu name is not specified it will be based on a filename. Maximum length for menu entry is 29 symbols.
You can use "?" symbol as game name to add hidden ROMs:
spec/sram.nes | ?
spec/controller.nes | ?
First hidden ROM will be started while holding Up+A+B at startup. Second one will be started while holding Down+A+B at startup. I'm using it to add some hardware tests. Also, you can add third hidden ROM, it will be started using the Konami Code in the loader menu :)
All games are alphabetically sorted by default so you don't need to care about game order. But if you are using custom order, you can use "-" symbol to add separators between games:
roms/filename1.nes
roms/filename2.nes
- | SOME TITLE
roms/filename3.nes
roms/filename4.nes
You can disable sorting and enable custom order using NOSORT=1 option when running Make. Or just add "!NOSORT" line to a game list file.
Check [configs/games.list](configs/games.list) for example.
### How to use Make
Just run:
`make <targets> [options]`
Possible targets:
* **nes20** - build .nes file (NES 2.0)
* **unif** - build .unf file (UNIF)
* **bin** - build raw binary file, can be used with flash memory programmer
* **all** - build .nes, .unf and .bin files at once
* **clean** - remove all temporary and output files
Possible options:
* **GAMES** - use as `GAMES=games.list` to specify the file with game list, default is "games.list"
* **MENU_IMAGE** - use as `MENU_IMAGE=menu_header.png` to specify image for menu header, default is "menu_header.png"
* **LANGUAGE** - use as `LANGUAGE=eng` to specify loader messages (like some warnings) language - "eng" or "rus", default is "eng"
* **SIZE** - use as `SIZE=32` - maximum ROM size in megabytes (flash chip size), builder will throw error in case of ROM overflow, default is 32
* **MAXCHRSIZE** - use as `MAXCHRSIZE=256` - maximum CHR size in kilobytes (CHR RAM chip size), builder will throw error in case if there is game with more CHR size, default is 256
* **OUTPUT_NES20** - use as `OUTPUT_NES20=output.nes` - output .nes file for **nes20** target
* **OUTPUT_UNIF** - use as `OUTPUT_UNIF=output.unf` - output .unf file for **unif** target
* **OUTPUT_BIN** - use as `OUTPUT_BIN=output.bin` - output .bin file for **bin** target
* **CONFIGS_DIR** - use as `CONFIGS_DIR=configs` - directory with game list files, default is "configs"
* **SUBMAPPER** - use as `SUBMAPPER=1` - specify submapper (chip/board version) to use, possible values: 0, 1, 2, 3, 4, 5, default is `SUBMAPPER=0`
* **ENABLE_SAVES** - use as `ENABLE_SAVES=1` - use self-writable flash memory to store game saves and remember last selected game if supported, default is `ENABLE_SAVES=0`, see ["about flash saving system" section](README.md#about-flash-saving-system)
* **ENABLE_LAST_GAME_SAVING** - use as `ENABLE_LAST_GAME_SAVING=1` - remember last played game, works only with `ENABLE_SAVES=1` and self-writable flash memory, default is `ENABLE_LAST_GAME_SAVING=1`
* **NOSORT** - use as `NOSORT=1` - disable automatic alphabetically game sorting, default is `NOSORT=0`
* **BADSECTORS** - use as `BADSECTORS=0,5,10` - specify list of bad sectors if you need to write cartridge with bad flash memory, default is none
* **REPORT** - use as `REPORT=report.txt` - specify file for human-readable build report, default is none
* **ENABLE_SOUND** - use as `ENABLE_SOUND=1` - enable or disable sound in the loader menu, default is `ENABLE_SOUND=1`
* **STARS** - use as `STARS=30` - amount of background stars in the loader menu, maximum is `STARS=62`, default is `STARS=30`
* **STARS_DIRECTION** - use as `STARS_DIRECTION=1` - direction of background stars in the loader menu, `STARS_DIRECTION=0` - down to up, `STARS_DIRECTION=1` - up to down, default is up to down
* **STAR_SPAWN_INTERVAL** - use as `STAR_SPAWN_INTERVAL=90` - spawn interval of background stars in the loader menu, default is `STAR_SPAWN_INTERVAL=90`
* **ENABLE_RIGHT_CURSOR** - use as `ENABLE_RIGHT_CURSOR=1` - show or hide right cursor in the loader menu, default is `ENABLE_RIGHT_CURSOR=1`
* **ENABLE_DIM_IN** - use as `ENABLE_DIM_IN=1` - enable dim-in (on startup, etc), default is `ENABLE_DIM_IN=1`
* **DIM_IN_DELAY** - use as `DIM_IN_DELAY=5` - dim-in speed (more - slower), default is `DIM_IN_DELAY=5`
* **ENABLE_DIM_OUT** - use as `ENABLE_DIM_OUT=1` - enable dim-out (before game launch, etc), default is `ENABLE_DIM_OUT=1`
* **DIM_OUT_DELAY** - use as `DIM_OUT_DELAY=1` - dim-out speed (more - slower), default is `DIM_OUT_DELAY=1`
#### Examples
Enable saves using self-writable flash memory:
`make nes GAMES=games.list ENABLE_SAVES=1`
Or change header image:
`make nes GAMES=games.list ENABLE_SAVES=1 MENU_HEADER=menu_example.png`
Use $5xxx registers instead of $6xxx and write to output.nes:
`make nes GAMES=games.list MINDKIDS=1 OUTPUT_NES20=output.nes`
Save output ROM as UNIF file:
`make unif GAMES=games.list OUTPUT_UNIF=output.unf`
## Games compatibility
COOLBOY supports games with **NROM** (mapper #0) and **MMC3** (mapper #4) mappers only. NROM is used by simple games without any mapper and MMC3 is the most popular mapper, so games support is good but not perfect. Also, most non-MMC3 games can be patched to run on a MMC3 mapper without any problem. Make sure that PRG RAM and CHR size requirements are met (see ["supported cartridges" section below](README.md#which-cartridges-are-supported-how-to-select-which-cartridge-to-buy)).
And one more thing about some weird buggy games. COOLBOY always uses writable CHR RAM even original game uses CHR ROM and it has not 'read-only' mode. So if game with CHR ROM writes to a ROM for some weird reason, CHR data will be corrupted. It can be fixed using ROM patches. Example game: Cowboy Kid.
Also, please note that PRG RAM is not working correctly on *original* Famicoms and AV Famicoms without additional cartridge hardware modification.
## Which cartridges are supported, how to select which cartridge to buy
There are many versions of COOLBOY cartridges and clones. Actually most of them are not "COOLBOY", it's just a name of the first cartridges with this chip.
You can find modifications:
* **With a different CHR size**. Some cartridges has only 128KB of RAM for CHR data and some 256KB. So 128KB version can't run many cool games with CHR size >128KB. You can easily detect amount of CHR RAM after looking at games list. If it has at least one game with large CHR, cartridge has 256KB. Example games: Megaman/Rockman 5, Earthbound Zero, Kirby's Adventure
* **With a different flash size**. Most cartridges has 32MBytes of flash memory but it's possible to find much more rare cartridges with less memory size. 32MBytes is maximum available size.
* **With and without additional PRG RAM chip**. It's required by some games like The Legend of Zelda, Jurassic Park, etc. So if cartridge contains those games, it has PRG RAM chip. Also, it's possible to solder this chip manually usually.
* **With and without battery**. Battery is used to keep data in PRG RAM chip even after console is turned off. It's used to save games progress. So if cartridge has battery, it also has PRG-RAM chip. There is no way to detect present of battery but usually seller can say it, also check product description in shop.
* **With a directly writable and non-writable flash memory**. Some new cartridges can be rewrited directly without additional soldering and some not. Direct rewrite will allow you not only rewrite cartridge's flash memory using very simple way but it will also allow to keep many game saves in cartridge's memory (if PRG RAM chip exists). Originally game's progress will be erased if any other game started that uses PRG RAM even if battery present. There is no way to know which cartridge has this feature but seems like it's all cartridges produced by "MINDKIDS". So if you can look at cartridge's board, check it for "MINDKIDS" label.
* **With a different register addresses**. Most cartridges has registers at $600x addresses but some cartridges has them at $500x. This toolset supports both versions, so you don't need to care about it.
So it's recommended to search for MINDKIDS cartridges with battery.
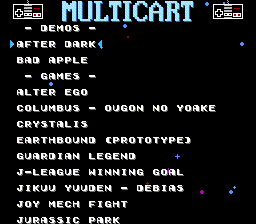
## Using the loader menu
Buttons:
* **Up** - move to previous game
* **Down** - move to next game
* **Right** - jump 10 games forward
* **Left** - jump 10 games backward
* **Start** - start selected game
* **A** - same, start selected game
* **B** - not used
Special combinations:
* Hold **Select** on startup to show some build and hardware info
* Hold **Select**+**A**+**B** on startup to run RAM tests, it will test PRG RAM and 256KB of CHR data
* Hold **Up**+**A**+**B** on startup to start first hidden ROM
* Hold **Down**+**A**+**B** on startup to start second hidden ROM
* Press **Up**, **Up**, **Down**, **Down**, **Left**, **Right**, **Left**, **Right**, **B**, **A** (the Konami code) to start third hidden ROM
## About flash saving system
When cartridge with a directly writable flash memory used (/WE and /OE pins are connected to the mapper), it's possible to use this memory as additional storage. If Make started with "ENABLE_SAVES=1" option, the last two sectors of flash memory (256KBytes) will be reserved for it. This memory will be used to store cursor position and progress of "battery-backed" games (even if cartridge has no battery, but you'll need to press reset to save the progress in this case). Please note that flash memory will not be rewritten every time. New data will be writed to free space on active sector marked by signature. When active sector is full, all actual data will be moved to the second one. User will be warned to keep power on.
## In-depth info - how it works
First method:
1. Convert images to a NES assets using the [NesTiler](https://github.com/ClusterM/NesTiler) tool.
2. Run **coolboy-combiner** with "**prepare**" option, it will automatically use the best way to fit games data in the target ROM and create "**games.asm**" file and offsets file. First one contains game names and register values for game loader menu. Second file contains info with addresses of data for every game in the final ROM.
3. Compile assembly files using [nesasm CE](https://github.com/ClusterM/nesasm). It will create .nes file with the loader menu. But it will not contain games data. You can tune loader menu using command line options and defines: header image, background stars behavior, sounds, etc.
4. Combine loader menu and games into one file (.nes, .unf or .bin) using **coolboy-combiner** with "**combine**" option and offsets file generated by step 2. Done.
Alternative method (easier and faster):
1. Convert images to a NES assets using the [NesTiler](https://github.com/ClusterM/NesTiler) tool.
2. Run **coolboy-combiner** with "**build**" option, it will automaticaly fit games, compile assembly files using [nesasm CE](https://github.com/ClusterM/nesasm) and combine everything into one file (.nes, .unf or .bin).
## Download
You can always download the latest version at [https://github.com/ClusterM/coolboy-multirom-builder/releases](https://github.com/ClusterM/coolboy-multirom-builder/releases).
Also, you can download automatic nightly builds: [http://clusterm.github.io/coolboy-multirom-builder/](http://clusterm.github.io/coolboy-multirom-builder/).
## Donate
* [Donation Alerts](https://www.donationalerts.com/r/clustermeerkat)
* [Boosty](https://boosty.to/cluster)
|
