
diff options
| author | Huabing Zhao <zhaohuabing@gmail.com> | 2018-06-19 19:07:06 +0300 |
|---|---|---|
| committer | Huabing Zhao <zhaohuabing@gmail.com> | 2018-06-19 19:07:06 +0300 |
| commit | 3d356f27c9aea5ccb777c09bf67588eb3b37a869 (patch) | |
| tree | 020ab2079153fe567b4b77299b594b7bcad12d31 /exampleSite | |
| parent | b4362eccf6a4daa944d12d57065346f628bb7c88 (diff) | |
add sample site
Signed-off-by: Huabing Zhao <zhaohuabing@gmail.com>
Diffstat (limited to 'exampleSite')
47 files changed, 4663 insertions, 0 deletions
diff --git a/exampleSite/build_algolia_index.sh b/exampleSite/build_algolia_index.sh new file mode 100755 index 0000000..828472e --- /dev/null +++ b/exampleSite/build_algolia_index.sh @@ -0,0 +1 @@ +npm run algolia diff --git a/exampleSite/config.toml b/exampleSite/config.toml new file mode 100644 index 0000000..054478e --- /dev/null +++ b/exampleSite/config.toml @@ -0,0 +1,88 @@ +baseurl = "" +title = "Huabing Blog" +theme = "hugo-theme-cleanwhite" +languageCode = "en-us" +# Enable comments by entering your Disqus shortname +disqusShortname = "" +googleAnalytics = "" +preserveTaxonomyNames = true +paginate = 5 #frontpage pagination +hasCJKLanguage = true + +[outputs] +home = ["HTML", "RSS", "Algolia"] + +[params] + header_image = "/img/home-bg-jeep.jpg" + SEOTitle = "赵化冰的博客 | Zhaohuabing Blog" + description = "赵化冰,程序员, 开源爱好者,生活探险家 | 这里是 赵化冰 的博客,与你一起发现更大的世界。" + keyword = "赵化冰, zhaohuabing, Zhaohuabing, , 赵化冰的网络日志, 赵化冰的博客, Zhaohuabing Blog, 博客, 个人网站, 互联网, Web, 云原生, PaaS, Istio, Kubernetes, 微服务, Microservice" + slogan = "路在脚下,心向远方" + + image_404 = "/img/404-bg.jpg" + title_404 = "你来到了没有知识的荒原 :(" + + # leancloud storage for page view counter + page_view_conter = true + leancloud_app_id = "" + leancloud_app_key = "" + + # algolia site search + algolia_search = false + algolia_appId = "" + algolia_indexName = "" + algolia_apiKey = "" + + # Sidebar settings + sidebar_about_description = "Software Developer, Open Source Enthusiast and Life Adventurer" + sidebar_avatar = "/img/avatar-zhaohuabing.jpg" # use absolute URL, seeing it's used in both `/` and `/about/` + + featured_tags = true + featured_condition_size = 2 + + # Baidu Analytics + ba_track_id = "" + + # We need a proxy to access Disqus api in China + disqus_proxy = "" + disqus_site = "" + + [params.social] + rss = true + email = "youemail@gmail.com" + #facebook = "full profile url in facebook" + #googleplus = "full profile url in googleplus" + #twitter = "full profile url in twitter" + linkedin = "full profile url in linkedin" + stackoverflow = "full profile url in stackoverflow" + #instagram = "full profile url in instagram" + github = "full profile url in github" + wechat = "link of wechat QR code image" + #pinterest = "full profile url in pinterest" + + [[params.friend_link]] + title = "Linda的博客" + href = "https://zhaozhihan.com" + + [[params.bookmark_link]] + title = "Martin Fowler" + href = "https://martinfowler.com" + [[params.bookmark_link]] + title = "ServiceMesh中文网" + href = "http://www.servicemesh.cn" + [[params.bookmark_link]] + title = "Awesome Service Mesh" + href = "https://servicemesh.gitbooks.io/awesome-servicemesh/" + [[params.bookmark_link]] + title = "Image Compression" + href = "https://tinypng.com/" + +[outputFormats.Algolia] +baseName = "algolia" +isPlainText = true +mediaType = "application/json" +notAlternative = true + +[params.algolia] +vars = ["title", "summary", "date", "publishdate", "expirydate", "permalink"] +params = ["categories", "tags"] diff --git a/exampleSite/content/post/2017-11-03-hello-world.md b/exampleSite/content/post/2017-11-03-hello-world.md new file mode 100644 index 0000000..b401bbf --- /dev/null +++ b/exampleSite/content/post/2017-11-03-hello-world.md @@ -0,0 +1,14 @@ +--- +layout: post +title: "Welcome to Zhaohuabing Blog" +subtitle: "Hello World, Hello Blog" +date: 2017-11-04 +author: "赵化冰" +URL: "/2017/11/03/hello-world/" +image: "https://img.zhaohuabing.com/post-bg-2015.jpg" +--- + +> “Yeah It's on. ” + + +## Hello World! diff --git a/exampleSite/content/post/2017-11-04-istio-install_and_example.md b/exampleSite/content/post/2017-11-04-istio-install_and_example.md new file mode 100644 index 0000000..b167a5a --- /dev/null +++ b/exampleSite/content/post/2017-11-04-istio-install_and_example.md @@ -0,0 +1,430 @@ +--- +layout: post +title: "Istio及Bookinfo示例程序安装试用笔记" +subtitle: "手把手教你从零搭建Istio及Bookinfo示例程序" +description: "Istio是来自Google,IBM和Lyft的一个Service Mesh(服务网格)开源项目,是Google继Kubernetes之后的又一大作,本文将演示如何从裸机开始从零搭建Istio及Bookinfo示例程序。" +excerpt: "Istio是来自Google,IBM和Lyft的一个Service Mesh(服务网格)开源项目,是Google继Kubernetes之后的又一大作,本文将演示如何从裸机开始从零搭建Istio及Bookinfo示例程序。" +date: 2017-11-04T12:00:00 +author: "赵化冰" +image: "https://img.zhaohuabing.com/in-post/istio-install_and_example/post-bg.jpg" +tags: + - Istio +URL: "/2017/11/04/istio-install_and_example/" +categories: [ Tech ] +--- + +## 服务网格简介 + +**服务网格**(Service Mesh)是为解决微服务的通信和治理而出现的一种**架构模式**。 + +服务网格将服务间通讯以及与此相关的管理控制功能从业务程序中下移到一个基础设施层,从而彻底隔离了业务逻辑和服务通讯两个关注点。采用服务网格后,应用开发者只需要关注并实现应用业务逻辑。服务之间的通信,包括服务发现,通讯的可靠性,通讯的安全性,服务路由等由服务网格层进行处理,并对应用程序透明。 + +<!--more--> +让我们来回顾一下微服务架构的发展过程。在出现服务网格之前,我们在微服务应用程序进程内处理服务通讯逻辑,包括服务发现,熔断,重试,超时等逻辑,如下图所示: + +通过对这部分负责服务通讯的逻辑进行抽象和归纳,可以形成一个代码库供应用程序调用。但应用程序还是需要处理和各种语言代码库的调用细节,并且各种代码库互不兼容,导致对应用程序使用的语言和代码框架有较大限制。 + +如果我们更进一步,将这部分逻辑从应用程序进程中抽取出来,作为一个单独的进程进行部署,并将其作为服务间的通信代理,如下图所示: + +因为通讯代理进程和应用进程一起部署,因此形象地把这种部署方式称为“sidecar”(三轮摩托的挎斗)。 + +应用间的所有流量都需要经过代理,由于代理以sidecar方式和应用部署在同一台主机上,应用和代理之间的通讯被认为是可靠的。然后由代理来负责找到目的服务并负责通讯的可靠性和安全等问题。 + +当服务大量部署时,随着服务部署的sidecar代理之间的连接形成了一个如下图所示的网格,被称之为Service Mesh(服务网格),从而得出如下的服务网格定义。 + +_服务网格是一个基础设施层,用于处理服务间通信。云原生应用有着复杂的服务拓扑,服务网格保证请求可以在这些拓扑中可靠地穿梭。在实际应用当中,服务网格通常是由一系列轻量级的网络代理组成的,它们与应用程序部署在一起,但应用程序不需要知道它们的存在。_ + +_William Morgan _[_WHAT’S A SERVICE MESH? AND WHY DO I NEED ONE?_](https://buoyant.io/2017/04/25/whats-a-service-mesh-and-why-do-i-need-one/)_ _ + + + +了解了服务网格的基本概念,下一步介绍一下[Istio](https://istio.io/)。Istio是来自Google,IBM和Lyft的一个Service Mesh(服务网格)开源项目,是Google继Kubernetes之后的又一大作,Istio架构先进,设计合理,刚一宣布就获得了Linkerd,nginmesh等其他Service Mesh项目的合作以及Red hat/Pivotal/Weaveworks/Tigera/Datawire等的积极响应。 + +可以设想,在不久的将来,微服务的标准基础设施将是采用kubernetes进行服务部署和集群管理,采用Istio处理服务通讯和治理,两者相辅相成,缺一不可。 + +## 安装Kubernetes + +Istio是微服务通讯和治理的基础设施层,本身并不负责服务的部署和集群管理,因此需要和Kubernetes等服务编排工具协同工作。 + +Istio在架构设计上支持各种服务部署平台,包括kubernetes,cloud foundry,Mesos等,但Istio作为Google亲儿子,对自家兄弟Kubernetes的支持肯定是首先考虑的。目前版本的0.2版本的手册中也只有Kubernetes集成的安装说明,其它部署平台和Istio的集成将在后续版本中支持。 + +从Istio控制面Pilot的架构图可以看到各种部署平台可以通过插件方式集成到Istio中,为Istio提供服务注册和发现功能。 + + + +kubernetes集群的部署较为复杂,[Rancher](http://rancher.com)提供了kubernetes部署模板,通过一键式安装,可以大大简化kubernetes集群的安装部署过程。 + +本文的测试环境为两台虚机组成的集群,操作系统是Ubuntu 16.04.3 LTS。两台虚机的地址分别为: +Rancher Server: 10.12.25.60 +工作节点: 10.12.25.116 + +通过Rancher安装Kubernetes集群的简要步骤如下: + +### 在server和工作节点上安装docker + +因为k8s并不支持最新版本的docker,因此需根据该页面安装指定版本的docker +[http://rancher.com/docs/rancher/v1.6/en/hosts/](http://rancher.com/docs/rancher/v1.6/en/hosts/) ,目前是1.12版本。 + +``` +curl https://releases.rancher.com/install-docker/1.12.sh | sh +``` + +如果需要以非root用户执行docker命令,参考[如何使用非root用户执行docker命令](http://zhaohuabing.com/2018/02/09/docker-without-sudo/)。 + + +### 启动Rancher server + +``` +sudo docker run -d --restart=always -p 8080:8080 rancher/server +``` + +### 登录Rancher管理界面,创建k8s集群 + +Rancher 管理界面的缺省端口为8080,在浏览器中打开该界面,通过菜单Default->Manage Environment->Add Environment添加一个kubernetes集群。这里需要输入名称kubernetes,描述,然后选择kubernetes template,点击create,创建Kubernetes环境。 + +点击菜单切换到kubernetes Environment,然后点击右上方的Add a host,添加一台host到kubernetes集群中。注意添加到集群中的host上必须先安装好符合要求的docker版本。 + +然后根据Rancher页面上的提示在host上执行脚本启动Rancher agent,以将host加入ranch cluster。注意脚本中包含了rancher server的地址,在host上必须可以ping通该地址。 + +host加入cluster后Rancher会在host上pull kubernetes的images并启动kubernetes相关服务,根据安装环境所在网络情况不同需要等待几分钟到几十分钟不等。 + +### 安装并配置kubectl + +待Rancher界面提示kubernetes创建成功后,安装kubernetes命令行工具kubectl + +``` +curl -LO https://storage.googleapis.com/kubernetes-release/release/v1.7.4/bin/linux/amd64/kubectl + +chmod +x ./kubectl + +sudo mv ./kubectl /usr/local/bin/kubectl +``` + +登录Rancher管理界面, 将 All Environments->kubernetes->KUBERNETES->CLI create config 的内容拷贝到~/.kube/config 中,以配置Kubectl和kubernetes server的连接信息。 + +## 安装Istio + +Istio提供了安装脚本,该脚本会根据操作系统下载相应的Istio安装包并解压到当前目录。 + +``` + curl -L https://git.io/getLatestIstio | sh - +``` + +根据脚本的提示将Istio命令行所在路径加入到系统PATH环境变量中 + +``` +export PATH="$PATH:/home/ubuntu/istio-0.2.10/bin" +``` + +在kubernetes集群中部署Istio控制面服务 + +``` +kubectl apply -f istio-0.2.10/install/kubernetes/istio.yaml +``` + +确认Istio控制面服务已成功部署。Kubernetes会创建一个istio-system namespace,将Istio相关服务部署在该namespace中。 + +确认Istio相关Service的部署状态 + +``` +kubectl get svc -n istio-system +``` + +``` +NAME CLUSTER-IP EXTERNAL-IP PORT(S) AGE +istio-egress 10.43.192.74 <none> 80/TCP 25s +istio-ingress 10.43.16.24 10.12.25.116,... 80:30984/TCP,443:30254/TCP 25s +istio-mixer 10.43.215.250 <none> 9091/TCP,9093/TCP,9094/TCP,9102/TCP,9125/UDP,42422/TCP 26s +istio-pilot 10.43.211.140 <none> 8080/TCP,443/TCP 25s +``` + +确认Istio相关Pod的部署状态 + +``` +kubectl get pods -n istio-system +``` + +``` +NAME READY STATUS RESTARTS AGE +istio-ca-367485603-qvbfl 1/1 Running 0 2m +istio-egress-3571786535-gwbgk 1/1 Running 0 2m +istio-ingress-2270755287-phwvq 1/1 Running 0 2m +istio-mixer-1505455116-9hmcw 2/2 Running 0 2m +istio-pilot-2278433625-68l34 1/1 Running 0 2m +``` + +从上面的输出可以看到,这里部署的主要是Istio控制面的服务,而数据面的网络代理要如何部署呢? +根据前面服务网格的架构介绍可以得知,网络代理是随着应用程序以sidecar的方式部署的,在下面部署Bookinfo示例程序时会演示如何部署网络代理。 + +## 部署Bookinfo示例程序 + +在下载的Istio安装包的samples目录中包含了示例应用程序。 + +通过下面的命令部署Bookinfo应用 + +``` +kubectl apply -f <(istioctl kube-inject -f istio-0.2.10/samples/bookinfo/kube/bookinfo.yaml) +``` + +确认Bookinfo服务已经启动 + +``` +kubectl get services +``` + +``` +NAME CLUSTER-IP EXTERNAL-IP PORT(S) AGE +details 10.43.175.204 <none> 9080/TCP 6m +kubernetes 10.43.0.1 <none> 443/TCP 5d +productpage 10.43.19.154 <none> 9080/TCP 6m +ratings 10.43.50.160 <none> 9080/TCP 6m +reviews 10.43.219.248 <none> 9080/TCP 6m +``` + +在浏览器中打开应用程序页面,地址为istio-ingress的External IP + +`http://10.12.25.116/productpage` + + +## 理解Istio Proxy实现原理 + +服务网格相对于sprint cloud等微服务代码库的一大优势是其对应用程序无侵入,在不修改应用程序代码的前提下对应用服务之间的通信进行接管,Istio是如何做到这点的呢?下面通过示例程序的部署剖析其中的原理。 + +如果熟悉kubernetes的应用部署过程,我们知道Bookinfo应用程序的标准部署方式是这样的: + +``` +kubectl apply -f istio-0.2.10/samples/bookinfo/kube/bookinfo.yaml +``` + +但从上面的部署过程可以看到,kubectl apply命令的输入并不是一个kubernetes yaml文件,而是`istioctl kube-inject -f istio-0.2.10/samples/bookinfo/kube/bookinfo.yaml`命令的输出。 + +这段命令在这里起到了什么作用呢?通过单独运行该命令并将输出保存到文件中,我们可以查看istioctl kube-inject命令到底在背后搞了什么小动作。 + +``` +istioctl kube-inject -f istio-0.2.10/samples/bookinfo/kube/bookinfo.yaml >> bookinfo_with_sidecar.yaml +``` + +对比bookinfo/_with/_sidecar.yaml文件和bookinfo.yaml,可以看到该命令在bookinfo.yaml的基础上做了如下改动: + +* 为每个pod增加了一个代理container,该container用于处理应用container之间的通信,包括服务发现,路由规则处理等。从下面的配置文件中可以看到proxy container通过15001端口进行监听,接收应用container的流量。 + +* 为每个pod增加了一个init-container,该container用于配置iptable,将应用container的流量导入到代理container中。 + +``` + #注入istio 网络代理 + image: docker.io/istio/proxy_debug:0.2.10 + imagePullPolicy: IfNotPresent + name: istio-proxy + resources: {} + securityContext: + privileged: true + readOnlyRootFilesystem: false + runAsUser: 1337 + volumeMounts: + - mountPath: /etc/istio/proxy + name: istio-envoy + - mountPath: /etc/certs/ + name: istio-certs + readOnly: true + #使用init container修改iptable + initContainers: + - args: + - -p + - "15001" + - -u + - "1337" + image: docker.io/istio/proxy_init:0.2.10 + imagePullPolicy: IfNotPresent + name: istio-init +``` + +从上面的分析,我们可以看出Istio的kube-inject工具的用途即是将代理sidecar注入了Bookinfo的kubernetes yaml部署文件中。通过该方式,不需要用户手动修改kubernetes的部署文件,即可在部署服务时将sidecar和应用一起部署。 + +通过命令查看pod中部署的docker container,确认是否部署了Istio代理 + +``` +kubectl get pods + +NAME READY STATUS RESTARTS AGE +details-v1-3688945616-8hv8x 2/2 Running 0 1d +productpage-v1-2055622944-cslw1 2/2 Running 0 1d +ratings-v1-233971408-8dcnp 2/2 Running 0 1d +reviews-v1-1360980140-474x6 2/2 Running 0 1d +reviews-v2-1193607610-cfhb5 2/2 Running 0 1d +reviews-v3-3340858212-b5c8k 2/2 Running 0 1d +``` + +查看reviews pod的中的container,可以看到pod中除reviews container外还部署了一个istio-proxy container + +``` +kubectl get pod reviews-v3-3340858212-b5c8k -o jsonpath='{.spec.containers[*].name}' + +reviews istio-proxy +``` + +而应用container的流量是如何被导入到istio-proxy中的呢? + +原理是Istio proxy在端口15001进行监听,pod中应用container的流量通过iptables规则被重定向到15001端口中。下面我们进入pod内部,通过相关命令来验证这一点。 + +先通过命令行找到ratings-v1-233971408-8dcnp pod的PID,以用于查看其network namespace內的iptables规则。 + +``` +CONTAINER_ID=$(kubectl get po ratings-v1-233971408-8dcnp -o jsonpath='{.status.containerStatuses[0].containerID}' | cut -c 10-21) + +PID=$(sudo docker inspect --format '{{ .State.Pid }}' $CONTAINER_ID) +``` + +可以使用nsenter命令来进入pod的network namespace执行命令。 +使用netstat命令可以看到istio proxy代理的监听端口15001 + +``` +sudo nsenter -t ${PID} -n netstat -all | grep 15001 + +tcp 0 0 *:15001 *:* LISTEN +``` + +使用iptables命令可以查看到下面的规则 + +``` +sudo nsenter -t ${PID} -n iptables -t nat -L -n -v + +Chain PREROUTING (policy ACCEPT 0 packets, 0 bytes) + pkts bytes target prot opt in out source destination + 16 960 ISTIO_REDIRECT all -- * * 0.0.0.0/0 0.0.0.0/0 /* istio/install-istio-prerouting */ + +Chain INPUT (policy ACCEPT 16 packets, 960 bytes) + pkts bytes target prot opt in out source destination + +Chain OUTPUT (policy ACCEPT 84838 packets, 7963K bytes) + pkts bytes target prot opt in out source destination + 1969 118K ISTIO_OUTPUT tcp -- * * 0.0.0.0/0 0.0.0.0/0 /* istio/install-istio-output */ + +Chain POSTROUTING (policy ACCEPT 84838 packets, 7963K bytes) + pkts bytes target prot opt in out source destination + +Chain ISTIO_OUTPUT (1 references) + pkts bytes target prot opt in out source destination + 0 0 ISTIO_REDIRECT all -- * lo 0.0.0.0/0 !127.0.0.1 /* istio/redirect-implicit-loopback */ + 1969 118K RETURN all -- * * 0.0.0.0/0 0.0.0.0/0 owner UID match 1337 /* istio/bypass-envoy */ + 0 0 RETURN all -- * * 0.0.0.0/0 127.0.0.1 /* istio/bypass-explicit-loopback */ + 0 0 ISTIO_REDIRECT all -- * * 0.0.0.0/0 0.0.0.0/0 /* istio/redirect-default-outbound */ + +Chain ISTIO_REDIRECT (3 references) + pkts bytes target prot opt in out source destination + 16 960 REDIRECT tcp -- * * 0.0.0.0/0 0.0.0.0/0 /* istio/redirect-to-envoy-port */ redir ports 15001 +``` + +从pod所在network namespace的iptables规则中可以看到,pod的入口和出口流量分别通过PREROUTING和OUTPUT chain指向了自定义的ISTIO/_REDIRECT chain,而ISTIO/_REDIRECT chain中的规则将所有流量都重定向到了istio proxy正在监听的15001端口中。从而实现了对应用透明的通信代理。 + +## 测试路由规则 + +多次刷新Bookinfo应用的productpage页面,我们会发现该页面中显示的Book Reviews有时候有带红星的评价信息,有时有带黑星的评价信息,有时只有文字评价信息。 +这是因为Bookinfo应用程序部署了3个版本的Reviews服务,每个版本的返回结果不同,在没有设置路由规则时,缺省的路由会将请求随机路由到每个版本的服务上,如下图所示: + + + +通过创建一条路由规则route-rule.yaml,将请求流量都引导到Reviews-v1服务上 + +``` +apiVersion: config.istio.io/v1alpha2 +kind: RouteRule +metadata: + name: reviews-default +spec: + destination: + name: reviews + precedence: 1 + route: + - labels: + version: v1 +``` + +启用该路由规则 + +``` +istioctl create -f route-rule.yaml -n default +``` + +再次打开productpage页面, 无论刷新多少次,显示的页面将始终是v1版本的输出,即不带星的评价内容。 + +删除该路由规则 + +``` +istioctl delete -f route_rule.yaml -n default +``` + +继续刷新productpage页面,将重新随机出现三个版本的评价内容页面。 + +## 分布式调用追踪 + +首先修改安装包中的 `istio-0.2.10/install/kubernetes/addons/zipkin.yaml` 部署文件,增加Nodeport,以便能在kubernetes集群外部访问zipkin界面。 + +``` +apiVersion: v1 +kind: Service +metadata: + name: zipkin + namespace: istio-system +spec: + ports: + - name: http + port: 9411 + nodePort: 30001 + selector: + app: zipkin + type: NodePort +``` + +部署zipkin服务。 + +``` +kubectl apply -f istio-0.2.10/install/kubernetes/addons/zipkin.yaml +``` + +在浏览器中打开zipkin页面,可以追踪一个端到端调用经过了哪些服务,以及各个服务花费的时间等详细信息,如下图所示: +`http://10.12.25.116:30001` + + +## 性能指标监控 + +首先修改安装包中的 `istio-0.2.10/install/kubernetes/addons/grafana.yaml` 部署文件,增加Nodeport,以便能在kubernetes集群外部访问grafana界面。 + +``` +apiVersion: v1 +kind: Service +metadata: + name: grafana + namespace: istio-system +spec: + ports: + - port: 3000 + protocol: TCP + name: http + nodePort: 30002 + selector: + app: grafana + type: NodePort +``` + +prometheus用于收集和存储信息指标,grafana用于将性能指标信息进行可视化呈现,需要同时部署prometheus和grafana服务。 + +``` +kubectl apply -f istio-0.2.10/install/kubernetes/addons/prometheus.yaml + +kubectl apply -f istio-0.2.10/install/kubernetes/addons/grafana.yaml +``` + +首先在浏览器中打开Bookinfo的页面`http://10.12.25.116/productpage`,刷新几次,以制造一些性能指标数据。 + +然后打开grafana页面查看性能指标`http://10.12.25.116:30002/dashboard/db/istio-dashboard`,如下图所示: + + +## 参考 + +* [Istio官方文档](https://istio.io/docs/) +* [Pattern: Service Mesh](http://philcalcado.com/2017/08/03/pattern_service_mesh.html) +* [WHAT’S A SERVICE MESH? AND WHY DO I NEED ONE?](https://buoyant.io/2017/04/25/whats-a-service-mesh-and-why-do-i-need-one/) +* [A Hacker’s Guide to Kubernetes Networking](https://thenewstack.io/hackers-guide-kubernetes-networking/) + + + diff --git a/exampleSite/content/post/2017-11-07-istio-traffic-shifting.md b/exampleSite/content/post/2017-11-07-istio-traffic-shifting.md new file mode 100644 index 0000000..e6db50b --- /dev/null +++ b/exampleSite/content/post/2017-11-07-istio-traffic-shifting.md @@ -0,0 +1,94 @@ +--- +layout: post +title: "使用Istio实现应用流量转移" +subtitle: "本文翻译自istio官方文档" +description: "本任务将演示如何将应用流量逐渐从旧版本的服务迁移到新版本。通过Istio,可以使用一系列不同权重的规则(10%,20%,··· 100%)将流量平缓地从旧版本服务迁移到新版本服务。" +excerpt: "本任务将演示如何将应用流量逐渐从旧版本的服务迁移到新版本。通过Istio,可以使用一系列不同权重的规则(10%,20%,··· 100%)将流量平缓地从旧版本服务迁移到新版本服务。" +date: 2017-11-07 +author: "赵化冰" +image: "https://img.zhaohuabing.com/in-post/istio-traffic-shifting/crossroads.png" +categories: [ "Tech"] +tags: + - Istio +URL: "/2017/11/07/istio-traffic-shifting/" +--- + +关于Istio的更多内容请参考[istio中文文档](http://istio.doczh.cn/)。 + +原文参见[Traffic Shifting](https://istio.io/docs/tasks/traffic-management/traffic-shifting.html)。 + +本任务将演示如何将应用流量逐渐从旧版本的服务迁移到新版本。通过Istio,可以使用一系列不同权重的规则(10%,20%,··· 100%)将流量平缓地从旧版本服务迁移到新版本服务。 +<!--more--> +为简单起见,本任务将采用两步将流量从`reviews:v1` 迁移到 `reviews:v3`,权重分别为50%,100%。 + + +# 开始之前 + +* 参照文档[安装指南](http://istio.doczh.cn/docs/setup/kubernetes/index.html)中的步骤安装Istio。 + +* 部署[BookInfo](http://istio.doczh.cn/docs/guides/bookinfo.html) 示例应用程序。 + +> 请注意:本文档假设示采用kubernetes部署示例应用程序。所有的示例命令行都采用规则yaml文件(例如`samples/bookinfo/kube/route-rule-all-v1.yaml`)指定的kubernetes版本。如果在不同的环境下运行本任务,请将`kube`修改为运行环境中相应的目录(例如,对基于Consul的运行环境,目录就是`samples/bookinfo/consul/route-rule-all-v1.yaml`)。 + + +# 基于权重的版本路由 + +1. 将所有微服务的缺省版本设置为v1. + + ```bash + istioctl create -f samples/bookinfo/kube/route-rule-all-v1.yaml + ``` + +1. 在浏览器中打开http://$GATEWAY_URL/productpage, 确认`reviews` 服务目前的活动版本是v1。 + + 可以看到浏览器中出现BooInfo应用的productpage页面。 + 注意`productpage`显示的评价内容不带星级。这是由于`reviews:v1`不会访问`ratings`服务。 + + > 请注意:如果之前执行过 [配置请求路由](http://istio.doczh.cn/docs/tasks/traffic-management/request-routing.html)任务,则需要先注销测试用户“jason”或者删除之前单独为该用户创建的测试规则: + + ```bash + istioctl delete routerule reviews-test-v2 + ``` + +1. 首先,使用下面的命令把50%的流量从`reviews:v1`转移到`reviews:v3`: + + ```bash + istioctl replace -f samples/bookinfo/kube/route-rule-reviews-50-v3.yaml + ``` + + 注意这里使用了`istioctl replace`而不是`create`。 + +1. 在浏览器中多次刷新`productpage`页面,大约有50%的几率会看到页面中出现带红星的评价内容。 + + > 请注意:在目前的Envoy sidecar实现中,可能需要刷新`productpage`很多次才能看到流量分发的效果。在看到页面出现变化前,有可能需要刷新15次或者更多。如果修改规则,将90%的流量路由到v3,可以看到更明显的效果。 + +1. 当v3版本的`reviews`服务已经稳定运行后,可以将100%的流量路由到`reviews:v3`: + + ```bash + istioctl replace -f samples/bookinfo/kube/route-rule-reviews-v3.yaml + ``` + + 此时,以任何用户登录到`productpage`页面,都可以看到带红星的评价信息。 + +# 理解原理 + +在这个任务中,我们使用了Istio的带权重路由的特性将流量从老版本的`reviews`服务逐渐迁移到了新版本服务中。 + +注意该方式和使用容器编排平台的部署特性来进行版本迁移是完全不同的。容器编排平台使用了实例scaling来对流量进行管理。而通过Istio,两个版本的`reviews`服务可以独立地进行scale up和scale down,并不会影响这两个版本服务之间的流量分发。 + +想了解更多支持scaling的按版本路由功能,请查看[Canary Deployments using Istio](https://istio.io/blog/canary-deployments-using-istio.html)。 + +# 清理 + +* 删除路由规则。 + + ```bash + istioctl delete -f samples/bookinfo/kube/route-rule-all-v1.yaml + ``` + +* 如果不打算尝试后面的任务,请参照[BookInfo cleanup](http://istio.doczh.cn/docs/guides/bookinfo.html#cleanup) 中的步骤关闭应用程序。 + + +# 进阶阅读 + +* 更多的内容请参见[请求路由](http://istio.doczh.cn/docs/concepts/traffic-management/rules-configuration.html)。 diff --git a/exampleSite/content/post/2017-11-08-istio-canary-release.md b/exampleSite/content/post/2017-11-08-istio-canary-release.md new file mode 100644 index 0000000..87542c8 --- /dev/null +++ b/exampleSite/content/post/2017-11-08-istio-canary-release.md @@ -0,0 +1,298 @@ +--- +title: "采用Istio实现灰度发布(金丝雀发布)" +subtitle: "用户无感知的平滑业务升级" +description: "当应用上线以后,运维面临的一大挑战是如何能在不影响已上线业务的情况下进行升级。本文将介绍如何使用Istio实现应用的灰度发布(金丝雀发布)" +excerpt: "当应用上线以后,运维面临的一大挑战是如何能在不影响已上线业务的情况下进行升级。本文将介绍如何使用Istio实现应用的灰度发布(金丝雀发布)" +date: 2017-11-08 15:00:00 +author: "赵化冰" +image: "https://img.zhaohuabing.com/in-post/istio-canary-release/canary_bg.jpg" +published: true +tags: + - Istio +URL: "/2017/11/08/istio-canary-release/" +categories: [ "Tech" ] +--- + +## 灰度发布(又名金丝雀发布)介绍 + +当应用上线以后,运维面临的一大挑战是如何能够在不影响已上线业务的情况下进行升级。做过产品的同学都清楚,不管在发布前做过多么完备的自动化和人工测试,在发布后都会出现或多或少的故障。根据墨菲定律,可能会出错的版本发布一定会出错。 + +"ANYTHING THAN CAN GO WRONG WILL GO WRONG" --MURPHY'S LAW + +因此我们不能寄希望于在线下测试时发现所有潜在故障。在无法百分百避免版本升级故障的情况下,需要通过一种方式进行可控的版本发布,把故障影响控制在可以接受的范围内,并可以快速回退。 + +可以通过[灰度发布(又名金丝雀发布)](https://martinfowler.com/bliki/CanaryRelease.html)来实现业务从老版本到新版本的平滑过渡,并避免升级过程中出现的问题对用户造成的影响。 + +“金丝雀发布”的来源于矿工们用金丝雀对矿井进行空气测试的做法。以前矿工挖煤的时候,矿工下矿井前会先把金丝雀放进去,或者挖煤的时候一直带着金丝雀。金丝雀对甲烷和一氧化碳浓度比较敏感,会先报警。所以大家都用“金丝雀”来搞最先的测试。 + +下图中,左下方的少部分用户就被当作“金丝雀”来用于测试新上线的1.1版本。如果新版本出现问题,“金丝雀”们会报警,但不会影响其他用户业务的正常运行。 + + +灰度发布(金丝雀发布)的流程如下: + +- 准备和生产环境隔离的“金丝雀”服务器。 +- 将新版本的服务部署到“金丝雀”服务器上。 +- 对“金丝雀”服务器上的服务进行自动化和人工测试。 +- 测试通过后,将“金丝雀”服务器连接到生产环境,将少量生产流量导入到“金丝雀”服务器中。 +- 如果在线测试出现问题,则通过把生产流量从“金丝雀”服务器中重新路由到老版本的服务的方式进行回退,修复问题后重新进行发布。 +- 如果在线测试顺利,则逐渐把生产流量按一定策略逐渐导入到新版本服务器中。 +- 待新版本服务稳定运行后,删除老版本服务。 + +## Istio实现灰度发布(金丝雀发布)的原理 +从上面的流程可以看到,如果要实现一套灰度发布的流程,需要应用程序和运维流程对该发布过程进行支持,工作量和难度的挑战是非常大的。虽然面对的问题类似,但每个企业或组织一般采用不同的私有化实现方案来进行灰度发布,为解决该问题导致研发和运维花费了大量的成本。 + +Istio通过高度的抽象和良好的设计采用一致的方式解决了该问题,采用sidecar对应用流量进行了转发,通过Pilot下发路由规则,可以在不修改应用程序的前提下实现应用的灰度发布。 + +备注:采用kubernetes的[滚动升级(rolling update)](https://kubernetes.io/docs/tasks/run-application/rolling-update-replication-controller/)功能也可以实现不中断业务的应用升级,但滚动升级是通过逐渐使用新版本的服务来替换老版本服务的方式对应用进行升级,在滚动升级不能对应用的流量分发进行控制,因此无法采用受控地把生产流量逐渐导流到新版本服务中,也就无法控制服务升级对用户造成的影响。 + +采用Istio后,可以通过定制路由规则将特定的流量(如指定特征的用户)导入新版本服务中,在生产环境下进行测试,同时通过渐进受控地导入生产流量,可以最小化升级中出现的故障对用户的影响。并且在同时存在新老版本服务时,还可根据应用压力对不同版本的服务进行独立的缩扩容,非常灵活。采用Istio进行灰度发布的流程如下图所示: + + +## 操作步骤 +下面采用Istion自带的BookinfoInfo示例程序来试验灰度发布的流程。 +### 测试环境安装 +首先参考[手把手教你从零搭建Istio及Bookinfo示例程序](http://zhaohuabing.com/2017/11/04/istio-install_and_example/)安装Kubernetes及Istio控制面。 + +因为本试验并不需要安装全部3个版本的reviews服务,因此如果已经安装了该应用,先采用下面的命令卸载。 + +``` +istio-0.2.10/samples/bookinfo/kube/cleanup.sh +``` +### 部署V1版本的服务 + +首先只部署V1版本的Bookinfo应用程序。由于示例中的yaml文件中包含了3个版本的reviews服务,我们先将V2和V3版本的Deployment从yaml文件istio-0.2.10/samples/bookinfo/kube/bookinfo.yaml中删除。 + +从Bookinfo.yaml中删除这部分内容: + +``` +apiVersion: extensions/v1beta1 +kind: Deployment +metadata: + name: reviews-v2 +spec: + replicas: 1 + template: + metadata: + labels: + app: reviews + version: v2 + spec: + containers: + - name: reviews + image: istio/examples-bookinfo-reviews-v2:0.2.3 + imagePullPolicy: IfNotPresent + ports: + - containerPort: 9080 +--- +apiVersion: extensions/v1beta1 +kind: Deployment +metadata: + name: reviews-v3 +spec: + replicas: 1 + template: + metadata: + labels: + app: reviews + version: v3 + spec: + containers: + - name: reviews + image: istio/examples-bookinfo-reviews-v3:0.2.3 + imagePullPolicy: IfNotPresent + ports: + - containerPort: 9080 +--- +``` + +部署V1版本的Bookinfo程序。 + +``` +kubectl apply -f <(istioctl kube-inject -f istio-0.2.10/samples/bookinfo/kube/bookinfo.yaml) +``` + +通过kubectl命令行确认pod部署,可以看到只有V1版本的服务。 + +``` +kubectl get pods + +NAME READY STATUS RESTARTS AGE +details-v1-3688945616-nhkqk 2/2 Running 0 2m +productpage-v1-2055622944-m3fql 2/2 Running 0 2m +ratings-v1-233971408-0f3s9 2/2 Running 0 2m +reviews-v1-1360980140-0zs9z 2/2 Running 0 2m +``` +在浏览器中打开应用程序页面,地址为istio-ingress的External IP。由于V1版本的reviews服务并不会调用rating服务,因此可以看到Product 页面显示的是不带星级的评价信息。 + +`http://10.12.25.116/productpage` + + +此时系统中微服务的部署情况如下图所示(下面的示意图均忽略和本例关系不大的details和ratings服务): + + +### 部署V2版本的reviews服务 +在部署V2版本的reviews服务前,需要先创建一条缺省路由规则route-rule-default-reviews.yaml,将所有生产流量都导向V1版本,避免对线上用户的影响。 + +``` +apiVersion: config.istio.io/v1alpha2 +kind: RouteRule +metadata: + name: reviews-default +spec: + destination: + name: reviews + precedence: 1 + route: + - labels: + version: v1 +``` +启用该路由规则。 + +``` +istioctl create -f route-rule-default-reviews.yaml -n default +``` +创建一个V2版本的部署文件bookinfo-reviews-v2.yaml,内容如下 +``` +apiVersion: extensions/v1beta1 +kind: Deployment +metadata: + name: reviews-v2 +spec: + replicas: 1 + template: + metadata: + labels: + app: reviews + version: v2 + spec: + containers: + - name: reviews + image: istio/examples-bookinfo-reviews-v2:0.2.3 + imagePullPolicy: IfNotPresent + ports: + - containerPort: 9080 +``` + +部署V2版本的reviews服务。 +``` +kubectl apply -f <(istioctl kube-inject -f bookinfo-reviews-v2.yaml) +``` +此时系统中部署了V1和V2两个版本的reviews服务,但所有的业务流量都被规则reviews-default导向了V1,如下图所示: + + + +### 将测试流量导入到V2版本的reviews服务 +在进行模拟测试时,由于测试环境和生产环境的网络,服务器,操作系统等环境存在差异,很难完全模拟生产环境进行测试。为了减少环境因素的对测试结果的影响,我们希望能在生产环境中进行上线前的测试,但如果没有很好的隔离措施,可能会导致测试影响已上线的业务,对企业造成损失。 + +通过采用Istio的路由规则,可以在类生产环境中进行测试,又完全隔离了线上用户的生产流量和测试流量,最小化模拟测试对已上线业务的影响。如下图所示: + + +创建一条规则,将用户名为 test-user 的流量导入到V2 + +``` +apiVersion: config.istio.io/v1alpha2 +kind: RouteRule +metadata: + name: reviews-test-user +spec: + destination: + name: reviews + precedence: 2 + match: + request: + headers: + cookie: + regex: "^(.*?;)?(user=test-user)(;.*)?$" + route: + - labels: + version: v2 +``` +注意:precedence属性用于设置规则的优先级,在同时存在多条规则的情况下,优先级高的规则将先执行。这条规则的precedence设置为2,以确保其在缺省规则之前运行,将test-user用户的请求导流到V2版本reviews服务中。 + +启用该规则。 + +``` +istioctl create -f route-rule-test-reviews-v2.yaml -n default +``` +以test-user用户登录,可以看到V2版本带星级的评价页面。 + + +注销test-user,只能看到V1版本不带星级的评价页面。如下图所示: + + +### 将部分生产流量导入到V2版本的reviews服务 + +在线上模拟测试完成后,如果系统测试情况良好,可以通过规则将一部分用户流量导入到V2版本的服务中,进行小规模的“金丝雀”测试。 + +修改规则route-rule-default-reviews.yaml,将50%的流量导入V2版本。 + +> 备注:本例只是描述原理,因此为简单起见,将50%流量导入V2版本,在实际操作中,更可能是先导入较少流量,然后根据监控的新版本运行情况将流量逐渐导入,如采用5%,10%,20%,50% ...的比例逐渐导入。 + +``` +apiVersion: config.istio.io/v1alpha2 +kind: RouteRule +metadata: + name: reviews-default +spec: + destination: + name: reviews + precedence: 1 + route: + - labels: + version: v1 + weight: 50 + - labels: + version: v2 + weight: 50 +``` + +``` +istioctl replace -f route-rule-default-reviews.yaml -n default +``` + +此时系统部署如下图所示: + + +### 将所有生产流量导入到到V2版本的reviews服务 + +如果新版本的服务运行正常,则可以将所有流量导入到V2版本。 + +``` +apiVersion: config.istio.io/v1alpha2 +kind: RouteRule +metadata: + name: reviews-default +spec: + destination: + name: reviews + precedence: 1 + route: + - labels: + version: v2 + weight: 100 +``` + +``` +istioctl replace -f route-rule-default-reviews.yaml -n default +``` +系统部署如下图所示: + + +此时不管以任何用户登录,都只能看到V2版本带星级的评价页面,如下图所示: + + +> 备注:如果灰度发布的过程中新版本的服务出现问题,则可以通过修改路由规则,将流量重新导入到V1版本的服务中,将V2版本故障修复后再进行测试。 + +### 删除V1版本的reviews服务 + +待V2版本上线稳定运行后,删除V1版本的reviews服务和测试规则。 +``` +kubectl delete pod reviews-v1-1360980140-0zs9z + +istioctl delete -f route-rule-test-reviews-v2.yaml -n default +``` + +## 参考 + +* [Istio官方文档](https://istio.io/docs/) + diff --git a/exampleSite/content/post/2017-11-23-windows-proxy-scripts.md b/exampleSite/content/post/2017-11-23-windows-proxy-scripts.md new file mode 100644 index 0000000..16e6c7d --- /dev/null +++ b/exampleSite/content/post/2017-11-23-windows-proxy-scripts.md @@ -0,0 +1,89 @@ +--- +layout: post +title: "使用脚本和定时任务自动设置windows HTTP 代理服务器" +subtitle: "" +description: "使用Visual Basic Script脚本和Windows定时任务自动设置windows HTTP 代理服务器。" +author: "赵化冰" +date: 2017-11-23 +image: "" +published: true +tags: + - Tips +URL: "/2017/11/23/windows-proxy-scripts/" +categories: [ Tips ] +--- + +## 问题 + +我非常愿意在日程使用的工作工具上进行投资,好的工具可以提升效率,因为工具的问题导致思维中断非常让人沮丧。我在办公室使用一台ThinkPad笔记本,笔记本是公司发的,我自己花钱升级了SSD,内存,安装的是Win10,秒级启动,安装vagrant和virtualbox后,用Linux虚机进行开发也很顺手。但一个小代理服务器设置的小问题却影响了我使用笔记本处理事务的体验。 +<!--more--> +由于工作需要,我回家也会经常带着笔记本,以在晚上开会和处理一些工作上的事情(是的,悲催的加班狗),因此笔记本的网络会在家里和办公室网络之间切换。在公司网络上要设置浏览器HTTP代理为公司代理,回到家后又需要把代理服务器设置修改回来。虽然步骤不多,但是每天都至少要重复两次。有时候打开笔记想要上网处理一些事情,首先要修改代理服务器,很是影响思维的流畅性。因此希望可以实现在笔记本连上网络时直接根据所连接的网络自动修改代理服务器设置,以避免影响使用笔记本进行事务处理的连续性。 + +## 思路 + +根据要解决的问题:“笔记本连上网络时直接根据所连接的网络自动修改代理服务器” ,需要一个修改代理服务器的脚本和一个触发脚本的机制。可以通过windows vbs脚本来修改代理服务器,vbs是visual basic的脚本版,语法和visual basic类似,可以直接在windows上执行,并可以操作windows中的设置,因此可以用来修改代理服务器。有了脚本后,为了避免每次手动执行脚本,可以使用windows定时任务来自动触发脚本执行。 + +## 脚本 + +注意需要将下面脚本中的proxy_server的值改为你网络环境中的代理服务器的IP和端口。 +该脚本根据IP地址的范围来判断是否处于办公环境,如果IP为10.*的网络,则认为在办公环境中,设置代理服务器;否则就认为是在家里的网络中,删除代理服务器。如果你的IP范围不同,可以根据实际情况修改。将脚本保存为setproxy.vbs。 + +``` +Const proxy_server="http://your_proxy_server:port" +Const ip_prefix="10" + +If isIPInCompany() then + setProxy() +else + clearProxy() +End If +WScript.Quit + +Function isIPInCompany() + Set NicList = GetObject("winmgmts:").InstancesOf("Win32_NetworkAdapterConfiguration") + For Each Nic in NicList + If Nic.IPEnabled then + StrIP = Nic.IPAddress(i) + if Left(StrIP,2) = ip_prefix then + isIPInCompany = true + Exit Function + else + isIPInCompany = false + End If + End If + Next +End Function + +Sub setProxy() + Set objShell = WScript.CreateObject("WScript.Shell") + RegLocate = "HKEY_CURRENT_USER/Software/Microsoft\Windows\CurrentVersion\Internet Settings\ProxyServer" + objShell.RegWrite RegLocate,proxy_server,"REG_SZ" + RegLocate = "HKEY_CURRENT_USER/Software/Microsoft\Windows\CurrentVersion\Internet Settings\ProxyEnable" + objShell.RegWrite RegLocate,"1","REG_DWORD" + MsgBox "HTTP Proxy is enabled" +End Sub + +Sub clearProxy() + Set objShell = WScript.CreateObject("WScript.Shell") + RegLocate = "HKEY_CURRENT_USER/Software/Microsoft\Windows\CurrentVersion\Internet Settings\ProxyServer" + objShell.RegWrite RegLocate,"0.0.0.0:80","REG_SZ" + RegLocate = "HKEY_CURRENT_USER/Software/Microsoft\Windows\CurrentVersion\Internet Settings\ProxyEnable" + objShell.RegWrite RegLocate,"0","REG_DWORD" + MsgBox "HTTP Proxy is disabled" +End Sub +``` + +## 采用windows 计划任务触发 + +windows任务可以通过事件触发,因此通过连接到网络的事件来触发设置代理的脚本执行,这样当笔记本电脑一连上网络,代理服务器就会自动设置好了。 +任务的触发条件需要选择: +Log: Microsoft-Windows-NetworkProfile/Operational +Source: NetworkProfile +Event ID: 10000 + +执行动作选择刚才创建的脚本就可以了。 + + + + + diff --git a/exampleSite/content/post/2017-11-28-access-application-from-outside.md b/exampleSite/content/post/2017-11-28-access-application-from-outside.md new file mode 100644 index 0000000..ad61871 --- /dev/null +++ b/exampleSite/content/post/2017-11-28-access-application-from-outside.md @@ -0,0 +1,256 @@ +--- +layout: post +title: "如何从外部访问Kubernetes集群中的应用?" +subtitle: "" +description: "我们知道,kubernetes的Cluster Network属于私有网络,只能在cluster Network内部才能访问部署的应用,那如何才能将Kubernetes集群中的应用暴露到外部网络,为外部用户提供服务呢?本文探讨了从外部网络访问kubernetes cluster中应用的几种实现方式。" +date: 2017-11-28 12:00:00 +author: "赵化冰" +image: "http://img.zhaohuabing.com/post-bg-2015.jpg" +published: true +tags: + - Kubernetes +URL: "/2017/11/28/access-application-from-outside/" +categories: [ Tech ] +--- + +## 前言 + +我们知道,kubernetes的Cluster Network属于私有网络,只能在cluster Network内部才能访问部署的应用,那如何才能将Kubernetes集群中的应用暴露到外部网络,为外部用户提供服务呢?本文探讨了从外部网络访问kubernetes cluster中应用的几种实现方式。 +<!--more--> +>本文尽量试着写得比较容易理解,但要做到“深入浅出”,把复杂的事情用通俗易懂的语言描述出来是非常需要功力的,个人自认尚未达到此境界,唯有不断努力。此外,kubernetes本身是一个比较复杂的系统,无法在本文中详细解释涉及的所有相关概念,否则就可能脱离了文章的主题,因此假设阅读此文之前读者对kubernetes的基本概念如docker,container,pod已有所了解。 + +另外此文中的一些内容是自己的理解,由于个人的知识范围有限,可能有误,如果读者对文章中的内容有疑问或者勘误,欢迎大家指证。 + +## Pod和Service + +我们首先来了解一下Kubernetes中的Pod和Service的概念。 + +Pod(容器组),英文中Pod是豆荚的意思,从名字的含义可以看出,Pod是一组有依赖关系的容器,Pod包含的容器都会运行在同一个host节点上,共享相同的volumes和network namespace空间。Kubernetes以Pod为基本操作单元,可以同时启动多个相同的pod用于failover或者load balance。 + + + +Pod的生命周期是短暂的,Kubernetes根据应用的配置,会对Pod进行创建,销毁,根据监控指标进行缩扩容。kubernetes在创建Pod时可以选择集群中的任何一台空闲的Host,因此其网络地址是不固定的。由于Pod的这一特点,一般不建议直接通过Pod的地址去访问应用。 + + +为了解决访问Pod不方便直接访问的问题,Kubernetes采用了Service的概念,Service是对后端提供服务的一组Pod的抽象,Service会绑定到一个固定的虚拟IP上,该虚拟IP只在Kubernetes Cluster中可见,但其实该IP并不对应一个虚拟或者物理设备,而只是IPtable中的规则,然后再通过IPtable将服务请求路由到后端的Pod中。通过这种方式,可以确保服务消费者可以稳定地访问Pod提供的服务,而不用关心Pod的创建、删除、迁移等变化以及如何用一组Pod来进行负载均衡。 + +Service的机制如下图所示,Kube-proxy监听kubernetes master增加和删除Service以及Endpoint的消息,对于每一个Service,kube proxy创建相应的iptables规则,将发送到Service Cluster IP的流量转发到Service后端提供服务的Pod的相应端口上。 + + +>备注:虽然可以通过Service的Cluster IP和服务端口访问到后端Pod提供的服务,但该Cluster IP是Ping不通的,原因是Cluster IP只是iptable中的规则,并不对应到一个网络设备。 + +## Service的类型 +Service的类型(ServiceType)决定了Service如何对外提供服务,根据类型不同,服务可以只在Kubernetes cluster中可见,也可以暴露到Cluster外部。Service有三种类型,ClusterIP,NodePort和LoadBalancer。其中ClusterIP是Service的缺省类型,这种类型的服务会提供一个只能在Cluster内才能访问的虚拟IP,其实现机制如上面一节所述。 + +## 通过NodePort提供外部访问入口 + +通过将Service的类型设置为NodePort,可以在Cluster中的主机上通过一个指定端口暴露服务。注意通过Cluster中每台主机上的该指定端口都可以访问到该服务,发送到该主机端口的请求会被kubernetes路由到提供服务的Pod上。采用这种服务类型,可以在kubernetes cluster网络外通过主机IP:端口的方式访问到服务。 + +> 注意:官方文档中说明了Kubernetes clusterIp的流量转发到后端Pod有Iptable和kube proxy两种方式。但对Nodeport如何转发流量却语焉不详。该图来自网络,从图来看是通过kube proxy转发的,我没有去研究过源码。欢迎了解的同学跟帖说明。 + + + +下面是通过NodePort向外暴露服务的一个例子,注意可以指定一个nodePort,也可以不指定。在不指定的情况下,kubernetes会从可用的端口范围内自动分配一个随机端口。 + +``` +kind: Service +apiVersion: v1 +metadata: + name: influxdb +spec: + type: NodePort + ports: + - port: 8086 + nodePort: 30000 + selector: + name: influxdb +``` + +通过NodePort从外部访问有下面的一些问题,自己玩玩或者进行测试时可以使用该方案,但不适宜用于生产环境。 + +* Kubernetes cluster host的IP必须是一个well-known IP,即客户端必须知道该IP。但Cluster中的host是被作为资源池看待的,可以增加删除,每个host的IP一般也是动态分配的,因此并不能认为host IP对客户端而言是well-known IP。 + +* 客户端访问某一个固定的host IP存在单点故障。假如一台host宕机了,kubernetes cluster会把应用 reload到另一节点上,但客户端就无法通过该host的nodeport访问应用了。 + +* 该方案假设客户端可以访问Kubernetes host所在网络。在生产环境中,客户端和Kubernetes host网络可能是隔离的。例如客户端可能是公网中的一个手机APP,是无法直接访问host所在的私有网络的。 + +因此,需要通过一个网关来将外部客户端的请求导入到Cluster中的应用中,在kubernetes中,这个网关是一个4层的load balancer。 + +## 通过Load Balancer提供外部访问入口 + +通过将Service的类型设置为LoadBalancer,可以为Service创建一个外部Load Balancer。Kubernetes的文档中声明该Service类型需要云服务提供商的支持,其实这里只是在Kubernetes配置文件中提出了一个要求,即为该Service创建Load Balancer,至于如何创建则是由Google Cloud或Amazon Cloud等云服务商提供的,创建的Load Balancer不在Kubernetes Cluster的管理范围中。kubernetes 1.6版本中,WS, Azure, CloudStack, GCE and OpenStack等云提供商已经可以为Kubernetes提供Load Balancer.下面是一个Load balancer类型的Service例子: + +``` +kind: Service +apiVersion: v1 +metadata: + name: influxdb +spec: + type: LoadBalancer + ports: + - port: 8086 + selector: + name: influxdb +``` +部署该Service后,我们来看一下Kubernetes创建的内容 +``` +$ kubectl get svc influxdb +NAME CLUSTER-IP EXTERNAL-IP PORT(S) AGE +influxdb 10.97.121.42 10.13.242.236 8086:30051/TCP 39s +``` +Kubernetes首先为influxdb创建了一个集群内部可以访问的ClusterIP 10.97.121.42。由于没有指定nodeport端口,kubernetes选择了一个空闲的30051主机端口将service暴露在主机的网络上,然后通知cloud provider创建了一个load balancer,上面输出中的EEXTERNAL-IP就是load balancer的IP。 + +测试使用的Cloud Provider是OpenStack,我们通过neutron lb-vip-show可以查看创建的Load Balancer详细信息。 + +``` +$ neutron lb-vip-show 9bf2a580-2ba4-4494-93fd-9b6969c55ac3 ++---------------------+--------------------------------------------------------------+ +| Field | Value | ++---------------------+--------------------------------------------------------------+ +| address | 10.13.242.236 | +| admin_state_up | True | +| connection_limit | -1 | +| description | Kubernetes external service a6ffa4dadf99711e68ea2fa163e0b082 | +| id | 9bf2a580-2ba4-4494-93fd-9b6969c55ac3 | +| name | a6ffa4dadf99711e68ea2fa163e0b082 | +| pool_id | 392917a6-ed61-4924-acb2-026cd4181755 | +| port_id | e450b80b-6da1-4b31-a008-280abdc6400b | +| protocol | TCP | +| protocol_port | 8086 | +| session_persistence | | +| status | ACTIVE | +| status_description | | +| subnet_id | 73f8eb91-90cf-42f4-85d0-dcff44077313 | +| tenant_id | 4d68886fea6e45b0bc2e05cd302cccb9 | ++---------------------+--------------------------------------------------------------+ + +$ neutron lb-pool-show 392917a6-ed61-4924-acb2-026cd4181755 ++------------------------+--------------------------------------+ +| Field | Value | ++------------------------+--------------------------------------+ +| admin_state_up | True | +| description | | +| health_monitors | | +| health_monitors_status | | +| id | 392917a6-ed61-4924-acb2-026cd4181755 | +| lb_method | ROUND_ROBIN | +| members | d0825cc2-46a3-43bd-af82-e9d8f1f85299 | +| | 3f73d3bb-bc40-478d-8d0e-df05cdfb9734 | +| name | a6ffa4dadf99711e68ea2fa163e0b082 | +| protocol | TCP | +| provider | haproxy | +| status | ACTIVE | +| status_description | | +| subnet_id | 73f8eb91-90cf-42f4-85d0-dcff44077313 | +| tenant_id | 4d68886fea6e45b0bc2e05cd302cccb9 | +| vip_id | 9bf2a580-2ba4-4494-93fd-9b6969c55ac3 | ++------------------------+--------------------------------------+ + +$ neutron lb-member-list ++--------------------------------------+--------------+---------------+--------+----------------+--------+ +| id | address | protocol_port | weight | admin_state_up | status | ++--------------------------------------+--------------+---------------+--------+----------------+--------+ +| 3f73d3bb-bc40-478d-8d0e-df05cdfb9734 | 10.13.241.89 | 30051 | 1 | True | ACTIVE | +| d0825cc2-46a3-43bd-af82-e9d8f1f85299 | 10.13.241.10 | 30051 | 1 | True | ACTIVE | ++--------------------------------------+--------------+---------------+--------+----------------+-------- +``` +可以看到OpenStack使用VIP 10.13.242.236在端口8086创建了一个Load Balancer,Load Balancer对应的Lb pool里面有两个成员10.13.241.89 和 10.13.241.10,正是Kubernetes的host节点,进入Load balancer流量被分发到这两个节点对应的Service Nodeport 30051上。 + +但是如果客户端不在Openstack Neutron的私有子网上,则还需要在load balancer的VIP上关联一个floating IP,以使外部客户端可以连接到load balancer。 + +部署Load balancer后,应用的拓扑结构如下图所示(注:本图假设Kubernetes Cluster部署在Openstack私有云上)。 + + +>备注:如果kubernetes环境在Public Cloud上,Loadbalancer类型的Service创建出的外部Load Balancer已经带有公网IP地址,是可以直接从外部网络进行访问的,不需要绑定floating IP这个步骤。例如在AWS上创建的Elastic Load Balancing (ELB),有兴趣可以看一下这篇文章:[Expose Services on your AWS Quick Start Kubernetes cluster]( http://docs.heptio.com/content/tutorials/aws-qs-services-elb.html)。 + +如果Kubernetes Cluster是在不支持LoadBalancer特性的cloud provider或者裸机上创建的,可以实现LoadBalancer类型的Service吗?应该也是可以的。Kubernetes本身并不直接支持Loadbalancer,但我们可以通过对Kubernetes进行扩展来实现,可以监听kubernetes Master的service创建消息,并根据消息部署相应的Load Balancer(如Nginx或者HAProxy),来实现Load balancer类型的Service。 + + +通过设置Service类型提供的是四层Load Balancer,当只需要向外暴露一个服务的时候,可以直接采用这种方式。但在一个应用需要对外提供多个服务时,采用该方式会为每一个服务(IP+Port)都创建一个外部load balancer。如下图所示 + +一般来说,同一个应用的多个服务/资源会放在同一个域名下,在这种情况下,创建多个Load balancer是完全没有必要的,反而带来了额外的开销和管理成本。直接将服务暴露给外部用户也会导致了前端和后端的耦合,影响了后端架构的灵活性,如果以后由于业务需求对服务进行调整会直接影响到客户端。可以通过使用Kubernetes Ingress进行L7 load balancing来解决该问题。 + +## 采用Ingress作为七层load balancer +首先看一下引入Ingress后的应用拓扑示意图(注:本图假设Kubernetes Cluster部署在Openstack私有云上)。 + +这里Ingress起到了七层负载均衡器和Http方向代理的作用,可以根据不同的url把入口流量分发到不同的后端Service。外部客户端只看到foo.bar.com这个服务器,屏蔽了内部多个Service的实现方式。采用这种方式,简化了客户端的访问,并增加了后端实现和部署的灵活性,可以在不影响客户端的情况下对后端的服务部署进行调整。 + +下面是Kubernetes Ingress配置文件的示例,在虚拟主机foot.bar.com下面定义了两个Path,其中/foo被分发到后端服务s1,/bar被分发到后端服务s2。 + +``` +apiVersion: extensions/v1beta1 +kind: Ingress +metadata: + name: test + annotations: + ingress.kubernetes.io/rewrite-target: / +spec: + rules: + - host: foo.bar.com + http: + paths: + - path: /foo + backend: + serviceName: s1 + servicePort: 80 + - path: /bar + backend: + serviceName: s2 + servicePort: 80 +``` + +注意这里Ingress只描述了一个虚拟主机路径分发的要求,可以定义多个Ingress,描述不同的7层分发要求,而这些要求需要由一个Ingress Controller来实现。Ingress Contorller会监听Kubernetes Master得到Ingress的定义,并根据Ingress的定义对一个7层代理进行相应的配置,以实现Ingress定义中要求的虚拟主机和路径分发规则。Ingress Controller有多种实现,Kubernetes提供了一个[基于Nginx的Ingress Controller](https://github.com/kubernetes/ingress-nginx)。需要注意的是,在部署Kubernetes集群时并不会缺省部署Ingress Controller,需要我们自行部署。 + +下面是部署Nginx Ingress Controller的配置文件示例,注意这里为Nginx Ingress Controller定义了一个LoadBalancer类型的Service,以为Ingress Controller提供一个外部可以访问的公网IP。 + +``` +apiVersion: v1 +kind: Service +metadata: + name: nginx-ingress +spec: + type: LoadBalancer + ports: + - port: 80 + name: http + - port: 443 + name: https + selector: + k8s-app: nginx-ingress-lb +--- +apiVersion: extensions/v1beta1 +kind: Deployment +metadata: + name: nginx-ingress-controller +spec: + replicas: 2 + revisionHistoryLimit: 3 + template: + metadata: + labels: + k8s-app: nginx-ingress-lb + spec: + terminationGracePeriodSeconds: 60 + containers: + - name: nginx-ingress-controller + image: gcr.io/google_containers/nginx-ingress-controller:0.8.3 + imagePullPolicy: Always + //----omitted for brevity---- +``` + +>备注:Google Cloud直接支持Ingress资源,如果应用部署在Google Cloud中,Google Cloud会自动为Ingress资源创建一个7层load balancer,并为之分配一个外部IP,不需要自行部署Ingress Controller。 + +## 结论 +采用Ingress加上Load balancer的方式可以将Kubernetes Cluster中的应用服务暴露给外部客户端。这种方式比较灵活,基本可以满足大部分应用的需要。但如果需要在入口处提供更强大的功能,如有更高的效率要求,需求进行安全认证,日志记录,或者需要一些应用的定制逻辑,则需要考虑采用微服务架构中的API Gateway模式,采用一个更强大的API Gateway来作为应用的流量入口。 + +## 参考 + +* [Accessing Kubernetes Pods from Outside of the Cluster](http://alesnosek.com/blog/2017/02/14/accessing-kubernetes-pods-from-outside-of-the-cluster/) + +* [Kubernetes nginx-ingress-controller](https://daemonza.github.io/2017/02/13/kubernetes-nginx-ingress-controller/) + +* [Using Kubernetes external load balancer feature](https://docs.openstack.org/magnum/ocata/dev/kubernetes-load-balancer.html) + +* [Expose Services on your AWS Quick Start Kubernetes cluster]( http://docs.heptio.com/content/tutorials/aws-qs-services-elb.html) + + diff --git a/exampleSite/content/post/2018-01-02-nginmesh-install.md b/exampleSite/content/post/2018-01-02-nginmesh-install.md new file mode 100644 index 0000000..9afb4df --- /dev/null +++ b/exampleSite/content/post/2018-01-02-nginmesh-install.md @@ -0,0 +1,386 @@ +--- +layout: post +title: "Nginx开源Service Mesh组件Nginmesh安装指南" +subtitle: "" +description: "Nginmesh是NGINX的Service Mesh开源项目,用于Istio服务网格平台中的数据面代理。它旨在提供七层负载均衡和服务路由功能,与Istio集成作为sidecar部署,并将以“标准,可靠和安全的方式”使得服务间通信更容易。Nginmesh在今年底已经连续发布了0.2和0.3版本,提供了服务发现,请求转发,路由规则,性能指标收集等功能。本文介绍如何采用kubeadmin安装kubernetes集群并部署Nginmesh sidecar。" +date: 2018-01-02 12:00:00 +author: "赵化冰" +image: "img/post-bg-2015.jpg" +published: true +tags: + - Istio + - service Mesh + - nginmesh +URL: "/2018/01/02/nginmesh-install/" +categories: [ Tech ] +--- + +## 前言 + +Nginmesh是NGINX的Service Mesh开源项目,用于Istio服务网格平台中的数据面代理。它旨在提供七层负载均衡和服务路由功能,与Istio集成作为sidecar部署,并将以“标准,可靠和安全的方式”使得服务间通信更容易。Nginmesh在今年底已经连续发布了0.2和0.3版本,提供了服务发现,请求转发,路由规则,性能指标收集等功能。 +<!--more--> + + +> 备注:本文安装指南基于Ubuntu 16.04,在Centos上某些安装步骤的命令可能需要稍作改动。 + +## 安装Kubernetes Cluster + +Kubernetes Cluster包含etcd, api server, scheduler,controller manager等多个组件,组件之间的配置较为复杂,如果要手动去逐个安装及配置各个组件,需要了解kubernetes,操作系统及网络等多方面的知识,对安装人员的能力要求较高。kubeadm提供了一个简便,快速安装Kubernetes Cluster的方式,并且可以通过安装配置文件提供较高的灵活性,因此我们采用kubeadm安装kubernetes cluster。 + +首先参照[kubeadm的说明文档](https://kubernetes.io/docs/setup/independent/install-kubeadm)在计划部署kubernetes cluster的每个节点上安装docker,kubeadm, kubelet 和 kubectl。 + +安装docker +``` +apt-get update +apt-get install -y docker.io +``` + +使用google的源安装kubelet kubeadm和kubectl +``` +apt-get update && apt-get install -y apt-transport-https +curl -s https://packages.cloud.google.com/apt/doc/apt-key.gpg | apt-key add - +cat <<EOF >/etc/apt/sources.list.d/kubernetes.list +deb http://apt.kubernetes.io/ kubernetes-xenial main +EOF +apt-get update +apt-get install -y kubelet kubeadm kubectl +``` +使用kubeadmin安装kubernetes cluster + +Nginmesh使用Kubernetes的[Initializer机制](https://kubernetes.io/docs/admin/extensible-admission-controllers/#initializers)来实现sidecar的自动注入。Initializer目前是kubernetes的一个Alpha feature,缺省是未启用的,需要[通过api server的参数](https://kubernetes.io/docs/admin/extensible-admission-controllers/#enable-initializers-alpha-feature)打开。因此我们先创建一个kubeadm-conf配置文件,用于配置api server的启动参数 + +``` +apiVersion: kubeadm.k8s.io/v1alpha1 +kind: MasterConfiguration +apiServerExtraArgs: + admission-control: Initializers,NamespaceLifecycle,LimitRanger,ServiceAccount,PersistentVolumeLabel,DefaultStorageClass,ValidatingAdmissionWebhook,ResourceQuota,DefaultTolerationSeconds,MutatingAdmissionWebhook + runtime-config: admissionregistration.k8s.io/v1alpha1 +``` +使用kubeadmin init命令创建kubernetes master节点。 +可以先试用--dry-run参数验证一下配置文件。 +``` +kubeadm init --config kubeadm-conf --dry-run +``` +如果一切正常,kubeadm将提示:Finished dry-running successfully. Above are the resources that would be created. + +下面再实际执行创建命令 +``` +kubeadm init --config kubeadm-conf +``` +kubeadm会花一点时间拉取docker image,命令完成后,会提示如何将一个work node加入cluster。如下所示: + +``` + kubeadm join --token fffbf6.13bcb3563428cf23 10.12.5.15:6443 --discovery-token-ca-cert-hash sha256:27ad08b4cd9f02e522334979deaf09e3fae80507afde63acf88892c8b72f143f + ``` +> 备注:目前kubeadm只能支持在一个节点上安装master,支持高可用的安装将在后续版本实现。kubernetes官方给出的workaround建议是定期备份 etcd 数据[kubeadm limitations](https://kubernetes.io/docs/setup/independent/create-cluster-kubeadm/#limitations)。 + +Kubeadm并不会安装Pod需要的网络,因此需要手动安装一个Pod网络,这里采用的是Calico +``` +kubectl apply -f https://docs.projectcalico.org/v2.6/getting-started/kubernetes/installation/hosted/kubeadm/1.6/calico.yaml +``` + +使用kubectl 命令检查master节点安装结果 + +``` +ubuntu@kube-1:~$ kubectl get all +NAME TYPE CLUSTER-IP EXTERNAL-IP PORT(S) AGE +svc/kubernetes ClusterIP 10.96.0.1 <none> 443/TCP 12m +``` + + 在每台工作节点上执行上述kubeadm join命令,即可把工作节点加入集群中。使用kubectl 命令检查cluster中的节点情况。 + +``` + ubuntu@kube-1:~$ kubectl get nodes +NAME STATUS ROLES AGE VERSION +kube-1 Ready master 21m v1.9.0 +kube-2 Ready <none> 47s v1.9.0 +``` + +## 安装Istio控制面和Bookinfo + +参考[Nginmesh文档](https://github.com/nginmesh/nginmesh)安装Istio控制面和Bookinfo +该文档的步骤清晰明确,这里不再赘述。 + +需要注意的是,在Niginmesh文档中,建议通过Ingress的External IP访问bookinfo应用程序。但[Loadbalancer只在支持的云环境中才会生效](https://kubernetes.io/docs/concepts/services-networking/service/#type-loadbalancer),并且还需要进行一定的配置。如我在Openstack环境中创建的cluster,则需要参照[该文档](https://docs.openstack.org/magnum/ocata/dev/kubernetes-load-balancer.html)对Openstack进行配置后,Openstack才能够支持kubernetes的Loadbalancer service。如未进行配置,通过命令查看Ingress External IP一直显示为pending状态。 + +``` +NAME TYPE CLUSTER-IP EXTERNAL-IP PORT(S) AGE +istio-ingress LoadBalancer 10.111.158.10 <pending> 80:32765/TCP,443:31969/TCP 11m +istio-mixer ClusterIP 10.107.135.31 <none> 9091/TCP,15004/TCP,9093/TCP,9094/TCP,9102/TCP,9125/UDP,42422/TCP 11m +istio-pilot ClusterIP 10.111.110.65 <none> 15003/TCP,443/TCP 11m +``` + +如不能配置云环境提供Loadbalancer特性, 我们可以直接使用集群中的一个节点IP:Nodeport访问Bookinfo应用程序。 + +``` +http://10.12.5.31:32765/productpage +``` +想要了解更多关于如何从集群外部进行访问的内容,可以参考[如何从外部访问Kubernetes集群中的应用?](http://zhaohuabing.com/2017/11/28/access-application-from-outside/) + +## 查看自动注入的sidecar +使用 kubectl get pod reviews-v3-5fff595d9b-zsb2q -o yaml 命令查看Bookinfo应用的reviews服务的Pod。 + +``` +apiVersion: v1 +kind: Pod +metadata: + annotations: + sidecar.istio.io/status: injected-version-0.2.12 + creationTimestamp: 2018-01-02T02:33:36Z + generateName: reviews-v3-5fff595d9b- + labels: + app: reviews + pod-template-hash: "1999151856" + version: v3 + name: reviews-v3-5fff595d9b-zsb2q + namespace: default + ownerReferences: + - apiVersion: extensions/v1beta1 + blockOwnerDeletion: true + controller: true + kind: ReplicaSet + name: reviews-v3-5fff595d9b + uid: 5599688c-ef65-11e7-8be6-fa163e160c7d + resourceVersion: "3757" + selfLink: /api/v1/namespaces/default/pods/reviews-v3-5fff595d9b-zsb2q + uid: 559d8c6f-ef65-11e7-8be6-fa163e160c7d +spec: + containers: + - image: istio/examples-bookinfo-reviews-v3:0.2.3 + imagePullPolicy: IfNotPresent + name: reviews + ports: + - containerPort: 9080 + protocol: TCP + resources: {} + terminationMessagePath: /dev/termination-log + terminationMessagePolicy: File + volumeMounts: + - mountPath: /var/run/secrets/kubernetes.io/serviceaccount + name: default-token-48vxx + readOnly: true + - args: + - proxy + - sidecar + - -v + - "2" + - --configPath + - /etc/istio/proxy + - --binaryPath + - /usr/local/bin/envoy + - --serviceCluster + - reviews + - --drainDuration + - 45s + - --parentShutdownDuration + - 1m0s + - --discoveryAddress + - istio-pilot.istio-system:15003 + - --discoveryRefreshDelay + - 1s + - --zipkinAddress + - zipkin.istio-system:9411 + - --connectTimeout + - 10s + - --statsdUdpAddress + - istio-mixer.istio-system:9125 + - --proxyAdminPort + - "15000" + - --controlPlaneAuthPolicy + - NONE + env: + - name: POD_NAME + valueFrom: + fieldRef: + apiVersion: v1 + fieldPath: metadata.name + - name: POD_NAMESPACE + valueFrom: + fieldRef: + apiVersion: v1 + fieldPath: metadata.namespace + - name: INSTANCE_IP + valueFrom: + fieldRef: + apiVersion: v1 + fieldPath: status.podIP + image: nginmesh/proxy_debug:0.2.12 + imagePullPolicy: Always + name: istio-proxy + resources: {} + securityContext: + privileged: true + readOnlyRootFilesystem: false + runAsUser: 1337 + terminationMessagePath: /dev/termination-log + terminationMessagePolicy: File + volumeMounts: + - mountPath: /etc/istio/proxy + name: istio-envoy + - mountPath: /etc/certs/ + name: istio-certs + readOnly: true + - mountPath: /var/run/secrets/kubernetes.io/serviceaccount + name: default-token-48vxx + readOnly: true + dnsPolicy: ClusterFirst + initContainers: + - args: + - -p + - "15001" + - -u + - "1337" + image: nginmesh/proxy_init:0.2.12 + imagePullPolicy: Always + name: istio-init + resources: {} + securityContext: + capabilities: + add: + - NET_ADMIN + privileged: true + terminationMessagePath: /dev/termination-log + terminationMessagePolicy: File + volumeMounts: + - mountPath: /var/run/secrets/kubernetes.io/serviceaccount + name: default-token-48vxx + readOnly: true + nodeName: kube-2 + restartPolicy: Always + schedulerName: default-scheduler + securityContext: {} + serviceAccount: default + serviceAccountName: default + terminationGracePeriodSeconds: 30 + tolerations: + - effect: NoExecute + key: node.kubernetes.io/not-ready + operator: Exists + tolerationSeconds: 300 + - effect: NoExecute + key: node.kubernetes.io/unreachable + operator: Exists + tolerationSeconds: 300 + volumes: + - emptyDir: + medium: Memory + name: istio-envoy + - name: istio-certs + secret: + defaultMode: 420 + optional: true + secretName: istio.default + - name: default-token-48vxx + secret: + defaultMode: 420 + secretName: default-token-48vxx +status: + conditions: + - lastProbeTime: null + lastTransitionTime: 2018-01-02T02:33:54Z + status: "True" + type: Initialized + - lastProbeTime: null + lastTransitionTime: 2018-01-02T02:36:06Z + status: "True" + type: Ready + - lastProbeTime: null + lastTransitionTime: 2018-01-02T02:33:36Z + status: "True" + type: PodScheduled + containerStatuses: + - containerID: docker://5d0c189b9dde8e14af4c8065ee5cf007508c0bb2b3c9535598d99dc49f531370 + image: nginmesh/proxy_debug:0.2.12 + imageID: docker-pullable://nginmesh/proxy_debug@sha256:6275934ea3a1ce5592e728717c4973ac704237b06b78966a1d50de3bc9319c71 + lastState: {} + name: istio-proxy + ready: true + restartCount: 0 + state: + running: + startedAt: 2018-01-02T02:36:05Z + - containerID: docker://aba3e114ac1aa87c75e969dcc1b0725696de78d3407c5341691d9db579429f28 + image: istio/examples-bookinfo-reviews-v3:0.2.3 + imageID: docker-pullable://istio/examples-bookinfo-reviews-v3@sha256:6e100e4805a8c10c47040ea7b66f10ad619c7e0068696032546ad3e35ad46570 + lastState: {} + name: reviews + ready: true + restartCount: 0 + state: + running: + startedAt: 2018-01-02T02:35:47Z + hostIP: 10.12.5.31 + initContainerStatuses: + - containerID: docker://b55108625832a3205a265e8b45e5487df10276d5ae35af572ea4f30583933c1f + image: nginmesh/proxy_init:0.2.12 + imageID: docker-pullable://nginmesh/proxy_init@sha256:f73b68839f6ac1596d6286ca498e4478b8fcfa834e4884418d23f9f625cbe5f5 + lastState: {} + name: istio-init + ready: true + restartCount: 0 + state: + terminated: + containerID: docker://b55108625832a3205a265e8b45e5487df10276d5ae35af572ea4f30583933c1f + exitCode: 0 + finishedAt: 2018-01-02T02:33:53Z + reason: Completed + startedAt: 2018-01-02T02:33:53Z + phase: Running + podIP: 192.168.79.138 + qosClass: BestEffort + startTime: 2018-01-02T02:33:39Z + +``` + +该命令行输出的内容相当长,我们可以看到Pod中注入了一个 nginmesh/proxy_debug container,还增加了一个initContainer nginmesh/proxy_init。这两个容器是通过kubernetes initializer自动注入到pod中的。这两个container分别有什么作用呢?让我们看一下[Nginmesh源代码中的说明](https://github.com/nginmesh/nginmesh/tree/49cd69a61d7d330685ef39ccd63fac06421c3da2/istio/agent): + +* proxy_debug, which comes with the agent and NGINX. + +* proxy_init, which is used for configuring iptables rules for transparently injecting an NGINX proxy from the proxy_debug image into an application pod. + +proxy_debug就是sidecar代理,proxy_init则用于配置iptable 规则,以将应用的流量导入到sidecar代理中。 + +查看proxy_init的Dockerfile文件,可以看到proxy_init其实是调用了[prepare_proxy.sh](https://github.com/nginmesh/nginmesh/blob/49cd69a61d7d330685ef39ccd63fac06421c3da2/istio/agent/docker-init/prepare_proxy.sh)这个脚本来创建iptable规则。 + +proxy_debug Dockerfile + +``` +FROM debian:stretch-slim +RUN apt-get update && apt-get install -y iptables +ADD prepare_proxy.sh / +ENTRYPOINT ["/prepare_proxy.sh"] +``` + +prepare_proxy.sh节选 + +``` +...omitted for brevity + +# Create a new chain for redirecting inbound and outbound traffic to +# the common Envoy port. +iptables -t nat -N ISTIO_REDIRECT -m comment --comment "istio/redirect-common-chain" +iptables -t nat -A ISTIO_REDIRECT -p tcp -j REDIRECT --to-port ${ENVOY_PORT} -m comment --comment "istio/redirect-to-envoy-port" + +# Redirect all inbound traffic to Envoy. +iptables -t nat -A PREROUTING -j ISTIO_REDIRECT -m comment --comment "istio/install-istio-prerouting" + +# Create a new chain for selectively redirecting outbound packets to +# Envoy. +iptables -t nat -N ISTIO_OUTPUT -m comment --comment "istio/common-output-chain" + +...omitted for brevity +``` + +## 关联阅读 + +[Istio及Bookinfo示例程序安装试用笔记](http://zhaohuabing.com/2017/11/04/istio-install_and_example/) + +## 参考 + +* [Service Mesh with Istio and NGINX](https://github.com/nginmesh/nginmesh/) + +* [Using kubeadm to Create a Cluster](https://kubernetes.io/docs/setup/independent/create-cluster-kubeadm/#14-installing-kubeadm-on-your-hosts) + +* [Kubernetes Reference Documentation-Dynamic Admission Control](https://kubernetes.io/docs/admin/extensible-admission-controllers/#enable-initializers-alpha-feature) + + diff --git a/exampleSite/content/post/2018-02-03-authentication-and-authorization-of-microservice.md b/exampleSite/content/post/2018-02-03-authentication-and-authorization-of-microservice.md new file mode 100644 index 0000000..9f2873a --- /dev/null +++ b/exampleSite/content/post/2018-02-03-authentication-and-authorization-of-microservice.md @@ -0,0 +1,200 @@ +--- +layout: post +title: "如何构建安全的微服务应用?" +subtitle: "微服务架构下的认证和鉴权方案探讨" +description: "微服务架构的引入为软件应用带来了诸多好处:包括小开发团队,缩短开发周期,语言选择灵活性,增强服务伸缩能力等。与此同时,也引入了分布式系统的诸多复杂问题。其中一个挑战就是如何在微服务架构中实现一个灵活,安全,高效的认证和鉴权方案。本文将尝试就此问题进行一次比较完整的探讨。" +excerpt: "微服务架构的引入为软件应用带来了诸多好处:包括小开发团队,缩短开发周期,语言选择灵活性,增强服务伸缩能力等。与此同时,也引入了分布式系统的诸多复杂问题。其中一个挑战就是如何在微服务架构中实现一个灵活,安全,高效的认证和鉴权方案。本文将尝试就此问题进行一次比较完整的探讨。" +date: 2018-02-03 12:00:00 +author: "赵化冰" +image: "https://img.zhaohuabing.com/in-post/2018-02-03-authentication-and-authorization-of-microservice/AuthenticationTrack.jpeg" +published: true +tags: + - Microservice + - Security +URL: "/2018/05/22/user_authentication_authorization/" +categories: [ Tech ] +--- + +## 前言 + +微服务架构的引入为软件应用带来了诸多好处:包括小开发团队,缩短开发周期,语言选择灵活性,增强服务伸缩能力等。与此同时,也引入了分布式系统的诸多复杂问题。其中一个挑战就是如何在微服务架构中实现一个灵活,安全,高效的认证和鉴权方案。本文将尝试就此问题进行一次比较完整的探讨。 +<!--more--> +## 单体应用的实现方式 +在单体架构下,整个应用是一个进程,在应用中,一般会用一个安全模块来实现用户认证和鉴权。 + +用户登录时,应用的安全模块对用户身份进行验证,验证用户身份合法后,为该用户生成一个会话(Session),并为该Session关联一个唯一的编号(Session Id)。Session是应用中的一小块内存结构,其中保存了登录用户的信息,如User name, Role, Permission等。服务器把该Session的Session Id返回给客户端,客户端将Session Id以cookie或者URL重写的方式记录下来,并在后续请求中发送给应用,这样应用在接收到客户端访问请求时可以使用Session Id验证用户身份,不用每次请求时都输入用户名和密码进行身份验证。 +> 备注:为了避免Session Id被第三者截取和盗用,客户端和应用之前应使用TLS加密通信,session也会设置有过期时间。 + + +<center>单体应用用户登录认证序列图</center> + +客户端访问应用时,Session Id随着HTTP请求发送到应用,客户端请求一般会通过一个拦截器处理所有收到的客户端请求。拦截器首先判断Session Id是否存在,如果该Session Id存在,就知道该用户已经登录。然后再通过查询用户权限判断用户能否执行该此请求,以实现操作鉴权。 + +<center>单体应用用户操作鉴权序列图</center> + +## 微服务认证和鉴权面临的问题 +在微服务架构下,一个应用被拆分为多个微服务进程,每个微服务实现原来单体应用中一个模块的业务功能。应用拆分后,对每个微服务的访问请求都需要进行认证和鉴权。如果参考单体应用的实现方式会遇到下述问题: +* 认证和鉴权逻辑需要在每个微服务中进行处理,需要在各个微服务中重复实现这部分公共逻辑。虽然我们可以使用代码库复用部分代码,但这又会导致所有微服务对特定代码库及其版本存在依赖,影响微服务语言/框架选择的灵活性。 +* 微服务应遵循单一职责原理,一个微服务只处理单一的业务逻辑。认证和鉴权的公共逻辑不应该放到微服务实现中。 +* 为了充分利用微服务架构的好处,实现微服务的水平扩展(Scalability)和弹性(Resiliency),微服务最好是无状态的。因此不建议使用session这种有状态的方案。 +* 微服务架构下的认证和鉴权涉及到场景更为复杂,涉及到用户访问微服务应用,第三方应用访问微服务应用,应用内多个微服务之间相互访问等多种场景,每种场景下的认证和鉴权方案都需要考虑到,以保证应用程序的安全性。 + +<center>微服务认证和鉴权涉及到的三种场景</center> + +## 微服务认证和鉴权的技术方案 + +### 用户身份认证 +一个完整的微服务应用是由多个相互独立的微服务进程组成的,对每个微服务的访问都需要进行用户认证。如果将用户认证的工作放到每个微服务中,应用的认证逻辑将会非常复杂。因此需要考虑一个SSO(单点登录)的方案,即用户只需要登录一次,就可以访问所有微服务提供的服务。 由于在微服务架构中以API Gateway作为对外提供服务的入口,因此可以考虑在API Gateway处提供统一的用户认证。 + +### 用户状态保持 +HTTP是一个无状态的协议,对服务器来说,用户的每次HTTP请求是相互独立的。互联网是一个巨大的分布式系统,HTTP协议作为互联网上的一个重要协议,要考虑到大量应用访问的效率问题。无状态意味着服务端可以把客户端的请求根据需要发送到集群中的任何一个节点,HTTP的无状态设计对负载均衡有明显的好处,由于没有状态,用户请求可以被分发到任意一个服务器,应用也可以在靠近用户的网络边缘部署缓存服务器。对于不需要身份认证的服务,例如浏览新闻网页等,这是没有任何问题的。但很多服务如网络购物,企业管理系统等都需要对用户的身份进行认证,因此需要在HTTP协议基础上采用一种方式保存用户的登录状态,避免用户每发起一次请求都需要进行验证。 + +传统方式是在服务器端采用Cookie来保存用户状态,由于在服务器是有状态的,对服务器的水平扩展有影响。在微服务架构下建议采用Token来记录用户登录状态。 + +Token和Seesion主要的不同点是存储的地方不同。Session是集中存储在服务器中的;而Token是用户自己持有的,一般以cookie的形式存储在浏览器中。Token中保存了用户的身份信息,每次请求都会发送给服务器,服务器因此可以判断访问者的身份,并判断其对请求的资源有没有访问权限。 + +Token用于表明用户身份,因此需要对其内容进行加密,避免被请求方或者第三者篡改。[JWT(Json Web Token)](https://jwt.io)是一个定义Token格式的开放标准(RFC 7519),定义了Token的内容,加密方式,并提供了各种语言的lib。 + +JWT Token的结构非常简单,包括三部分: +* Header<BR> +头部包含类型,为固定值JWT。然后是JWT使用的Hash算法。 +``` +{ + "alg": "HS256", + "typ": "JWT" +} +``` +* Payload<BR> +包含发布者,过期时间,用户名等标准信息,也可以添加用户角色,用户自定义的信息。 +``` +{ + "sub": "1234567890", + "name": "John Doe", + "admin": true +} +``` +* Signature<BR> +Token颁发方的签名,用于客户端验证Token颁发方的身份,也用于服务器防止Token被篡改。 +签名算法 +``` +HMACSHA256( + base64UrlEncode(header) + "." + + base64UrlEncode(payload), + secret) +``` + +这三部分使用Base64编码后组合在一起,成为最终返回给客户端的Token串,每部分之间采用"."分隔。下图是上面例子最终形成的Token + +采用Token进行用户认证,服务器端不再保存用户状态,客户端每次请求时都需要将Token发送到服务器端进行身份验证。Token发送的方式[rfc6750](https://tools.ietf.org/html/rfc6750)进行了规定,采用一个 Authorization: Bearer HHTP Header进行发送。 +``` +Authorization: Bearer mF_9.B5f-4.1JqM +``` +采用Token方式进行用户认证的基本流程如下图所示: +1. 用户输入用户名,密码等验证信息,向服务器发起登录请求 +1. 服务器端验证用户登录信息,生成JWT token +1. 服务器端将Token返回给客户端,客户端保存在本地(一般以Cookie的方式保存) +1. 客户端向服务器端发送访问请求,请求中携带之前颁发的Token +1. 服务器端验证Token,确认用户的身份和对资源的访问权限,并进行相应的处理(拒绝或者允许访问) +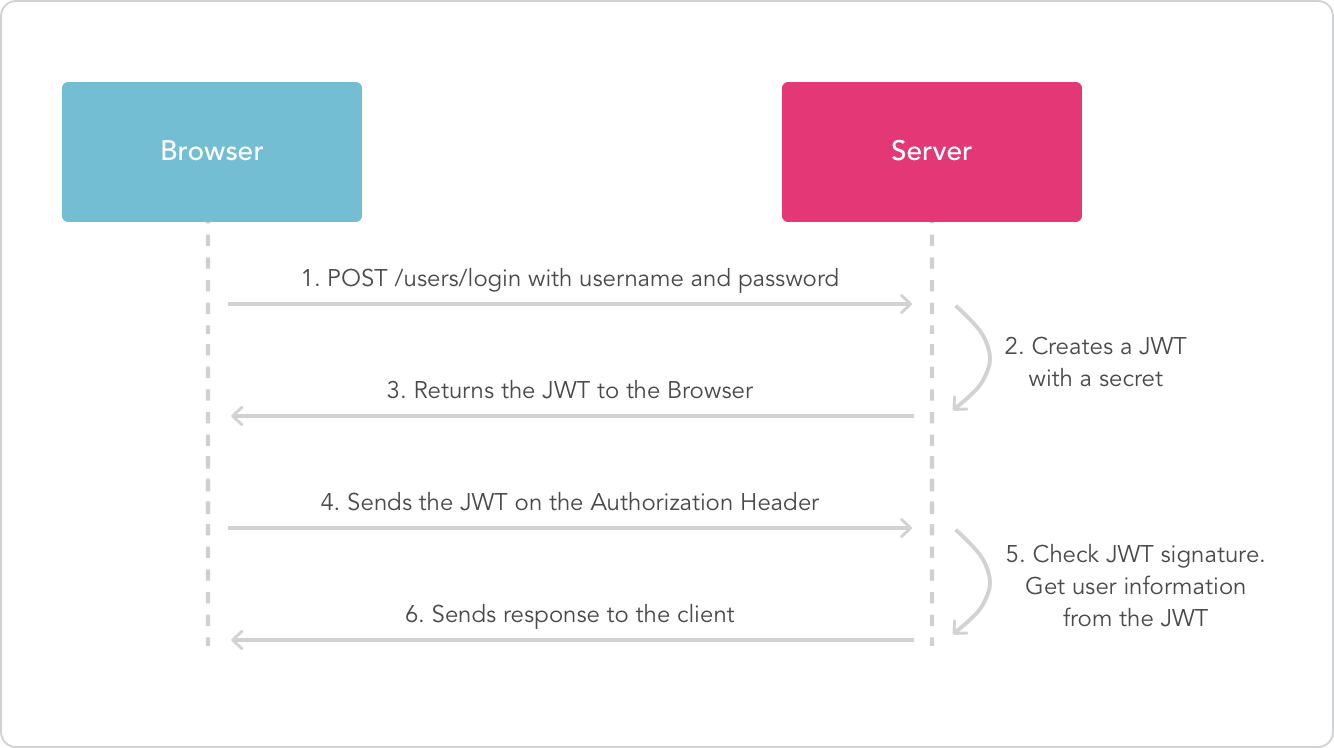 +<center>采用Token进行用户认证的流程图</center> + +### 实现单点登录 +单点登录的理念很简单,即用户只需要登录应用一次,就可以访问应用中所有的微服务。API Gateway提供了客户端访问微服务应用的入口,Token实现了无状态的用户认证。结合这两种技术,可以为微服务应用实现一个单点登录方案。 + +用户的认证流程和采用Token方式认证的基本流程类似,不同之处是加入了API Gateway作为外部请求的入口。 + +用户登录 +1. 客户端发送登录请求到API Gateway +2. API Gateway将登录请求转发到Security Service +3. Security Service验证用户身份,并颁发Token + +用户请求 +1. 客户端请求发送到API Gateway +1. API Gateway调用的Security Service对请求中的Token进行验证,检查用户的身份 +2. 如果请求中没有Token,Token过期或者Token验证非法,则拒绝用户请求。 +3. Security Service检查用户是否具有该操作权 +4. 如果用户具有该操作权限,则把请求发送到后端的Business Service,否则拒绝用户请求 + +<center>采用API Gateway和Token实现微服务应用的单点登录</center> + +### 用户权限控制 +用户权限控制有两种做法,在API Gateway处统一处理,或者在各个微服务中单独处理。 +#### API Gateway处进行统一的权限控制 +客户端发送的HTTP请求中包含有请求的Resource及HTTP Method。如果系统遵循REST规范,以URI资源方式对访问对象进行建模,则API Gateway可以从请求中直接截取到访问的资源及需要进行的操作,然后调用Security Service进行权限判断,根据判断结果决定用户是否有权限对该资源进行操作,并转发到后端的Business Service。这种实现方式API Gateway处统一处理鉴权逻辑,各个微服务不需要考虑用户鉴权,只需要处理业务逻辑,简化了各微服务的实现。 +#### 由各个微服务单独进行权限控制 +如果微服务未严格遵循REST规范对访问对象进行建模,或者应用需要进行定制化的权限控制,则需要在微服务中单独对用户权限进行判断和处理。这种情况下微服务的权限控制更为灵活,但各个微服务需要单独维护用户的授权数据,实现更复杂一些。 + +### 第三方应用接入 +对于第三方应用接入的访问控制,有两种实现方式: +#### API Token +第三方使用一个应用颁发的API Token对应用的数据进行访问。该Token由用户在应用中生成,并提供给第三方应用使用。在这种情况下,一般只允许第三方应用访问该Token所属用户自身的数据,而不能访问其他用户的敏感私有数据。 + +例如Github就提供了Personal API Token功能,用户可以在[Github的开发者设置界面](https://github.com/settings/tokens)中创建Token,然后使用该Token来访问Github的API。在创建Token时,可以设置该Token可以访问用户的哪些数据,如查看Repo信息,删除Repo,查看用户信息,更新用户信息等。 + +使用API Token来访问Github API +``` +curl -u zhaohuabing:fbdf8e8862252ed0f3ba9dba4e328c01ac93aeec https://api.github.com/user + +``` +使用API Token而不是直接使用用户名/密码来访问API的好处是降低了用户密码暴露的风险,并且可以随时收回Token的权限而不用修改密码。 + + +由于API Token只能访问指定用户的数据,因此适合于用户自己开发一些脚本或小程序对应用中自己的数据进行操作。 +#### OAuth +某些第三方应用需要访问不同用户的数据,或者对多个用户的数据进行整合处理,则可以考虑采用OAuth。采用OAuth,当第三方应用访问服务时,应用会提示用户授权第三方应用相应的访问权限,根据用户的授权操作结果生成用于访问的Token,以对第三方应用的操作请求进行访问控制。 + +同样以Github为例,一些第三方应用如Travis CI,GitBook等就是通过OAuth和Github进行集成的。 +OAuth针对不同场景有不同的认证流程,一个典型的认证流程如下图所示: +* 用户向OAuth客户端程序发起一个请求,OAuth客户端程序在处理该请求时发现需要访问用户在资源服务器中的数据。 +* 客户端程序将用户请求重定向到认证服务器,该请求中包含一个callback的URL。 +* 认证服务器返回授权页面,要求用户对OAuth客户端的资源请求进行授权。 +* 用户对该操作进行授权后,认证服务器将请求重定向到客户端程序的callback url,将授权码返回给客户端程序。 +* 客户端程序将授权码发送给认证服务器,请求token。 +* 认证服务器验证授权码后将token颁发给客户端程序。 +* 客户端程序采用颁发的token访问资源,完成用户请求。 + +>备注: +>1. OAuth中按照功能区分了资源服务器和认证服务器这两个角色,在实现时这两个角色常常是同一个应用。将该流程图中的各个角色对应到Github的例子中,资源服务器和认证服务器都是Github,客户端程序是Travis CI或者GitBook,用户则是使用Travis CI或者GitBook的直接用户。 +> +>2. 有人可能会疑惑在该流程中为何要使用一个授权码(Authorization Code)来申请Token,而不是由认证服务器直接返回Token给客户端。OAuth这样设计的原因是在重定向到客户端Callback URL的过程中会经过用户代理(浏览器),如果直接传递Token存在被窃取的风险。采用授权码的方式,申请Token时客户端直接和认证服务器进行交互,并且认证服务期在处理客户端的Token申请请求时还会对客户端进行身份认证,避免其他人伪造客户端身份来使用认证码申请Token。 +>下面是一个客户端程序采用Authorization Code来申请Token的示例,client_id和client_secret被用来验证客户端的身份。 +> +>``` +>POST /oauth/token HTTP/1.1 +>Host: authorization-server.com +> +>grant_type=authorization_code +>&code=xxxxxxxxxxx +>&redirect_uri=https://example-app.com/redirect +>&client_id=xxxxxxxxxx +>&client_secret=xxxxxxxxxx +>``` + + + +<center>OAuth认证流程</center> + + +另外在谈及OAuth时,我们需要注意微服务应用作为OAuth客户端和OAuth服务器的两种不同场景: + +在实现微服务自身的用户认证时,也可以采用OAuth将微服务的用户认证委托给一个第三方的认证服务提供商,例如很多应用都将用户登录和微信或者QQ的OAuth服务进行了集成。 + +第三方应用接入和微服务自身用户认证采用OAuth的目的是不同的,前者是为了将微服务中用户的私有数据访问权限授权给第三方应用,微服务在OAuth架构中是认证和资源服务器的角色;而后者的目的是集成并利用知名认证提供服务商提供的OAuth认证服务,简化繁琐的注册操作,微服务在OAuth架构中是客户端的角色。 + +因此在我们需要区分这两种不同的场景,以免造成误解。 + +### 微服务之间的认证 +除了来自用户和第三方的北向流量外,微服务之间还有大量的东西向流量,这些流量可能在同一个局域网中,也可能跨越不同的数据中心,这些服务间的流量存在被第三方的嗅探和攻击的危险,因此也需要进行安全控制。 + +通过双向SSL可以实现服务之间的相互身份认证,并通过TLS加密服务间的数据传输。需要为每个服务生成一个证书,服务之间通过彼此的证书进行身份验证。在微服务运行环境中,可能存在大量的微服务实例,并且微服务实例经常会动态变化,例如随着水平扩展增加服务实例。在这种情况下,为每个服务创建并分发证书变得非常困难。我们可以通过创建一个私有的证书中心(Internal PKI/CA)来为各个微服务提供证书管理如颁发、撤销、更新等。 + + +## 参考 + +* [How We Solved Authentication and Authorization in Our Microservice Architecture](https://initiate.andela.com/how-we-solved-authentication-and-authorization-in-our-microservice-architecture-994539d1b6e6) +* [How to build your own public key infrastructure](https://blog.cloudflare.com/how-to-build-your-own-public-key-infrastructure/) +* [OAuth 2.0 Authorization Code Request](https://www.oauth.com/oauth2-servers/access-tokens/authorization-code-request/) +* [PKI/CA工作原理及架构](https://www.jianshu.com/p/c65fa3af1c01) +* [深入聊聊微服务架构的身份认证问题](http://www.primeton.com/read.php?id=2390) + + diff --git a/exampleSite/content/post/2018-02-09-docker-without-sudo.md b/exampleSite/content/post/2018-02-09-docker-without-sudo.md new file mode 100644 index 0000000..de26410 --- /dev/null +++ b/exampleSite/content/post/2018-02-09-docker-without-sudo.md @@ -0,0 +1,27 @@ +--- +layout: post +title: "如何使用非root用户执行docker命令" +subtitle: "" +description: "如何使用非root用户执行docker命令" +excerpt: "如何使用非root用户执行docker命令" +date: 2018-02-09 10:00:00 +author: "赵化冰" +image: "https://img.zhaohuabing.com/in-post/docker.jpg" +published: true +showtoc: false +tags: + - Tips + - Docker +URL: "/2018/02/09/docker-without-sudo/" +categories: [ Tips ] +--- + +### Add the docker group if it doesn't already exist: + +sudo groupadd docker + +### Add the connected user "$USER" to the docker group. Change the user name to match your preferred user if you do not want to use your current user: + +sudo gpasswd -a $USER docker + +### Either do a newgrp docker or log out/in to activate the changes to groups. diff --git a/exampleSite/content/post/2018-02-09-vim-tips.md b/exampleSite/content/post/2018-02-09-vim-tips.md new file mode 100644 index 0000000..58bcad2 --- /dev/null +++ b/exampleSite/content/post/2018-02-09-vim-tips.md @@ -0,0 +1,66 @@ +--- +layout: post +title: "Vim Tips" +subtitle: "" +description: "Vim Tips and tricks" +date: 2018-02-09 11:00:00 +author: "赵化冰" +image: "https://img.zhaohuabing.com/in-post/2018-02-09-vim-tips/matrix.jpg" +published: true +tags: + - Tips + - Vim +URL: "/2018/02/09/vim-tips/" +categories: [ Tips ] +--- +## vim graphical cheat sheet + + +<!--more--> +## Vim Jumps + +* ^ — Move to start of line +* $ — Move to end of line +* b — Move back a word +* w — Move forward a word +* e — Move to the end of the next word +* Ctrl-o and Ctrl-i to go to the previous/next location you jumped to +* ``(two backticks) jump back to where you were +* gi go back to the last place you inserted a text and enter insert mode + +## Vim Navigations + +* { and } jump paragraph back and forth +* Ctrl-F/B move one screen back and forth +* Search the word under cursor, then n/p to jump to next/previous + + +## Enable Vim mode in bash +vi ~/.inputrc +set editing-mode vi + +## Enable system clipboard upport + +See if system clipboard is supported: +``` +$ vim --version | grep clipboard +-clipboard +iconv +path_extra -toolbar ++eval +mouse_dec +startuptime -xterm_clipboard +``` + +Rinstall vim as vim-gnome: +``` +sudo apt-get install vim-gnome +``` +Select what you want using the mouse - then type to copy to clipboard: +``` +"+y +``` + +To paste to vim from clipboard type: +``` +"+p +``` +## Others +* Ex: open the current directory +* set number: show line number diff --git a/exampleSite/content/post/2018-03-13-use-docker-behind-http-proxy.md b/exampleSite/content/post/2018-03-13-use-docker-behind-http-proxy.md new file mode 100644 index 0000000..54c9ba0 --- /dev/null +++ b/exampleSite/content/post/2018-03-13-use-docker-behind-http-proxy.md @@ -0,0 +1,46 @@ +--- +layout: post +title: "如何配置docker使用HTTP代理" +subtitle: "" +description: "如何配置docker使用HTTP代理" +date: 2018-03-13 18:00:00 +author: "赵化冰" +image: "https://img.zhaohuabing.com/in-post/docker.jpg" +published: true +tags: + - Tips + - Docker +URL: "/2018/03/13/use-docker-behind-http-proxy/" +categories: [ Tips ] +--- +## Ubuntu +### 设置docker使用http proxy +``` +sudo /etc/default/docker + +export http_proxy="http://127.0.0.1:3128/" +export https_proxy="http://127.0.0.1:3128/" +export HTTP_PROXY="http://127.0.0.1:3128/" +export HTTPS_PROXY="http://127.0.0.1:3128/" +``` +<!--more--> +### 加载配置并重启docker +``` +sudo service docker restart +``` +## CentOS +### 设置docker使用http proxy +``` +sudo mkdir -p /etc/systemd/system/docker.service.d + +echo ' +[Service] +Environment="HTTP_PROXY=http://proxy.foo.bar.com:80/" +' | sudo tee /etc/systemd/system/docker.service.d/http-proxy.conf +``` + +### 加载配置并重启docker +``` +sudo systemctl daemon-reload +sudo systemctl restart docker +``` diff --git a/exampleSite/content/post/2018-03-29-what-is-service-mesh-and-istio.md b/exampleSite/content/post/2018-03-29-what-is-service-mesh-and-istio.md new file mode 100644 index 0000000..2e12291 --- /dev/null +++ b/exampleSite/content/post/2018-03-29-what-is-service-mesh-and-istio.md @@ -0,0 +1,251 @@ +--- +layout: post +title: "谈谈微服务架构中的基础设施:Service Mesh与Istio" +subtitle: "Service Mesh模式及Istio开源项目介绍" +description: "作为一种架构模式,微服务将复杂系统切分为数十乃至上百个小服务,每个服务负责实现一个独立的业务逻辑。这些小服务易于被小型的软件工程师团队所理解和修改,并带来了语言和框架选择灵活性,缩短应用开发上线时间,可根据不同的工作负载和资源要求对服务进行独立缩扩容等优势。另一方面,当应用被拆分为多个微服务进程后,进程内的方法调用变成了了进程间的远程调用。引入了对大量服务的连接、管理和监控的复杂性,本文介绍了Service Mesh模式如何应对微服务架构的这些挑战,以及Service Mesh的明星开源项目Istio。" +date: 2018-03-29 12:00:00 +author: "赵化冰" +image: "https://img.zhaohuabing.com/in-post/istio-install_and_example/post-bg.jpg" +published: true +tags: + - Microservice + - Service Mesh + - Istio +URL: "/2018/03/29/what-is-service-mesh-and-istio/" +categories: [ Tech ] +--- + +## 微服务架构的演进 +作为一种架构模式,微服务将复杂系统切分为数十乃至上百个小服务,每个服务负责实现一个独立的业务逻辑。这些小服务易于被小型的软件工程师团队所理解和修改,并带来了语言和框架选择灵活性,缩短应用开发上线时间,可根据不同的工作负载和资源要求对服务进行独立缩扩容等优势。 + +另一方面,当应用被拆分为多个微服务进程后,进程内的方法调用变成了了进程间的远程调用。引入了对大量服务的连接、管理和监控的复杂性。 + <!--more--> + + +该变化带来了分布式系统的一系列问题,例如: +* 如何找到服务的提供方? +* 如何保证远程方法调用的可靠性? +* 如何保证服务调用的安全性? +* 如何降低服务调用的延迟? +* 如何进行端到端的调试? + +另外生产部署中的微服务实例也增加了运维的难度,例如: + +* 如何收集大量微服务的性能指标已进行分析? +* 如何在不影响上线业务的情况下对微服务进行升级? +* 如何测试一个微服务集群部署的容错和稳定性? + +这些问题涉及到成百上千个服务的通信、管理、部署、版本、安全、故障转移、策略执行、遥测和监控等,要解决这些微服务架构引入的问题并非易事。 + +让我们来回顾一下微服务架构的发展过程。在出现服务网格之前,我们最开始在微服务应用程序内理服务之间的通讯逻辑,包括服务发现,熔断,重试,超时,加密,限流等逻辑。 + +在一个分布式系统中,这部分逻辑比较复杂,为了为微服务应用提供一个稳定、可靠的基础设施层,避免大家重复造轮子,并减少犯错的可能,一般会通过对这部分负责服务通讯的逻辑进行抽象和归纳,形成一个代码库供各个微服务应用程序使用,如下图所示: + +公共的代码库减少了应用程序的开发和维护工作量,降低了由应用开发人员单独实现微服务通讯逻辑出现错误的机率,但还是存在下述问题: +* 微服务通讯逻辑对应用开发人员并不透明,应用开发人员需要理解并正确使用代码 库,不能将其全部精力聚焦于业务逻辑。 +* 需要针对不同的语言/框架开发不同的代码库,反过来会影响微服务应用开发语言 和框架的选择,影响技术选择的灵活性。 +* 随着时间的变化,代码库会存在不同的版本,不同版本代码库的兼容性和大量运行 环境中微服务的升级将成为一个难题。 + +可以将微服务之间的通讯基础设施层和TCP/IP协议栈进行类比。TCP/IP协议栈为操作系统中的所有应用提供基础通信服务,但TCP/IP协议栈和应用程序之间并没有紧密的耦合关系,应用只需要使用TCP/IP协议提供的底层通讯功能,并不关心TCP/IP协议的实现,如IP如何进行路由,TCP如何创建链接等。 + +同样地,微服务应用也不应该需要关注服务发现,Load balancing,Retries,Circuit Breaker等微服务之间通信的底层细节。如果将为微服务提供通信服务的这部分逻辑从应用程序进程中抽取出来,作为一个单独的进程进行部署,并将其作为服务间的通信代理,可以得到如下图所示的架构: + +因为通讯代理进程伴随应用进程一起部署,因此形象地把这种部署方式称为“sidecar”/边车(即三轮摩托的挎斗)。 + +应用间的所有流量都需要经过代理,由于代理以sidecar方式和应用部署在同一台主机上,应用和代理之间的通讯可以被认为是可靠的。由代理来负责找到目的服务并负责通讯的可靠性和安全等问题。 + +当服务大量部署时,随着服务部署的sidecar代理之间的连接形成了一个如下图所示的网格,该网格成为了微服务的通讯基础设施层,承载了微服务之间的所有流量,被称之为Service Mesh(服务网格)。 + + +_服务网格是一个基础设施层,用于处理服务间通信。云原生应用有着复杂的服务拓扑,服务网格保证请求可以在这些拓扑中可靠地穿梭。在实际应用当中,服务网格通常是由一系列轻量级的网络代理组成的,它们与应用程序部署在一起,但应用程序不需要知道它们的存在。 + +_William Morgan _[_WHAT’S A SERVICE MESH? AND WHY DO I NEED ONE?_ +](https://buoyant.io/2017/04/25/whats-a-service-mesh-and-why-do-i-need-one/)_ + +服务网格中有数量众多的Sidecar代理,如果对每个代理分别进行设置,工作量将非常巨大。为了更方便地对服务网格中的代理进行统一集中控制,在服务网格上增加了控制面组件。 + + + +这里我们可以类比SDN的概念,控制面就类似于SDN网管中的控制器,负责路由策略的指定和路由规则下发;数据面类似于SDN网络中交换机,负责数据包的转发。 + +由于微服务的所有通讯都由服务网格基础设施层提供,通过控制面板和数据面板的配合,可以对这些通讯进行监控、托管和控制,以实现微服务灰度发布,调用分布式追踪,故障注入模拟测试,动态路由规则,微服务闭环控制等管控功能。 + +## Istio服务网格 +Istio是一个Service Mesh开源项目,是Google继Kubernetes之后的又一力作,主要参与的公司包括Google,IBM和Lyft。 + +凭借kubernetes良好的架构设计及其强大的扩展性,Google围绕kubernetes打造一个生态系统。Kubernetes用于微服务的编排(编排是英文Orchestration的直译,用大白话说就是描述一组微服务之间的关联关系,并负责微服务的部署、终止、升级、缩扩容等)。其向下用CNI(容器网络接口),CRI(容器运行时接口)标准接口可以对接不同的网络和容器运行时实现,提供微服务运行的基础设施。向上则用Istio提供了微服务治理功能。 + +由下图可见,Istio补充了Kubernetes生态圈的重要一环,是Google的微服务版图里一个里程碑式的扩张。 + + +Google借Istio的力量推动微服务治理的事实标准,对Google自身的产品Google Cloud有极其重大的意义。其他的云服务厂商,如Redhat,Pivotal,Nginx,Buoyant等看到大势所趋,也纷纷跟进,宣布自身产品和Istio进行集成,以避免自己被落下,丢失其中的市场机会。 + +可以预见不久的将来,对于云原生应用而言,采用kubernetes进行服务部署和集群管理,采用Istio处理服务通讯和治理,将成为微服务应用的标准配置。 + +Istio服务包括网格由数据面和控制面两部分。 +* 数据面由一组智能代理(Envoy)组成,代理部署为边车,调解和控制微服务之间所有的网络通信。 +* 控制面负责管理和配置代理来路由流量,以及在运行时执行策略。 + + + +### Istio控制面 +Istio控制面板包括3个组件:Pilot, Mixer和Istio-Auth。 +#### Pilot +Pilot维护了网格中的服务的标准模型,这个标准模型是独立于各种底层平台的。Pilot通过适配器和各底层平台对接,以填充此标准模型。 + +例如Pilot中的Kubernetes适配器通过Kubernetes API服务器得到kubernetes中pod注册信息的更改,入口资源以及存储流量管理规则等信息,然后将该数据被翻译为标准模型提供给Pilot使用。通过适配器模式,Pilot还可以从Mesos, Cloud Foundry, Consul中获取服务信息,也可以开发适配器将其他提供服务发现的组件集成到Pilot中。 + +除此以外,Pilo还定义了一套和数据面通信的标准API,API提供的接口内容包括服务发现 、负载均衡池和路由表的动态更新。通过该标准API将控制面和数据面进行了解耦,简化了设计并提升了跨平台的可移植性。基于该标准API已经实现了多种Sidecar代理和Istio的集成,除Istio目前集成的Envoy外,还可以和Linkerd, Nginmesh等第三方通信代理进行集成,也可以基于该API自己编写Sidecar实现。 + +Pilot还定义了一套DSL(Domain Specific Language)语言,DSL语言提供了面向业务的高层抽象,可以被运维人员理解和使用。运维人员使用该DSL定义流量规则并下发到Pilot,这些规则被Pilot翻译成数据面的配置,再通过标准API分发到Envoy实例,可以在运行期对微服务的流量进行控制和调整。 + + +#### Mixer +在微服务应用中,通常需要部署一些基础的后端公共服务以用于支撑业务功能。这些基础设施包括策略类如访问控制,配额管理;以及遥测报告如APM,日志等。微服务应用和这些后端支撑系统之间一般是直接集成的,这导致了应用和基础设置之间的紧密耦合,如果因为运维原因需要对基础设置进行升级或者改动,则需要修改各个微服务的应用代码,反之亦然。 + +为了解决该问题,Mixer在应用程序代码和基础架构后端之间引入了一个通用中间层。该中间层解耦了应用和后端基础设施,应用程序代码不再将应用程序代码与特定后端集成在一起,而是与Mixer进行相当简单的集成,然后Mixer负责与后端系统连接。 + +Mixer主要提供了三个核心功能: +* 前提条件检查。允许服务在响应来自服务消费者的传入请求之前验证一些前提条件。前提条件可以包括服务使用者是否被正确认证,是否在服务的白名单上,是否通过ACL检查等等。 +* 配额管理。 使服务能够在分配和释放多个维度上的配额,配额这一简单的资源管理工具可以在服务消费者对有限资源发生争用时,提供相对公平的(竞争手段)。Rate Limiting就是配额的一个例子。 +* 遥测报告。使服务能够上报日志和监控。在未来,它还将启用针对服务运营商以及服务消费者的跟踪和计费流。 + + +Mixer的架构如图所示: + + +首先,Sidecar会从每一次请求中收集相关信息,如请求的路径,时间,源IP,目地服务,tracing头,日志等,并请这些属性上报给Mixer。Mixer和后端服务之间是通过适配器进行连接的,Mixer将Sidecar上报的内容通过适配器发送给后端服务。 + +由于Sidecar只和Mixer进行对接,和后端服务之间并没有耦合,因此使用Mixer适配器机制可以接入不同的后端服务,而不需要修改应用的代码,例如通过不同的Mixer适配器,可以把Metrics收集到Prometheus或者InfluxDB,甚至可以在不停止应用服务的情况下动态切换后台服务。 + +其次,Sidecar在进行每次请求处理时会通过Mixer进行策略判断,并根据Mixer返回的结果决定是否继续处理该次调用。通过该方式,Mixer将策略决策移出应用层,使运维人员可以在运行期对策略进行配置,动态控制应用的行为,提高了策略控制的灵活性。例如可以配置每个微服务应用的访问白名单,不同客户端的Rate limiting,等等。 + +逻辑上微服务之间的每一次请求调用都会经过两次Mixer的处理:调用前进行策略判断,调用后进行遥测数据收集。Istio采用了一些机制来避免Mixer的处理影响Envoy的转发效率。 + +从上图可以看到,Istio在Envoy中增加了一个Mixer Filter,该Filter和控制面的Mixer组件进行通讯,完成策略控制和遥测数据收集功能。Mixer Filter中保存有策略判断所需的数据缓存,因此大部分策略判断在Envoy中就处理了,不需要发送请求到Mixer。另外Envoy收集到的遥测数据会先保存在Envoy的缓存中,每隔一段时间再通过批量的方式上报到Mixer。 + + +#### Auth +Istio支持双向SSL认证(Mutual SSL Authentication)和基于角色的访问控制(RBAC),以提供端到端的安全解决方案。 + +##### 认证 +Istio提供了一个内部的CA(证书机构),该CA为每个服务颁发证书,提供服务间访问的双向SSL身份认证,并进行通信加密,其架构如下图所示: + + +其工作机制如下: +部署时: + +* CA监听Kubernetes API Server, 为集群中的每一个Service Account创建一对密钥和证书,并发送给Kubernetes API Server。注意这里不是为每个服务生成一个证书,而是为每个Service Account生成一个证书。Service Account和kubernetes中部署的服务可以是一对多的关系。Service Account被保存在证书的SAN(Subject Alternative Name)字段中。 +* 当Pod创建时,Kubernetes根据该Pod关联的Service Account将密钥和证书以Kubernetes Secrets资源的方式加载为Pod的Volume,以供Envoy使用。 +* Pilot生成数据面的配置,包括Envoy需使用的密钥和证书信息,以及哪个Service Account可以允许运行哪些服务,下发到Envoy。 +>备注:如果是虚机环境,则采用一个Node Agent生成密钥,向Istio CA申请证书,然后将证书传递给Envoy。 + +运行时: + +* 服务客户端的出站请求被Envoy接管。 +* 客户端的Envoy和服务端的Envoy开始双向SSL握手。在握手阶段,客户端Envoy会验证服务端Envoy证书中的Service Account有没有权限运行该请求的服务,如没有权限,则认为服务端不可信,不能创建链接。 +* 当加密TSL链接创建好后,请求数据被发送到服务端的Envoy,然后被Envoy通过一个本地的TCP链接发送到服务中。 + +##### 鉴权 + +Istio“基于角色的访问控制”(RBAC)提供了命名空间,服务,方法三个不同大小粒度的服务访问权限控制。其架构如下图所示: + + +管理人员可以定制访问控制的安全策略,这些安全策略保存在Istio Config Store中。 Istio RBAC Engine从Config Store中获取安全策略,根据安全策略对客户端发起的请求进行判断,并返回鉴权结果(允许或者禁止)。 + +Istio RBAC Engine目前被实现为一个Mixer Adapter,因此其可以从Mixer传递过来的上下文中获取到访问请求者的身份(Subject)和操作请求(Action),并通过Mixer对访问请求进行策略控制,允许或者禁止某一次请求。 + +Istio Policy中包含两个基本概念: + +* ServiceRole,定义一个角色,并为该角色指定对网格中服务的访问权限。指定角色访问权限时可以在命名空间,服务,方法的不同粒度进行设置。 + +* ServiceRoleBinding,将角色绑定到一个Subject,可以是一个用户,一组用户或者一个服务。 + +### Istio数据面 +Istio数据面以“边车”(sidecar)的方式和微服务一起部署,为微服务提供安全、快速、可靠的服务间通讯。由于Istio的控制面和数据面以标准接口进行交互,因此数据可以有多种实现,Istio缺省使用了Envoy代理的扩展版本。 + +Envoy是以C ++开发的高性能代理,用于调解服务网格中所有服务的所有入站和出站流量。Envoy的许多内置功能被Istio发扬光大,例如动态服务发现,负载均衡,TLS加密,HTTP/2 & gRPC代理,熔断器,路由规则,故障注入和遥测等。 + +Istio数据面支持的特性如下: + +| Outbound特性 | Inbound特性 | +|--------|--------| +| Service authentication(服务认证)|Service authentication(服务认证)| +|Load Balancing(负载均衡) |Authorization(鉴权)| +|Retry and circuit breaker(重试和断路器)|Rate limits(请求限流)| +|Fine-grained routing(细粒度的路由)|Load shedding(负载控制)| +|Telemetry(遥测)|Telemetry(遥测)| +|Request Tracing(分布式追踪)|Request Tracing(分布式追踪)| +|Fault Injection(故障注入)|Fault Injection(故障注入)| + +>备注:Outbound特性是指服务请求侧的Sidecar提供的功能特性,而Inbound特性是指服务提供侧Sidecar提供的功能特性。一些特性如遥测和分布式跟踪需要两侧的Sidecar都提供支持;而另一些特性则只需要在一侧提供,例如鉴权只需要在服务提供侧提供,重试只需要在请求侧提供。 + +### 典型应用场景 +Istio服务管控包括下列的典型应用场景: + +#### 分布式调用追踪 +在微服务架构中,业务的调用链非常复杂,一个来自用户的请求可能涉及到几十个服务的协同处理。因此需要一个跟踪系统来记录和分析同一次请求在整个调用链上的相关事件,从而帮助研发和运维人员分析系统瓶颈,快速定位异常和优化调用链路。 + +Istio通过在Envoy代理上收集调用相关数据,实现了对应用无侵入的分布式调用跟踪分析。 Istio实现分布式调用追踪的原理如下图所示: + +Envoy收集一个端到端调用中的各个分段的数据,并将这些调用追踪信息发送给Mixer,Mixer Adapter 将追踪信息发送给相应的服务后端进行处理。整个调用追踪信息的生成流程不需要应用程序介入,因此不需要将分布式跟踪相关代码注入到应用程序中。 + +>注意:应用仍需要在进行出口调用时将收到的入口请求中tracing相关的header转发出去,传递给调用链中下一个边车进行处理。 + +#### 度量收集 +Istio 实现度量收集的原理如下图所示: + + +Envoy收集指标相关的原始数据,如请求的服务,HTTP状态码,调用时延等,这些收集到的指标数据被送到Mixer,通过Mixer Adapters 将指标信息转换后发送到后端的监控系统中。由于Mixer使用了插件机制,后端监控系统可以根据需要在运行期进行动态切换。 + +#### 灰度发布 +当应用上线以后,运维面临的一大挑战是如何能够在不影响已上线业务的情况下进行升级。无论进行了多么完善的测试,都无法保证线下测试时发现所有潜在故障。在无法百分百避免版本升级故障的情况下,需要通过一种方式进行可控的版本发布,把故障影响控制在可以接受的范围内,并可以快速回退。 + +可以通过灰度发布(又名金丝雀发布)来实现业务从老版本到新版本的平滑过渡,并避免升级过程中出现的问题对用户造成的影响。 + +Istio通过高度的抽象和良好的设计采用一致的方式实现了灰度发布。在发布新版本后,运维人员可以通过定制路由规则将特定的流量(如具有指定特征的测试用户)导入新版本服务中以进行测试。通过渐进受控地向新版本导入生产流量,可以最小化升级中出现的故障对用户的影响。 + +采用Istio进行灰度发布的流程如下图所示: + +首先,通过部署新版本的服务,并将通过路由规则将金丝雀用户的流量导入到新版本服务中 + + +测试稳定后,使用路由规则将生产流量逐渐导入到新版本系统中,如按5%,10%,50%,80%逐渐导入。 + + +如果新版本工作正常,则最后将所有流量导入到新版本服务中,并将老版本服务下线;如中间出现问题,则可以将流量重新导回老版本,在新版本中修复故障后采用该流程重新发布。 + + +#### 断路器 +在微服务架构中,存在着许许多多的服务单元,若一个服务出现故障,就会因依赖关系形成故障蔓延,最终导致整个系统的瘫痪,这样的架构相较传统架构就更加的不稳定。为了解决这样的问题,因此产生了断路器模式。 + +断路器模式指,在某个服务发生故障时,断路器的故障监控向调用放返回一个及时的错误响应,而不是长时间的等待。这样就不会使得调用线程因调用故障被长时间占用,从而避免了故障在整个系统中的蔓延。 + +Istio 实现断路器的原理如下图所示: + +管理员通过destination policy设置断路触发条件,断路时间等参数。例如设置服务B发生10次5XX错误后断路15分钟。则当服务B的某一实例满足断路条件后,就会被从LB池中移除15分钟。在这段时间内,Envoy将不再把客户端的请求转发到该服务实例。 + +Istio的断路器还支持配置最大链接数,最大待处理请求数,最大请求数,每链接最大请求数,重试次数等参数。当达到设置的最大请求数后,新发起的请求会被Envoy直接拒绝。 + + +#### 故障注入 +对于一个大型微服务应用而言,系统的健壮性非常重要。在微服务系统中存在大量的服务实例,当部分服务实例出现问题时,微服务应用需要具有较高的容错性,通过重试,断路,自愈等手段保证系统能够继续对外正常提供服务。因此在应用发布到生产系统强需要对系统进行充分的健壮性测试。 + +对微服务应用进行健壮性测试的一个最大的困难是如何对系统故障进行模拟。在一个部署了成百上千微服务的测试环境中,如果想通过对应用,主机或者交换机进行设置来模拟微服务之间的通信故障是非常困难的。 + +Istio通过服务网格承载了微服务之间的通信流量,因此可以在网格中通过规则进行故障注入,模拟部分微服务出现故障的情况,对整个应用的健壮性进行测试。 + +故障注入的原理如下图所示: + +测试人员通过Pilot向Envoy注入了一个规则,为发向服务MS-B的请求加入了指定时间的延迟。当客户端请求发向MSB-B时,Envoy会根据该规则为该请求加入时延,引起客户的请求超时。通过设置规则注入故障的方式,测试人员可以很方便地模拟微服务之间的各种通信故障,对微服务应用的健壮性进行较为完整的模拟测试。 + +## 总结 +服务网格为微服务提供了一个对应用程序透明的安全、可靠的通信基础设施层。采用服务网格后,微服务应用开发人员可以专注于解决业务领域问题,将一些通用问题交给服务网格处理。采用服务网格后,避免了代码库带来的依赖,可以充分发挥微服务的异构优势,开发团队可以根据业务需求和开发人员能力自由选择技术栈。 + +Istio具有良好的架构设计,提供了强大的二次开发扩展性和用户定制能力。虽然Istio目前还处于beta阶段,但已经获得众多知名公司和产品的支持,是一个非常具有前景的开源服务网格开源项目。 + +## 参考 + +* [Istio online documentation](https://istio.io/docs/) +* [Pattern: Service Mesh](http://philcalcado.com/2017/08/03/pattern_service_mesh.html) +* [Mixer and the SPOF Myth](https://istio.io/blog/2017/mixer-spof-myth.html) diff --git a/exampleSite/content/post/2018-04-11-service-mesh-vs-api-gateway.md b/exampleSite/content/post/2018-04-11-service-mesh-vs-api-gateway.md new file mode 100644 index 0000000..b3ec3d2 --- /dev/null +++ b/exampleSite/content/post/2018-04-11-service-mesh-vs-api-gateway.md @@ -0,0 +1,79 @@ +--- +layout: post +title: "Service Mesh 和 API Gateway的关系探讨(译文)" +subtitle: "" +description: "API Gateway和Service Mesh的关系是我最近一直在思考的问题,也和同事及社区的朋友之间进行了一些讨论。这篇短文很清晰地总结了两者之间的相似之处以及这两者在微服务架构中的不同用途。" +excerpt: "API Gateway和Service Mesh的关系是我最近一直在思考的问题,也和同事及社区的朋友之间进行了一些讨论。这篇短文很清晰地总结了两者之间的相似之处以及这两者在微服务架构中的不同用途。" +date: 2018-04-11 09:32:00 +author: "赵化冰" +image: "https://img.zhaohuabing.com/in-post/2018-04-11-service-mesh-vs-api-gateway/background.jpg" +published: true +tags: + - Microservice + - Service Mesh + - API Gateway +URL: "/2018/04/11/service-mesh-vs-api-gateway/" +categories: [ Tech ] +--- + +## Service Mesh vs API Gateway + +在[前一篇关于Service Mesh的文章](https://medium.com/microservices-in-practice/service-mesh-for-microservices-2953109a3c9a)中,我提到了几个关于Service Mesh和API Gateway之间关系的问题,在本篇文章中,我打算就Service Mesh和API Gateway的用途进行进一步讨论。 + +为了区分API Gateway和Service Mesh,让我们先分别看看两者各自的关键特征。 + +## API Gateway: 将服务作为被管理的API向外部暴露 + + +使用API Gateway的主要目的是将微服务作为被管理的API暴露(给外部系统)。因此,我们在API Gateway层开发的API或者边界服务对外提供了业务功能。 + +API/边界服务调用下游的组合或者原子微服务,通过组合/混装多个下游微服务的方式来提供业务逻辑。 + +在API/Edge服务调用下游服务时,需要采用一种可靠的通信方式,应用了断路器,超时,负载均衡/故障转移等可靠性模式。因此大部分的API Gateway解决方案都内置了这些特性。 + +API Gateway也内置了以下特性的支持,包括:服务发现,分析(可见性:性能指标,监控,分布式日志,分布式调用追踪)和安全。 + +API Gateway和API管理生态系统的其他组件的关系紧密,比如: API 市场/商店, API 发布门户。 + +## Service Mesh:微服务的网络通信基础设施 + +现在我们来看看Service Mesh有哪些不同。 + +Service Mesh是一个网络通信基础设施, 可以用于将应用层的网络通信功能从你的服务代码中剥离出来。 + +采用Service Mesh, 你不用在服务代码中实现用于可靠通信的模式如断路,超时等,类似地,Service Mesh也提供了服务发现,服务可见性等其他功能。 + +## API Gateway和Service Mesh实践 + +API Gateway和Service Mesh之间的主要不同点:API Gateway是暴露API/边界服务的关键组件,而Service Mesh则仅仅是一个服务间通信的基础设施,并不了解应用中的业务逻辑。 + +下图说明了API Gateway和Service Mesh的关系。如同前面所说,这两者之间也有一些重叠的部分(例如断路器等),但重要的是需要理解这两者是用于完全不同的用途。 + + +图1: API Gateway和Service Mesh实践 + + + +如上图所示,Service Mesh作为Sidecar(边车)和服务一起部署,它是独立于服务的业务逻辑的。 + +另一方面,API Gateway 提供了所有的API服务(这些API服务有明确定义的业务功能),它是应用业务逻辑的一部分。API Gateway可以具有内建的服务间通信能力,但它也可以使用Service Mesh来调用下游服务(API Gateway->Service Mesh->Microservices)。 + +在API管理层次,你可以使用API Gateway内建的服务间通信能力;也可以通过Service Mesh来调用下游服务,以将应用网络通信功能从应用程序转移到Service Mesh中。 + +## 译者按 + +API Gateway和Service Mesh的关系是我最近一直在思考的问题,也和同事及社区的朋友之间进行了一些讨论。这篇短文很清晰地总结了两者之间的相似之处以及这两者在微服务架构中的不同用途。 + +文章中提到“可以使用API Gateway内建的服务间通信能力;也可以通过Service Mesh来调用下游服务”。在和同事讨论时,大家提到一个比较重要的考虑因素是在API Gateway处引入一个Sidecar可能带来的额外延迟。 + +API Gateway作为微服务引用的流量入口,其对效率要求较高,如果随API Gateway部署一个Sidecar,可能对效率有一定影响。 + +我对此未进行测试,但从理论上来说,服务发现,重试,断路等逻辑无论放到API Gateway还是Service Mesh中耗时应该是差不多的,部署Sidecar只是增加了创建一个本地链接的消耗,如下图所示: + + +将API Gateway和Service Mesh的功能进行清晰划分,API Gateway负责应用逻辑,Service Mesh负责服务通讯,Metrics收集等微服务基础设施,这样划分后在架构上更为清晰。对于效率问题,我们可以考虑对API Gateway进行水平扩展来解决。 + +## 原文 + +本译文发表已征得原作者同意,原文参见 [Service Mesh vs API Gateway](https://medium.com/microservices-in-practice/service-mesh-vs-api-gateway-a6d814b9bf56) + diff --git a/exampleSite/content/post/2018-04-16-using-helm-to-deploy-to-kubernetes.md b/exampleSite/content/post/2018-04-16-using-helm-to-deploy-to-kubernetes.md new file mode 100644 index 0000000..cfabfac --- /dev/null +++ b/exampleSite/content/post/2018-04-16-using-helm-to-deploy-to-kubernetes.md @@ -0,0 +1,373 @@ +--- +layout: post +title: "Helm介绍" +subtitle: "强大的Kubernetes包管理工具" +description: "Helm是Kubernetes生态系统中的一个软件包管理工具。本文将介绍为何要使用Helm进行Kubernetes软件包管理,澄清Helm中使用到的相关概念,并通过一个具体的示例学习如何使用Helm打包,分发,安装,升级及回退Kubernetes应用。" +excerpt: "Helm是Kubernetes生态系统中的一个软件包管理工具。本文将介绍为何要使用Helm进行Kubernetes软件包管理,澄清Helm中使用到的相关概念,并通过一个具体的示例学习如何使用Helm打包,分发,安装,升级及回退Kubernetes应用。" +date: 2018-04-16 15:00:00 +author: "赵化冰" +image: "https://img.zhaohuabing.com/in-post/2018-04-16-using-helm-to-deploy-to-kubernetes/buffalo.jpg" +published: true +tags: + - Kubernetes + - Helm +categories: [ Tech ] +URL: "/2018/04/16/using-helm-to-deploy-to-kubernetes/" +--- + +## 前言 +- - - +Helm是Kubernetes生态系统中的一个软件包管理工具。本文将介绍为何要使用Helm进行Kubernetes软件包管理,澄清Helm中使用到的相关概念,并通过一个具体的示例学习如何使用Helm打包,分发,安装,升级及回退Kubernetes应用。 + +## Kubernetes应用部署的挑战 +- - - +让我们首先来看看Kubernetes,kubernetes提供了基于容器的应用集群管理,为容器化应用提供了部署运行、资源调度、服务发现和动态伸缩等一系列完整功能。 + +kubernetes的核心设计理念是: 用户定义应用程序的规格,而kubernetes则负责按照定义的规则部署并运行应用程序,如果应用系统出现问题导致偏离了定义的规格,kubernetes负责对其进行自动修正。例如应用规格要求部署两个实例,其中一个实例异常终止了,kubernetes会检查到并重新启动一个新的实例。 + +用户通过使用kubernetes API对象来描述应用程序规格,包括Pod,Service,Volume,Namespace,ReplicaSet,Deployment,Job等等。一般这些对象需要写入一系列的yaml文件中,然后通过kubernetes命令行工具kubectl进行部署。 + +以下面的wordpress应用程序为例,涉及到多个kubernetes API对象,这些kubernetes API对象分散在多个yaml文件中。 + +图1: Wordpress应用程序中涉及到的kubernetes API对象 + + + +可以看到,在进行kubernetes软件部署时,我们面临下述问题: +* 如何管理,编辑和更新这些这些分散的kubernetes应用配置文件? +* 如何把一套的相关配置文件作为一个应用进行管理? +* 如何分发和重用kubernetes的应用配置? + +Helm的引入很好地解决上面这些问题。 + +## Helm是什么? +- - - +很多人都使用过Ubuntu下的ap-get或者CentOS下的yum, 这两者都是Linux系统下的包管理工具。采用apt-get/yum,应用开发者可以管理应用包之间的依赖关系,发布应用;用户则可以以简单的方式查找、安装、升级、卸载应用程序。 + +我们可以将Helm看作Kubernetes下的apt-get/yum。Helm是Deis (https://deis.com/) 开发的一个用于kubernetes的包管理器。 + +对于应用发布者而言,可以通过Helm打包应用,管理应用依赖关系,管理应用版本并发布应用到软件仓库。 + +对于使用者而言,使用Helm后不用需要了解Kubernetes的Yaml语法并编写应用部署文件,可以通过Helm下载并在kubernetes上安装需要的应用。 + +除此以外,Helm还提供了kubernetes上的软件部署,删除,升级,回滚应用的强大功能。 + +## Helm组件及相关术语 +- - - +开始接触Helm时遇到的一个常见问题就是Helm中的一些概念和术语非常让人迷惑,我开始学习Helm就遇到这个问题。 + +因此我们先了解一下Helm的这些相关概念和术语。 + +* Helm + + Kubernetes的应用打包工具,也是命令行工具的名称。 +* Tiller + + Helm的服务端,部署在Kubernetes集群中,用于处理Helm的相关命令。 +* Chart + + Helm的打包格式,内部包含了一组相关的kubernetes资源。 +* Repoistory + + Helm的软件仓库,repository本质上是一个web服务器,该服务器保存了chart软件包以供下载,并有提供一个该repository的chart包的清单文件以供查询。在使用时,Helm可以对接多个不同的Repository。 +* Release + + 使用Helm install命令在Kubernetes集群中安装的Chart称为Release。 + +> 需要特别注意的是, Helm中提到的Release和我们通常概念中的版本有所不同,这里的Release可以理解为Helm使用Chart包部署的一个应用实例。 +> +> 其实Helm中的Release叫做Deployment更合适。估计因为Deployment这个概念已经被Kubernetes使用了,因此Helm才采用了Release这个术语。 + +下面这张图描述了Helm的几个关键组件Helm(客户端),Tiller(服务器),Repository(Chart软件仓库),Chart(软件包)之前的关系。 + +图2: Helm软件架构 + + +## 安装Helm +- - - +下面我们通过一个完整的示例来介绍Helm的相关概念,并学习如何使用Helm打包,分发,安装,升级及回退kubernetes应用。 + +可以参考Helm的帮助文档https://docs.helm.sh/using_helm/#installing-helm 安装Helm + +采用二进制的方式安装Helm + +1. 下载 Helm https://github.com/kubernetes/helm/releases +1. 解压 tar -zxvf helm-v2.0.0-linux-amd64.tgz +1. 拷贝到bin目录 mv linux-amd64/helm /usr/local/bin/helm + +然后使用下面的命令安装服务器端组件Tiller + +```bash +Helm init +``` + +## 构建一个Helm chart +- - - + +让我们在实践中来了解Helm。这里将使用一个Go测试小程序,让我们先为这个小程序创建一个Helm chart。 + +``` +git clone https://github.com/zhaohuabing/testapi.git; +cd testapi +``` + +首先创建一个chart的骨架 +``` +helm create testapi-chart +``` + +该命令创建一个testapi-chart目录,该目录结构如下所示,我们主要关注目录中的这三个文件即可: Chart.yaml,values.yaml 和 NOTES.txt。 +```Bash +testapi-chart +├── charts +├── Chart.yaml +├── templates +│ ├── deployment.yaml +│ ├── _helpers.tpl +│ ├── NOTES.txt +│ └── service.yaml +└── values.yaml +``` + +* Chart.yaml 用于描述这个chart,包括名字,描述信息以及版本。 +* values.yaml 用于存储templates目录中模板文件中用到的变量。 模板文件一般是Go模板。如果你需要了解更多关于Go模板的相关信息,可以查看Hugo (https://gohugo.io) 的一个关于Go模板的介绍 (https://gohugo.io/templates/go-templates/)。 +* NOTES.txt 用于向部署该chart的用于介绍chart部署后的一些信息。例如介绍如何使用这个chart,列出缺省的设置等。 + +打开Chart.yaml, 填写你部署的应用的详细信息,以testapi为例: +``` +apiVersion: v1 +description: A simple api for testing and debugging +name: testapi-chart +version: 0.0.1 +``` +然后打开并根据需要编辑values.yaml。下面是testapi应用的values.yaml文件内容。 + +``` +replicaCount: 2 +image: + repository: daemonza/testapi + tag: latest + pullPolicy: IfNotPresent +service: + name: testapi + type: ClusterIP + externalPort: 80 + internalPort: 80 +resources: + limits: + cpu: 100m + memory: 128Mi + requests: + cpu: 100m + memory: 128Mi +``` + +在 testapi_chart 目录下运行下面命令以对chart进行校验。 + +``` +helm lint +==> Linting . +[INFO] Chart.yaml: icon is recommended + +1 chart(s) linted, no failures +``` + +如果文件格式错误,可以根据提示进行修改;如果一切正常,可以使用下面的命令对chart进行打包: + +``` +helm package testapi-chart --debug +``` + +这里添加了 --debug 参数来查看打包的输出,输出应该类似于: + +``` +Saved /Users/daemonza/testapi/testapi-chart/testapi-chart-0.0.1.tgz to current directory +Saved /Users/daemonza/testapi/testapi-chart/testapi-chart-0.0.1.tgz to /Users/daemonza/.helm/repository/local +``` + +chart被打包为一个压缩包testapi-chart-0.0.1.tgz,该压缩包被放到了当前目录下,并同时被保存到了helm的本地缺省仓库目录中。 + +## Helm Repository +- - - +虽然我们已经打包了chart并发布到了helm的本地目录中,但通过Helm search命令查找,并不能找不到刚才生成的chart包。 +``` +helm search testapi +No results found +``` + +这是因为repository目录中的chart还没有被Helm管理。我们可以在本地启动一个Repository Server,并将其加入到Helm repo列表中。 + +通过helm repo list命令可以看到目前helm中只配置了一个名为stable的repo,该repo指向了google的一个服务器。 +```Bash +helm repo list +NAME URL +stable https://kubernetes-charts.storage.googleapis.com +``` + +使用helm serve命令启动一个repo server,该server缺省使用'$HELM_HOME/repository/local'目录作为chart存储,并在8879端口上提供服务。 + +```Bash +helm serve& +Now serving you on 127.0.0.1:8879 +``` +启动本地repo server后,将其加入helm的repo列表。 +```Bash +helm repo add local http://127.0.0.1:8879 +"local" has been added to your repositories +``` + +现在再查找testapi chart包,就可以找到了。 + +```Bash +helm search testapi + +NAME CHART VERSION APP VERSION DESCRIPTION +local/testapi-chart 0.0.1 A Helm chart for Kubernetes +``` + +## 在kubernetes中部署Chart +- - - +chart被发布到仓储后,可以通过Helm instal命令部署chart,部署时指定chart名及Release(部署的实例)名: +``` + helm install local/testapi-chart --name testapi +``` +该命令的输出应类似: + +``` +NAME: testapi +LAST DEPLOYED: Mon Apr 16 10:21:44 2018 +NAMESPACE: default +STATUS: DEPLOYED + +RESOURCES: +==> v1/Service +NAME TYPE CLUSTER-IP EXTERNAL-IP PORT(S) AGE +testapi-testapi-chart ClusterIP 10.43.121.84 <none> 80/TCP 0s + +==> v1beta1/Deployment +NAME DESIRED CURRENT UP-TO-DATE AVAILABLE AGE +testapi-testapi-chart 1 1 1 0 0s + +==> v1/Pod(related) +NAME READY STATUS RESTARTS AGE +testapi-testapi-chart-9897d9f8c-nn6wd 0/1 Pending 0 0s + + +NOTES: +1. Get the application URL by running these commands: + export POD_NAME=$(kubectl get pods --namespace default -l "app=testapi-testapi-chart" -o jsonpath="{.items[0].metadata.name}") + echo "Visit http://127.0.0.1:8080 to use your application" + kubectl port-forward $POD_NAME 8080:80 +``` + +使用下面的命令列出所有已部署的Release以及其对应的Chart。 +``` +helm ls +``` + +该命令的输出应类似: +``` +NAME REVISION UPDATED STATUS CHART NAMESPACE +testapi 1 Mon Apr 16 10:21:44 2018 DEPLOYED testapi-chart-0.0.1 default +``` + +可以看到在输出中有一个Revision(更改历史)字段,该字段用于表示某一Release被更新的次数,可以用该特性对已部署的Release进行回滚。 + +## 升级和回退 +- - - + +修改Chart.yaml,将版本号从0.0.1 修改为 1.0.0, 然后使用Helm package命令打包并发布到本地仓库。 + +查看本地库中的Chart信息,可以看到在本地仓库中testapi-chart有两个版本 + +```Bash +helm search testapi -l +NAME CHART VERSION APP VERSION DESCRIPTION +local/testapi-chart 0.0.1 A Helm chart for Kubernetes +local/testapi-chart 1.0.0 A Helm chart for Kubernetes +``` + +现在用helm upgrade将已部署的testapi升级到新版本。可以通过参数指定需要升级的版本号,如果没有指定版本号,则缺省使用最新版本。 + +``` +helm upgrade testapi local/testapi-chart +``` + +已部署的testapi release被升级到1.0.0版本 + +```Bash +helm list +NAME REVISION UPDATED STATUS CHART NAMESPACE +testapi 2 Mon Apr 16 10:43:10 2018 DEPLOYED testapi-chart-1.0.0 default +``` + +可以通过Helm history查看一个Release的多次更改。 + +```Bash +helm history testapi +REVISION UPDATED STATUS CHART DESCRIPTION +1 Mon Apr 16 10:21:44 2018 SUPERSEDED testapi-chart-0.0.1 Install complete +2 Mon Apr 16 10:43:10 2018 DEPLOYED testapi-chart-1.0.0 Upgrade complete +``` +如果更新后的程序由于某些原因运行有问题,我们则需要回退到旧版本的应用,可以采用下面的命令进行回退。其中的参数1是前面Helm history中查看到的Release的更改历史。 + +```Bash +helm rollback testapi 1 +``` + +使用Helm list命令查看,部署的testapi的版本已经回退到0.0.1 +```Bash +helm list +NAME REVISION UPDATED STATUS CHART NAMESPACE +testapi 3 Mon Apr 16 10:48:20 2018 DEPLOYED testapi-chart-0.0.1 default +``` +## 总结 +- - - + +Helm作为kubernetes应用的包管理以及部署工具,提供了应用打包,发布,版本管理以及部署,升级,回退等功能。Helm以Chart软件包的形式简化Kubernetes的应用管理,提高了对用户的友好性。 + +## Q&A +- - - + +昨天在Docker.io技术微信群里面进行了Helm的分享,下面是分享过程中得到的一些有意思的反馈,进一步启发了我自己的一些思考。 + +**Q**: Helm结合CD有什么好的建议吗?<BR> +**A**: 采用Helm可以把零散的Kubernetes应用配置文件作为一个chart管理,chart源码可以和源代码一起放到git库中管理。Helm还简了在CI/CD pipeline的软件部署流程。通过把chart参数化,可以在测试环境和生产环境可以采用不同的chart参数配置。 + +下图是采用了Helm的一个CI/CD流程 + + +**Q**: 感谢分享,请问下多环境(test,staging,production)的业务配置如何管理呢?通过heml打包configmap吗,比如配置文件更新,也要重新打chats包吗?谢谢,这块我比较乱<BR> +**A**:Chart是支持参数替换的,可以把业务配置相关的参数设置为模板变量。使用Helm install Chart的时候可以指定一个参数值文件,这样就可以把业务参数从Chart中剥离了。例子: helm install --values=myvals.yaml wordpress + +**Q**: helm能解决服务依赖吗?<BR> +**A**:可以的,在chart可以通过requirements.yaml声明对其他chart的依赖关系。如下面声明表明chart依赖apache和mysql这两个第三方chart。 +```yaml +dependencies: + - name: apache + version: 1.2.3 + repository: http://example.com/charts + - name: mysql + version: 3.2.1 + repository: http://another.example.com/charts +``` + +**Q**: chart的reversion 可以自定义吗?比如跟git的tag<BR> +**A**: 这位朋友应该是把chart的version和Release的reversion搞混了,呵呵。 Chart是没有reversion的,Chart部署的一个实例(Release)才有Reversion,Reversion是Release被更新后自动生成的。 + +**Q**: 没有看到helm指向k8s的配置,怎么确认在哪个K8s集群运行的?<BR> +**A**: 使用和kubectl相同的配置,在 ~/.kube/config 中。 + +**Q**: 这个简单例子并没有看出 Helm 相比 kubectl 有哪些优势,可以简要说一下吗?<BR> +**A**: Helm将kubernetes应用作为一个软件包整体管理,例如一个应用可能有前端服务器,后端服务器,数据库,这样会涉及多个Kubernetes 部署配置文件,Helm就整体管理了。另外Helm还提供了软件包版本,一键安装,升级,回退。Kubectl和Helm就好比你手工下载安装一个应用 和 使用apt-get 安装一个应用的区别。 + +**Q**: 如何在helm install 时指定命名空间?<BR> +**A**: helm install local/testapi-chart --name testapi --namespace mynamespace + +## 参考 +- - - + +* [Using Helm to deploy to Kubernetes](https://daemonza.github.io/2017/02/20/using-helm-to-deploy-to-kubernetes/) +* [Helm documentation](https://docs.helm.sh/helm/) +* [Helm - Application deployment management for Kubernetes](https://www.slideshare.net/alexLM/helm-application-deployment-management-for-kubernetes) + diff --git a/exampleSite/content/post/2018-05-01-may-day-jiulonghu.md b/exampleSite/content/post/2018-05-01-may-day-jiulonghu.md new file mode 100644 index 0000000..ab79880 --- /dev/null +++ b/exampleSite/content/post/2018-05-01-may-day-jiulonghu.md @@ -0,0 +1,137 @@ +--- +layout: post +title: "川西秘境探险" +subtitle: "2018五一甘堡藏寨,九龙湖自驾游记" +date: 2018-05-01 +author: "赵化冰" +image: "https://img.zhaohuabing.com/in-post/2018-05-01-may-day-jiulonghu/snowmountain.jpg" +published: true +hide-in-home: true +tags: + - Travel +categories: [ Life ] +URL: "/2018/05/01/may-day-jiulonghu" +--- + +## 寻浮云牧场不遇 + +五一节前的一周内,几个朋友就纷纷坐不住了,一个二个不再安心上班,开始在微信群里讨论过节要到哪里耍。 +大家思来想去,最后决定还是去理县方向。因为根据多年自驾的经验,只要出了汶川,沿途都是风景。 + +<!--more--> +放假第一天和第二天上午老婆加班,我在家里陪女儿做作业,提前把车油加好,准备路上的衣物。第二天中午老婆上完班,我迫不及待开着小狮子就向都汶高速出发了。虽然加班耽误了一天半,但我们这次也算错峰出行了,一路上畅通无阻,心情自然也比较愉快。 开车1个多点小时就赶到了汶川,这时朋友一家刚在汶川县城吃完午饭,我们在出汶川不远,桃坪羌寨附近胜利会师了。 + +两位领导一起协商了一下,决定先开车去通化乡的“浮云牧场”看看。“浮云牧场”是最近的一个网红酒店,在通化乡山上的一个藏寨旁边。有道是:“浮云牧场”,不放牛羊,只牧浮云和姑娘。 + +“浮云牧场”走的是网红路线,马蜂窝,微信公众号的宣传做得好,知名度较高,房间比较紧俏,在五一期间更是一房难求,而且价格也比较感人。两位领导都持家有方,指示我们上去看看风景,然后下山再找住宿。 + +过了桃坪羌寨大概几公里,317国道右边有一个比较明显的指路牌,往右上山,就是到浮云牧场的路。我们兴冲冲地开车上了山,此时,我们心中向往的浮云牧场是这样子的(取图自网络): + +上山的路况还可以,但比较窄,回头弯较多,需要注意对方来车。开了将近1小时后,来到了半山腰,对面来了好几辆下山的车。由于两方相遇的路面较窄,开始堵车了。这时乘机向对方打听了山上的情况,得知酒店封路了,只有预定了房间的人才能进入浮云牧场。 + +得知这个消息,此时我们的内心是崩溃的,已经开了一大半的山路,现在却得知不能进去。没有办法,大家商量后还是决定下山。不过“塞翁失马,焉知非福”,这次没进入浮云牧场,为第二天探秘一个新景点埋下伏笔,现在暂时不表。于是我和朋友调转车头,悻悻下山,败意而回。 + + +## 夜宿甘堡藏寨 +下山后,大家商量晚上的住宿。我觉得桃坪羌寨靠路边,环境也一般,提议去靠近理县的甘堡藏寨。朋友因为在桃坪羌寨住过了,因此也想去另外的地方试试。于是一路向理县方向进发,由于限速较低,车辆也开始多了起来,感觉没多远的距离,开了接近1小时,6点左右来到了甘堡藏寨。 + +最后一个靠小河边的藏家乐入住,一个标间240元,包3个人一顿晚饭,一顿早饭。我和朋友两家分别在二楼和三楼的两间房间住下。这里得表扬一下领导,每次出来耍选择的住宿都挺好,性价比高,住着也舒服。 + +这是一个河边的小院,有三层楼,院子里面种满了各种植物和花卉,老板是个很和气的中年人,把小院收拾得很舒服。房间里挺宽敞,床上套着雪白的床单,非常干净整洁。 + +院子里的洋槐树树冠上开满了白色的小花,配着嫩绿的树叶和攀缘的蔷薇,感觉非常的清新和惬意。 + + +老板的三层小楼,这里的修房的材料不是砖头,而是就地取材用山上的片状岩石修砌而成的,很有特色。 + + +窗户旁边挂着金黄色的玉米。 + + +院子里种的玫瑰花。 + + +我们和老板闲聊,提到今天没得进到浮云牧场,老板笑道:这浮云牧场的景色我们这里到处都有,只是浮云牧场有老板投资,宣传做得好罢了。这后面山上就有草场,还有一个九龙湖,就挺好耍。我们听了,赶紧向老板仔细打听线路和路况,跃跃欲试,打算明天去探寻这个尚未开发的野景点。 + +不一会儿,麻利的老板和老板娘就把晚餐准备好了。我们和其他客人一起围桌吃晚饭。晚餐味道不错,好些是城里平时吃不到的东西。例如有老腊肉,核桃花,和一些不知名的野菜,非常爽口开胃。我带了一瓶红酒,和朋友们一起就着这山野美味,好不畅快。 + +晚上小朋友闹着要玩游戏,于是先一起玩了一会儿游戏,洗漱之后,便倒在床上酣然入梦。是夜,半梦半醒之间,窗外潺潺的河水声,院子里淡淡的槐花香仿佛也潜入梦来。 + + +## 甘堡藏寨风情 +昨晚虽然睡得不是很熟,但藏家院子里空气清新,精神恢复得很快,我没到七点就醒了。起床和大家一起吃了早饭,早饭是烤馍,鸡蛋,咸菜和稀饭。吃完饭后,陪孩子们去寨子里逛了一下。寨子不大,半个小时就能走完,街上摆着一些小摊,售卖一些民族特色的小饰品。 + + +两个小朋友在小摊上找自己喜欢的小饰品,摊主是一个十八九岁的小姑娘,她平时在成都读书,放假回来摆个小摊勤工俭学。最后照顾她生意,给每个小朋友买了一个十多块钱的小玩意。 + + +寨子墙上的石板画,画的是藏族传说中的英雄人物格萨尔王。 + +## 探秘九龙湖 +我逛完寨子,其余人也收拾妥当了。向老板告辞后,我们准备向九龙湖进发。细心的老板怕我们找不到地方,特意给我们画了一张地图。 + + +开车顺着河边一路上山,很快就上了盘山公路。路面是水泥的,有护栏,只是路比较窄,很对地方只能容一车通过。川西山区的路基本都是这样之字形的,回头弯很多,这种回头弯一般有30到40度的坡度。我家的小狮子是1.6的,如果速度开慢点的话,过弯时得用一档。 + + +山路两边的风景很美,低海拔地区有很多樱桃树,核桃树以及开满了花的洋槐树。洋槐花蜜过一段时间就会上市了,很香的。我们摘了一些花带回家,杨槐花焯水后可以炒蛋,也可以和在面里面吃。 + + +树上结满了樱桃,别看樱桃树不高,一棵树可以产两百斤樱桃。 + + +再往上开,到了海拔高一点的地方,乔木就比较少了,路两边多是低矮的绿色灌木,以及不知名的小花。五月间的植物都是嫩绿嫩绿的,煞是好看。 + + + +看到几头牛在路边吃草,看这淡定的眼神!山路边还时不时冒出一群小黑猪,目测就是一只就十多斤重,想给它们拍张照片,飞快地钻进灌木丛里面了,只好作罢。川西山里和草原上这种猪都是这样像牛羊一样放养的。我们流着口水说这个是资格的跑山猪,味道肯定巴适! + + +半山上的几户藏家。 + + +开到最高的一个寨子后,后面的路就是土路了。向寨子里一个大姐打听了一下,大姐信誓旦旦地说这两天没下大雨,轿车开上去没问题,于是我们就继续往上开了。 + +上土路后不久,遇到一个搭车的老爷子,他要去山顶的寺庙烧香。我们的运气也挺好,要不是老人家陪我们一起,后面我们不一定找得到地方。 + + +开了一段土路后,发现路比较窄,路边就是悬崖,而且没有护栏。老婆娃儿都说还是停下来走路上去算了。于是和朋友找了一个路口把车停到路边,开始走路上山。朋友停车后说,在前面几个转弯的地方,开车时脚趾拇都抓紧了。 + +最后一段就是这种路,地面硬化程度不错,没有下雨的情况下,胆子大点的老师傅可以开上山。 + + +老爷子说这个路开车完全没得问题嘛,他看到别人都开车上去的。我们是不敢继续往前开了,他也只好下车和我们一起走。我一边走一边和老人家聊天,得知他已经高寿76了,完全看不出来,腰板硬朗,牙齿健全,走路比我们年轻人还快。老人家自豪地说他寨子阳光好,地肥沃,种什么粮食产量都高。 + +老人家所在的寨子,地里面已经种上了玉米。 + + +我继续和老爷子边走边聊,老爷子告诉我,走山路要不紧不慢,快了容易呼吸不畅,引起高原反应。还给我介绍路边的各种植物,哪种可以食用。从聊天中得知,大爷姓何,祖上是从陕西迁移到这里的,到他这里已经是第九代了。家里有四个女儿,都在理县做生意或者打工,寨子的家里就他和老伴。他说他喜欢住在山里,一年也出不了几次山。 +看得出老爷子很高兴有人能陪他说说话,住在山里虽然空气好,但子女不在身边,老人平时估计也比较寂寞。 + +老爷子说这种野菜煮汤喝很香。 + + +转过一个弯,听见路边的灌木丛中“噗噗”的声音,飞出一只长尾巴的大鸟来,老爷子说那是野鸡。太快了没能拍到照片。 + +就这么慢慢地走了将近1小时,来到了山顶上。 + +令人惊奇的是,虽然上山的路很陡,但山顶上却非常开阔,有一大片草坝子。从山顶上可以隐约看到对面巍峨的雪山,今天天气不是很好,能见度不高,如果是在晴天的话,肯定非常壮观。 + + +山顶搭建了一个台子和一个草房。大爷说这是举行节日的时候的临时厨房。每年有三个时间山顶的草坝上会举行锅庄舞会。这个木板上标注了山顶上望过去的几座雪山,可以看到最高的大黄峰有将近6000米高。 + + +山顶还有一个小秋千,两个小孩在上面玩得不亦乐乎。 + + +我对比了网上浮云牧场的图片,感觉这个山顶的雪山比浮云牧场更雄伟。这座山的风景也更好,树木,灌木,草地层次分明;而浮云牧场上山的路上很多地方是光秃秃的。 + +到山顶后,再往前走大约500米,翻过一个小山坡就到了九龙湖,但是湖中长满了草,没有水。大爷说现在水不多,九龙湖一共有九个海子,前面的海子还比较远。此时天空飘起了小雨,由于担心下雨后下山的路湿滑不安全,我们和大爷就此告别,开始下山了。离别时,大爷热情地给我说他家在寨子里面的位置,让我们下次过来耍时再来找他。大爷钻进灌木,很快就不见了,看着他消失的背影,我心想,下次到这边来耍时,希望还能遇到这个开朗乐观的何大爷。 + +下山的路比上山要轻松多了,大家有说有笑,很快就走到了停车的地方,一路开下山。然后走317,都汶,成灌回了成都。路上有一点小堵,但一切都很顺利,回到成都时也才6点左右。 + + +> 请注意:川西地区山路路况复杂,请勿根据博客内容自行前往,否则一切后果自负。 + + + diff --git a/exampleSite/content/post/2018-05-06-cryptocurrency_week1.md b/exampleSite/content/post/2018-05-06-cryptocurrency_week1.md new file mode 100644 index 0000000..6468da9 --- /dev/null +++ b/exampleSite/content/post/2018-05-06-cryptocurrency_week1.md @@ -0,0 +1,35 @@ +--- +layout: post +title: "Introduction to crypto and cryptocurrencies" +subtitle: "Bitcoin and Cryptocurrency Technologies-Week 1" +date: 2018-05-06 +author: "赵化冰" +image: "https://img.zhaohuabing.com/in-post/2018-05-06-cryptocurrency_week1/bitcoin_1.jpg" +description : "I have noticed the buzzwords “Bitcoin” and “Blockchain” for a while. There are lots of articles, news, and talks around them. It seems that many people believe that cryptocurrency is the future of online payment, some even claim that blockchain would become the fundamental technology of the next generation of the Internet." +published: true +tags: + - Cryptocurrency + - Blockchain + - Bitcoin +categories: [ Note ] +URL: "/2018/05/06/cryptocurrency_week1" +--- + +> This series of articles are my notes of "Bitcoin and Cryptocurrency Technologies" online course. + +## How did I get into this? +I have noticed the buzzwords “Bitcoin” and “Blockchain” for a while. There are lots of articles, news, and talks around them. It seems that many people believe that cryptocurrency is the future of online payment, some even claim that blockchain would become the fundamental technology of the next generation of the Internet. +<!--more--> + +Given its popularity, I can’t help thinking that should I also invest in it? Maybe investing money in Bitcoin or other cryptocurrencies is too risky now, but at least I could try to learn the technologies behind these. So one day I could use this knowledge to help me estimate a potential cryptocurrency investment opportunity, or maybe find a job :-) + +## What's my finding of blockchain and cryptocurrency learning materials? +I did some searches and found so many materials about Bitcoin and Blockchain. Some of them did good jobs at explaining parts of the whole picture, But it’s a big topic so I think a systematic learning path makes more sense. + +Finally, I found this amazing “Bitcoin and Cryptocurrency Technologies” online course. It's created by the professors of Princeton University. The course has a series of well-organized lecture videos explaining the technologies behind Bitcoin from the very beginning to more advanced topics. It also has programming practices after each lecture so you can get hands in the codes and get a better understanding of the theories you got from the videos. + +I encourage anyone who is interested in cryptocurrency to attend this wonderful online course. You will not only get a chance to learn the theories and technical details behind the popular Bitcoin but also even be able to create your own version of cryptocurrency after finishing this course! The last important thing is that it's totally free! What you need to do to gain all of these is just watching the course videos and try to practice and finish your programming assignments. The course is mobile friendly, so you can even watch the course on your mobile phone when commuting on the subway, that's exactly what I'm doing, a great way to make use of the fragmented time. + +You can find the online course here: [Bitcoin and Cryptocurrency Technologies](https://www.coursera.org/learn/cryptocurrency) + +[Example codes on GitHub](https://github.com/zhaohuabing) diff --git a/exampleSite/content/post/2018-05-07-cryptocurrency_week1_cryptographic_hash_function.md b/exampleSite/content/post/2018-05-07-cryptocurrency_week1_cryptographic_hash_function.md new file mode 100644 index 0000000..b6101ac --- /dev/null +++ b/exampleSite/content/post/2018-05-07-cryptocurrency_week1_cryptographic_hash_function.md @@ -0,0 +1,156 @@ +--- +layout: post +title: "Cryptographic Hash Function" +subtitle: "Bitcoin and Cryptocurrency Technologies-Week 1" +date: 2018-05-09 22:00:00 +author: "赵化冰" +image: "https://img.zhaohuabing.com/in-post/2018-05-06-cryptocurrency_week1/bitcoin_3.jpg" +description: "Hash function can produce a fixed lenght digest of any size of data, and the original data can not be found out if it's properly used." +published: true +tags: + - Cryptocurrency + - Blockchain + - Bitcoin +categories: [ Note ] + +URL: "/2018/05/07/cryptocurrency_week1_cryptographic_hash_function" +--- + +> This series of articles are my notes of "Bitcoin and Cryptocurrency Technologies" online course. + +## Hash Function +Hash function is a mathematical function:*H(X)=Y* +* H: A hash function which takes an input value and calculates an output value +* X: Input of the hash function, it could be any data of any length +* Y: Output of the hash function: a fix-size bit(, it can be 256, 384, 516 ..., Bitcoin uses 256) +<!--more--> + +## Cryptographic Properties + +A hash function which is used for cryptographic purposes should have these properties: + +### Collision Free + +**Definition:** + +A hash function H is said to be collision free if: +It's infeasible to find two values X1 and X2, such that *X1!=X2*, yet *H(X1)=H(X2)* +Or in other words, +It's infeasible to find two inputs which can produce the same outputs. + +**Explaination:** + +The collision does exist because the inputs can be any data and the outputs are only 2 to 256 possibilities. + +But for a good hash function, it's just impossible to find them in an acceptable time frame even use all the computers to solve this together on the earth. + +We can use this property of hash functions to create a digest for a given data. By comparing the hash digests, we can tell if a big file is modified or corrupted during a transmission, which is often used in downloading a software. + +### Hiding + +**Definition:** + +A hash function H is hiding if: +when a secret value R is chosen from a highly spread-out distribution that, then given the hash result of *H( R/|X)*, it is infeasible to find X. /| means concatenation of two strings. + +**The Problem We Want to Solve:** + +We want a hash function that it's infeasible to find out the input by the output of a hash function. + +The problem is that if there are only a few values of inputs, it will be very easy to figure out what the input is by the output by simply trying all the possible values of inputs and see if they match the output. + +**Solution:** + +Concatenating input with a random R which is randomly chosen from a highly spread-out distribution like this: *H( R/|X)* + +**Explanation:** + +With R appended to the input, now it's infeasible to figure out what input is by just traversing all the values because there're too many possibilities. + +R is used to hide the input, by using R, the Hash function can hide the input while exposing the output. + +#### Two Uses of Hiding Property +##### 1. Commitment +This use of hiding property is explained in the lecture. + +**Scenario:** + +We want to make a commitment, keep it as a secret, and reveal it later to others. + +**Requirements:** + +* The commitment can't be seen until it's revealed +* The commitment can't be changed. +* Other people can verify the commitment once it's revealed + +**Implementation:** + +*hash(message/|key)=commitment* + +* Message: the commitment we want to make, which may only have a few values. +* Key is a generated value from a spread-out distribution used to hide the message +* commitment: the hash of message concatenated with the key + +**Explanation:** + +1. You want to make a commitment, the message, to others. It could be any message. +2. You choose a generated key which is used to hide the message. +3. You get the hash of the key message combination. +4. You publish the hash result, which is the commitment, to others and keep the key and message only to yourself. So other people know you have made a commitment, but they don't know what exactly it is. +5. After a while, you decide to reveal the commitment, so you publish the key and message. +6. Other people can use the hash function *hash(message/|key)* to calculate the hash result, compare it with the hash(commitment) you previously published. If it's the same, they can verify that you didn't change the commitment you have made. + +> * Because a key is used to hide the message, other people can't figure out what's the message before you reveal it. +> * Because of collision-free property, you can't find a message' such that *hash(message'/|key)=hash(message/|key)*, so it's impossible to change the committed message after publishing it. + +##### 2. Secure Password +Another common use of hiding property of hash is to secure passwords. + +**Scenario:** + +A website needs to verify the user password when user login. Instead of storing the password in the system, a more secure approach is just storing the hash of the password and compare the hash to verify the user. By this way, the user password won't be at risk even the system is broken by attackers because the attackers can't get the password by the hash. + +But there's still a problem, many people tend to use simple words as their passwords. Attackers can make a long list of common passwords used by people, calculate the hash of these passwords in advance, and use these hashes to attack the system to figure out what's the password. It's called a rainbow attack. + + +**Solution:** + +Use a randomly generated 'salt' to safeguard the password. + +*hash(password/|salt)=output* + +**Explanation:** + +To solve this problem, we can append a generated random value to the password, this value is often called 'salt'. Salt is saved along with the hashed password in the system. So the system can get the hash out of the combination of user password and salt, compare it with the stored hash to verify user identity. + +By appending a salt to the password, attackers can no longer use a pre-calculated password-hash map to attack the system. Even two users happened to choose the same string as their passwords, the hashes stored in the system are different because their salts are different, which is randomly generated. + +**Example:** + +> This example is excerpted from [wikipedia](https://en.wikipedia.org/wiki/Salt_(cryptography) ) + +| Username|Password|Salt value| String to be hashed|Hashed value = SHA256 (Password + Salt value)| +| ------- |--------| ---------| ---------|---------| +|user1|password123|E1F53135E559C253| password123+E1F53135E559C253| 72AE25495A7981C40622D49F9A52E4F1565C90F048F59027BD9C8C8900D5C3D8| +|user2|password123|84B03D034B409D4E|password123+84B03D034B409D4E| B4B6603ABC670967E99C7E7F1389E40CD16E78AD38EB1468EC2AA1E62B8BED3A| + +As the table above illustrates, different salt values will create completely different hashed values, even when the plaintext passwords are exactly the same. Additionally, dictionary attacks are mitigated to a degree as an attacker cannot practically precompute the hashes. However, a salt cannot protect against common or easily guessed passwords because the attacker can still combine the salt with all the possible password in the dictionary and try to match the hash of the combinations with the hashed value stored in the attached target. The salt just makes the attack more difficult because attackers need two additional steps: 1. find out the salt of the attacked target 2. Calculate the hash every time + +### Puzzle-Friendly + +**Definition:** + +A hash function H is said to be puzzle-friendly if: +Given an R which is chosen from a highly spread-out distribution and a target set Y. +Try to find a solution X such that *H(R/|X) $$/in$$ Y*. +There is no solving strategy to find X much better than just trying every possible value of X. + +**Usage:** + +Puzzle-friendly property is used for Bitcoin mining. The miner needs to find out a specific number R, which is concatenated with the data of the block, and the hash of the combination should fall into a certain range. The first one who solves this puzzle can add the outstanding transaction into the blockchain and get Bitcoin as the reward. + +Bitcoin Minding Puzzle: find R such that *H(R/|BlockData) $$/in$$ ValidRange* + +## SHA-256 +SHA-256 is the hash function used in Bitcoin which has all the three needed properties. + diff --git a/exampleSite/content/post/2018-05-12-cryptocurrency_week1_digital_signature.md b/exampleSite/content/post/2018-05-12-cryptocurrency_week1_digital_signature.md new file mode 100644 index 0000000..aa1b1c1 --- /dev/null +++ b/exampleSite/content/post/2018-05-12-cryptocurrency_week1_digital_signature.md @@ -0,0 +1,87 @@ +--- +layout: post +title: "Digital Signature and Public Key as Identities" +subtitle: "Bitcoin and Cryptocurrency Technologies-Week 1" +date: 2018-05-15 +author: "赵化冰" +description: "Some fundamental cryptographic technologies in Bitcoin: Asymmetic encryption(Public/Private key), Digital Signature, Digital Identity(Public key and Digital Certificate)." +image: "https://img.zhaohuabing.com/in-post/2018-05-06-cryptocurrency_week1/bitcoin_header.jpg" +published: true +tags: + - Cryptocurrency + - Blockchain + - Bitcoin + - Digital Signature +categories: [ Note ] +URL: "/2018/05/12/cryptocurrency_week1_digital_signature" + +--- + +> This series of articles are my notes of "Bitcoin and Cryptocurrency Technologies" online course. +<!--more--> + +## Digital Signature +Just like a written signature of a document, but it's in digital form. The desired features: +* Only you can sign your own signature +* Everyone can verify your signature +* A signature is tied to a certain document, it can't be copied and used with other documents +<!--more--> + +## How to Sign and Verify a Digital Signature +### Generate a Pair of Public Key and Secrete/Private Key +**(sk, pk) := generates(keysize)** + +The mathematics feature of public/private key pair: Messages encrypted with private can only be decrypted with the public key, and vice versa. +You keep the private key to yourself and publish the public key to others. +Because only you have the private key, so if anyone who receives an encrypted message and the message can be decrypted with your public key, they can make sure that the message is sent from you. +### Sign a Message with the Private Key +**signature: = sign(sk, message)** + +We usually sign the hash of the message rather than the message itself. +It's because singing a fixed size hash(such as 256 bit) is much more efficient than signing a long message, and the collision-free feature of hash function can assure that no one can forge another message which has the same hash. +So the sign function is like: +**signature := encrypt(sk, hash(message))** +### Verify the Signature with Message +Others receive a message with a signature which is claimed to be sent by the signer. +They verify the message with the public key of the signer, which has already been published to all. +**isValid := verify(pk, message, signature)** + +Like I mentioned before, we usually sign the hash of the message, so the verify function is like: +**isValid := isEqual(decrypt(pk, hash(message)), signature)** + + +## Use Digital Signature with Cryptocurrency +Signing a hash pointer is identical to signing the whole structure of the data in the hash pointer points to. +* Sign the head hash pointer of a blockchain(LinkedList) is identical to sign all the transaction data in the blockchain +* Sign the root of a Merkle tree is identical to sign all the transaction data in the Merkle tree + +Explanation: +Because modification of any part in the data structure will result inconsistent at the head/root, so as long as we have verified the digital signature of the head/root, we can know for sure that the whole structure can't be forged because no one can create a fake data structure with the same head/root. + +## Public Key as Identities + +Because only the owner of the public key knowns the matching private key, so only the owner can send out a message signed with that private key. + +If we can verify the signature of a message with a public key,we can be sure that message has been sent out on behalf of the person behind of that public key,in other word,the public key is an identity of that person. + +There are two kinds of identities +### Certificated Identities + In some cases, such as signing a business contract or sending an email, you need to let the other side know who you are and able to verify your true identity, such as your name, your organization, so they can trust you when doing business with you. + +But how can people make sure the public key they received is the original one it is claimed to be? How can people know that the public key has not been modified by a middleman or it is not forged by an attacker? + +To solve this kind of trust issues in the public key publishing process, we introduced the digital certificate, which is a document consists of a public key, user identity and a signature of a trusted authority. The public key of the trusted authority has already been planted into operating systems or browsers, it's called root certificate. + +Obtain a digital certifacte from an authority + +Verify a digital signature using a certificate issued by an authority + + +### Anonymous Identities +Sometimes, you may want to keep anonymous, in that case, you just publish your public key without a certification. One example is the identiy in Bitcoin, you might not want to let others known how many money you have, especially you have a lot and prefer to keep a low profile. + +Even without certification, you can still use that anonymous identity(the public key) to do business with others as long as the people don't care who exactly you are. + +## Example Codes on GitHub +* [Digital Signature example in Java](https://github.com/zhaohuabing/digital-signature) + diff --git a/exampleSite/content/post/2018-05-12-cryptocurrency_week1_hash_pointer_and_data_structures.md b/exampleSite/content/post/2018-05-12-cryptocurrency_week1_hash_pointer_and_data_structures.md new file mode 100644 index 0000000..f95e714 --- /dev/null +++ b/exampleSite/content/post/2018-05-12-cryptocurrency_week1_hash_pointer_and_data_structures.md @@ -0,0 +1,64 @@ +--- +layout: post +title: "Hash Pointers and Data Structures" +subtitle: "Bitcoin and Cryptocurrency Technologies-Week 1" +author: "赵化冰" +date: 2018-05-12 +image: "https://img.zhaohuabing.com/in-post/2018-05-06-cryptocurrency_week1/blockchain.png" +published: true +description: "Hash pointer is used to bulid some key data structures in cryptocurrency, such as Block chain and Merkel tree." +tags: + - Cryptocurrency + - Blockchain + - Bitcoin +categories: [ "Note" ] +URL:: "/2018/05/12/cryptocurrency_week1_hash_pointer_and_data_structures/" + +--- + +> This series of articles are my notes of "Bitcoin and Cryptocurrency Technologies" online course. + +## Hash Pointer +Hash Pointer is comprised of two parts: +* Pointer to where some information is stored +* Cryptographic hash of that information +The pointer can be used to get the information, the hash can be used to verify that information hasn't been changed + +<!--more--> + +## Data Structures Built with Hash Pointers + +### Blockchain +Hash pointers can be used to build a linked list, which is also called a blockchain. + + +We should Note that the hash stored in the hash pointer is the hash of the whole data of the previous block, which also includes the hash pointer to the block before that one. This makes it's impossible to tamper a block in the blockchain without letting others know. + +**Tamper Evident Property of Blockchain** +We only need to keep the hash pointer to the last block of the blockchain. Then when somebody shows the whole blockchain later and claim the data in it is not modified, we can tell if any block in the chain is tampered by traversing the blocks backwards and verifying the hashes one by one. + +**Explanation** +* An attacker wants to tamper with one block of the chain, let's say, block 1. +* The attacker changed the content of block 1, because of "collision free" property of the hash function, he is not able to find another data which has the same hash with the old one. So now the hash of this modified block is also changed. +* To avoid others noticing the inconsistency, he also needs to change the hash pointer of that block in the next block, which is block 2. +* Now the content of block 2 is changed, so to make this story consistent, the hash pointer in block3 must be changed. +* Finally, the attacker goes to the hash pointer to the last block of the blockchain, which is a roadblock for him, because we keep and remember that hash pointer. + + + +### Merkle Tree +Merkle tree is a binary tree building with hash pointers. The leaves are data blocks, nodes further up in the tree are the hashes of their respective children. + + + +**Features** +* **Tamper evident** +Just like blockchain, we only need to remember the hash pointer in the root (top-level node), then we can traverse down to any leaf data block to check if a node is in the tree or has it been tampered with. +* **Traversal efficiency** +To verify a data block, we only need to traverse the path from the top to the leaf where the data is. So the complexity is O(log n), which is much more efficient compared with O(n) of a linked list blockchain. +* **None-membership proof** +If Merkel tree is sorted, we can prove a given data is not in the tree: if the data before and after the given data are both in the tree and they're consecutive, so there's no space between them, this proves that the given data is not in three. + +## Example Codes on GitHub +* [Blockchain Implementation in Java](https://github.com/zhaohuabing/blockchain) +* [Merkle Tree Implementation in Java](https://github.com/zhaohuabing/merkle-tree) diff --git a/exampleSite/content/post/2018-05-20-cryptocurrency_week1_scroogecoin.md b/exampleSite/content/post/2018-05-20-cryptocurrency_week1_scroogecoin.md new file mode 100644 index 0000000..d6b7e15 --- /dev/null +++ b/exampleSite/content/post/2018-05-20-cryptocurrency_week1_scroogecoin.md @@ -0,0 +1,181 @@ +--- +layout: post +title: "Programming Assignment: Scrooge Coin" +subtitle: "Bitcoin and Cryptocurrency Technologies-Week 1" +date: 2018-05-20 +author: "赵化冰" +description: "Finally, I got to the most exciting part of week 1 lectures-the programming assignment!" +image: "https://img.zhaohuabing.com/in-post/2018-05-06-cryptocurrency_week1/programming.jpg" +published: true +tags: + - Cryptocurrency + - Bitcoin +categories: [ Note ] +URL: "/2018/05/20/cryptocurrency_week1_scroogecoin/" + +--- + +> This series of articles are my notes of "Bitcoin and Cryptocurrency Technologies" online course. + +Finally, I got to the most exciting part of week 1 lectures-the programming assignment! +<!--more--> +I'm supposed to submit the assignment earlier because it was due a few weeks ago, however, I'd like to keep my pace relatively slow. I can't invest my full time to this course because I have a job to do, so I only take this course in my spare time. I also would like to digest all the information in one lesson before moving on to the next. Some fundamental technologies such as hash function, hash pointer, blockchain, Merkel tree and digital signature have been well-explained in week 1 lectures. In order to better understand these technologies, I also did some searches and programming practices, which can be found in my previous posts. + +<!--more--> +It turns out that writing posts on my blog is a better way to learn, I have to fully understand the lessons before I can explain them in my posts. + +## Scrooge Coin Transaction +Scrooge Coin programming assignment is a little bit tricky, the video of this lesson hasn't explained some implementation details. To help you understand the transaction data structure used in Scrooge Coin, I draw this diagram: + + +Every transaction has a set of inputs and a set of outputs. An input in a transaction must use a hash pointer to refer to its corresponding output in the previous transaction, and it must be signed with the private key of the owner because the owner needs to prove he/she agrees to spend his/her coins. + +Every output is correlated to the public key of the receiver, which is his/her ScroogeCoin address. + +In the first transaction, we assume that Scrooge has created 10 coins and assigned them to himself, we don't doubt that because the system-Scroogecoin has a building rule which says that Scrooge has right to create coins. + +In the second transaction, Scrooge transferred 3.9 coins to Alice and 5.9 coins to Bob. The sum of the two outputs is 0.2 less than the input because the transaction fee was 0.2 coin. + +In the third transaction, there were two inputs and one output, Alice and Bob transferred 9.7 coins to mike, and the transaction fee was 0.1 coin. + +## Unclaimed transaction outputs pool +Another trick we need to Note when doing the programming assignment is that an UTXOPool is introduced to track the unclaimed outputs (unspent coins), so we can know whether the corresponding output of an input of the transaction is available or not. + +## TxHandler Java Code +``` +import java.security.PublicKey; +import java.util.ArrayList; +import java.util.HashSet; +import java.util.List; +import java.util.Set; + +public class TxHandler { + private UTXOPool utxoPool; + + /** + * Creates a public ledger whose current UTXOPool (collection of unspent + * transaction outputs) is {@code utxoPool}. This should make a copy of utxoPool + * by using the UTXOPool(UTXOPool uPool) constructor. + */ + public TxHandler(UTXOPool utxoPool) { + this.utxoPool = new UTXOPool(utxoPool); + } + + /** + * @return true if: (1) all outputs claimed by {@code tx} are in the current + * UTXO pool, (2) the signatures on each input of {@code tx} are valid, + * (3) no UTXO is claimed multiple times by {@code tx}, (4) all of + * {@code tx}s output values are non-negative, and (5) the sum of + * {@code tx}s input values is greater than or equal to the sum of its + * output values; and false otherwise. + */ + public boolean isValidTx(Transaction tx) { + Set<UTXO> claimedUTXO = new HashSet<UTXO>(); + double inputSum = 0; + double outputSum = 0; + + List<Transaction.Input> inputs = tx.getInputs(); + for (int i = 0; i < inputs.size(); i++) { + Transaction.Input input = inputs.get(i); + + if (!isConsumedCoinAvailable(input)) { + return false; + } + + if (!verifySignatureOfConsumeCoin(tx, i, input)) { + return false; + } + + if (isCoinConsumedMultipleTimes(claimedUTXO, input)) { + return false; + } + + UTXO utxo = new UTXO(input.prevTxHash, input.outputIndex); + Transaction.Output correspondingOutput = utxoPool.getTxOutput(utxo); + inputSum += correspondingOutput.value; + + } + + List<Transaction.Output> outputs = tx.getOutputs(); + for (int i = 0; i < outputs.size(); i++) { + Transaction.Output output = outputs.get(i); + if (output.value <= 0) { + return false; + } + + outputSum += output.value; + } + + // Should the input value and output value be equal? Otherwise the ledger will + // become unbalanced. + // The difference between inputSum and outputSum is the transaction fee + if (outputSum > inputSum) { + return false; + } + + return true; + } + + private boolean isCoinConsumedMultipleTimes(Set<UTXO> claimedUTXO, Transaction.Input input) { + UTXO utxo = new UTXO(input.prevTxHash, input.outputIndex); + return !claimedUTXO.add(utxo); + } + + private boolean verifySignatureOfConsumeCoin(Transaction tx, int index, Transaction.Input input) { + UTXO utxo = new UTXO(input.prevTxHash, input.outputIndex); + Transaction.Output correspondingOutput = utxoPool.getTxOutput(utxo); + PublicKey pk = correspondingOutput.address; + return Crypto.verifySignature(pk, tx.getRawDataToSign(index), input.signature); + } + + private boolean isConsumedCoinAvailable(Transaction.Input input) { + UTXO utxo = new UTXO(input.prevTxHash, input.outputIndex); + return utxoPool.contains(utxo); + } + + /** + * Handles each epoch by receiving an unordered array of proposed transactions, + * checking each transaction for correctness, returning a mutually valid array + * of accepted transactions, and updating the current UTXO pool as appropriate. + */ + public Transaction[] handleTxs(Transaction[] possibleTxs) { + List<Transaction> acceptedTx = new ArrayList<Transaction>(); + for (int i = 0; i < possibleTxs.length; i++) { + Transaction tx = possibleTxs[i]; + if (isValidTx(tx)) { + acceptedTx.add(tx); + + removeConsumedCoinsFromPool(tx); + addCreatedCoinsToPool(tx); + } + } + + Transaction[] result = new Transaction[acceptedTx.size()]; + acceptedTx.toArray(result); + return result; + } + + private void addCreatedCoinsToPool(Transaction tx) { + List<Transaction.Output> outputs = tx.getOutputs(); + for (int j = 0; j < outputs.size(); j++) { + Transaction.Output output = outputs.get(j); + UTXO utxo = new UTXO(tx.getHash(), j); + utxoPool.addUTXO(utxo, output); + } + } + + private void removeConsumedCoinsFromPool(Transaction tx) { + List<Transaction.Input> inputs = tx.getInputs(); + for (int j = 0; j < inputs.size(); j++) { + Transaction.Input input = inputs.get(j); + UTXO utxo = new UTXO(input.prevTxHash, input.outputIndex); + utxoPool.removeUTXO(utxo); + } + } + +} +``` +## All the Example Codes on GitHub +I wrap the codes into a maven project, just run ```mvn test``` then the example codes will build and run all the test cases. + +[Scrooge Coin example in Java](https://github.com/zhaohuabing/scroogecoin) diff --git a/exampleSite/content/post/2018-05-21-algolia-integration-with-jekyll.md b/exampleSite/content/post/2018-05-21-algolia-integration-with-jekyll.md new file mode 100644 index 0000000..c330e58 --- /dev/null +++ b/exampleSite/content/post/2018-05-21-algolia-integration-with-jekyll.md @@ -0,0 +1,180 @@ +--- +layout: post +title: "使用Algolia为Gitpage博客提供站内搜索" +subtitle: "" +date: 2018-05-21 11:00:00 +author: "赵化冰" +image: "https://img.zhaohuabing.com/in-post/2018-05-06-cryptocurrency_week1/bitcoin_header.jpg" +published: false +tags: + - Jekyll:q + - Bitcoin +categories: [ Note ] +URL: "/2018/05/21/algolia-integration-with-jekyll" + +--- + +> This series of articles are my notes of "Bitcoin and Cryptocurrency Technologies" online course. + +## Table of Content +{:.no_toc} + +* Table of Content +{:toc} + +## Scrooge Coin Transaction +Scrooge Coin programming assignment is a little bit tricky, the video of this lesson hasn't explained some implementation details. To help you understand the transaction data structure used in Scrooge Coin, I draw this diagram: + + +<!--more--> +Every transaction has a set of inputs and a set of outputs. An input in a transaction must use a hash pointer to refer to its corresponding output in the previous transaction, and it must be signed with the private key of the owner because the owner needs to prove he/she agrees to spend his/her coins. + +Every output is correlated to the public key of the receiver, which is his/her ScroogeCoin address. + +In the first transaction, we assume that Scrooge has created 10 coins and assigned them to himself, we don't doubt that because the system-Scroogecoin has a building rule which says that Scrooge has right to create coins. + +In the second transaction, Scrooge transferred 3.9 coins to Alice and 5.9 coins to Bob. The sum of the two outputs is 0.2 less than the input because the transaction fee was 0.2 coin. + +In the third transaction, there were two inputs and one output, Alice and Bob transferred 9.7 coins to mike, and the transaction fee was 0.1 coin. + +## Unclaimed transaction outputs pool +Another trick we need to Note when doing the programming assignment is that an UTXOPool is introduced to track the unclaimed outputs (unspent coins), so we can know whether the corresponding output of an input of the transaction is available or not. + +## TxHandler Java Code +``` +import java.security.PublicKey; +import java.util.ArrayList; +import java.util.HashSet; +import java.util.List; +import java.util.Set; + +public class TxHandler { + private UTXOPool utxoPool; + + /** + * Creates a public ledger whose current UTXOPool (collection of unspent + * transaction outputs) is {@code utxoPool}. This should make a copy of utxoPool + * by using the UTXOPool(UTXOPool uPool) constructor. + */ + public TxHandler(UTXOPool utxoPool) { + this.utxoPool = new UTXOPool(utxoPool); + } + + /** + * @return true if: (1) all outputs claimed by {@code tx} are in the current + * UTXO pool, (2) the signatures on each input of {@code tx} are valid, + * (3) no UTXO is claimed multiple times by {@code tx}, (4) all of + * {@code tx}s output values are non-negative, and (5) the sum of + * {@code tx}s input values is greater than or equal to the sum of its + * output values; and false otherwise. + */ + public boolean isValidTx(Transaction tx) { + Set<UTXO> claimedUTXO = new HashSet<UTXO>(); + double inputSum = 0; + double outputSum = 0; + + List<Transaction.Input> inputs = tx.getInputs(); + for (int i = 0; i < inputs.size(); i++) { + Transaction.Input input = inputs.get(i); + + if (!isConsumedCoinAvailable(input)) { + return false; + } + + if (!verifySignatureOfConsumeCoin(tx, i, input)) { + return false; + } + + if (isCoinConsumedMultipleTimes(claimedUTXO, input)) { + return false; + } + + UTXO utxo = new UTXO(input.prevTxHash, input.outputIndex); + Transaction.Output correspondingOutput = utxoPool.getTxOutput(utxo); + inputSum += correspondingOutput.value; + + } + + List<Transaction.Output> outputs = tx.getOutputs(); + for (int i = 0; i < outputs.size(); i++) { + Transaction.Output output = outputs.get(i); + if (output.value <= 0) { + return false; + } + + outputSum += output.value; + } + + // Should the input value and output value be equal? Otherwise the ledger will + // become unbalanced. + // The difference between inputSum and outputSum is the transaction fee + if (outputSum > inputSum) { + return false; + } + + return true; + } + + private boolean isCoinConsumedMultipleTimes(Set<UTXO> claimedUTXO, Transaction.Input input) { + UTXO utxo = new UTXO(input.prevTxHash, input.outputIndex); + return !claimedUTXO.add(utxo); + } + + private boolean verifySignatureOfConsumeCoin(Transaction tx, int index, Transaction.Input input) { + UTXO utxo = new UTXO(input.prevTxHash, input.outputIndex); + Transaction.Output correspondingOutput = utxoPool.getTxOutput(utxo); + PublicKey pk = correspondingOutput.address; + return Crypto.verifySignature(pk, tx.getRawDataToSign(index), input.signature); + } + + private boolean isConsumedCoinAvailable(Transaction.Input input) { + UTXO utxo = new UTXO(input.prevTxHash, input.outputIndex); + return utxoPool.contains(utxo); + } + + /** + * Handles each epoch by receiving an unordered array of proposed transactions, + * checking each transaction for correctness, returning a mutually valid array + * of accepted transactions, and updating the current UTXO pool as appropriate. + */ + public Transaction[] handleTxs(Transaction[] possibleTxs) { + List<Transaction> acceptedTx = new ArrayList<Transaction>(); + for (int i = 0; i < possibleTxs.length; i++) { + Transaction tx = possibleTxs[i]; + if (isValidTx(tx)) { + acceptedTx.add(tx); + + removeConsumedCoinsFromPool(tx); + addCreatedCoinsToPool(tx); + } + } + + Transaction[] result = new Transaction[acceptedTx.size()]; + acceptedTx.toArray(result); + return result; + } + + private void addCreatedCoinsToPool(Transaction tx) { + List<Transaction.Output> outputs = tx.getOutputs(); + for (int j = 0; j < outputs.size(); j++) { + Transaction.Output output = outputs.get(j); + UTXO utxo = new UTXO(tx.getHash(), j); + utxoPool.addUTXO(utxo, output); + } + } + + private void removeConsumedCoinsFromPool(Transaction tx) { + List<Transaction.Input> inputs = tx.getInputs(); + for (int j = 0; j < inputs.size(); j++) { + Transaction.Input input = inputs.get(j); + UTXO utxo = new UTXO(input.prevTxHash, input.outputIndex); + utxoPool.removeUTXO(utxo); + } + } + +} +``` +## All the Example Codes on GitHub +I wrap the codes into a maven project, just run ```mvn test``` then the example codes will build and run all the test cases. + +[Scrooge Coin example in Java](https://github.com/zhaohuabing/scroogecoin) diff --git a/exampleSite/content/post/2018-05-22-user_authentication_authorization.md b/exampleSite/content/post/2018-05-22-user_authentication_authorization.md new file mode 100644 index 0000000..767f053 --- /dev/null +++ b/exampleSite/content/post/2018-05-22-user_authentication_authorization.md @@ -0,0 +1,141 @@ +--- +layout: post +title: "微服务安全沉思录之一" +subtitle: "用户访问认证与鉴权" +description: "这段时间对之前微服务安全相关的一些想法进行了进一步总结和归纳,理清在之前文章里面没有想得太清楚的地方,例如服务间的认证与鉴权以及用户身份在服务调用链中的传递。在这一系列博客里面将分为三个部分对微服务安全进行系统阐述:用户访问认证与鉴权,服务间认证与鉴权,外部系统访问控制。" +excerpt: "这段时间对之前微服务安全相关的一些想法进行了进一步总结和归纳,理清在之前文章里面没有想得太清楚的地方,例如服务间的认证与鉴权以及用户身份在服务调用链中的传递。在这一系列博客里面将分为三个部分对微服务安全进行系统阐述:用户访问认证与鉴权,服务间认证与鉴权,外部系统访问控制。" +date: 2018-05-23T10:00:00 +author: "赵化冰" +image: "https://img.zhaohuabing.com/in-post/2018-05-22-user_authentication_authorization/background.jpg" +published: true +tags: + - Microservice + - Security +URL: "/2018/05/22/user_authentication_authorization" +categories: [ "Tech" ] +--- + +> 这段时间对之前微服务安全相关的一些想法进行了进一步总结和归纳,理清了在之前文章里面没有想得太清楚的地方,例如服务间的认证与鉴权以及用户身份在服务调用链中的传递。 +> +> 在这一系列文章里,我将尝试分为三个部分对微服务安全进行系统阐述:用户访问认证与鉴权,服务间认证与鉴权,外部系统访问控制。 + +## 目录 +{:.no_toc} + +* 目录 +{:toc} + + +## 前言 +微服务架构的引入为软件应用带来了诸多好处:包括小开发团队,缩短开发周期,语言选择灵活性,增强服务伸缩能力等。与此同时,也引入了分布式系统的诸多复杂问题。其中一个挑战就是如何在微服务架构中实现一个灵活,安全,高效的认证和鉴权方案。 + +相对于传统单体应用,微服务架构下的认证和鉴权涉及到场景更为复杂,涉及到用户访问微服务应用,第三方应用访问微服务应用,应用内多个微服务之间相互访问等多种场景,每种场景下的认证和鉴权方案都需要考虑到,以保证应用程序的安全性。本系列博文将就此问题进行一次比较完整的探讨。 + +<center>微服务认证和鉴权涉及到的三种场景</center> + +## 用户认证和鉴权 + +### 用户身份认证 +一个完整的微服务应用是由多个相互独立的微服务进程组成的,对每个微服务的访问都需要进行用户认证。如果将用户认证的工作放到每个微服务中,存在下面一些问题: +* 需要在各个微服务中重复实现这部分公共逻辑。虽然我们可以使用代码库复用部分代码,但这又会导致所有微服务对特定代码库及其版本存在依赖,影响微服务语言/框架选择的灵活性。 +* 将认证和鉴权的公共逻辑放到微服务实现中违背了单一职责原理,开发人员应重点关注微服务自身的业务逻辑。 +* 用户需要分别登录以访问系统中不同的服务。 + +由于在微服务架构中以API Gateway作为对外提供服务的入口,因此可以在API Gateway处提供统一的用户认证,用户只需要登录一次,就可以访问系统中所有微服务提供的服务。 + +### 用户状态保持 +HTTP是一个无状态的协议,对服务器来说,用户的每次HTTP请求是相互独立的。互联网是一个巨大的分布式系统,HTTP协议作为互联网上的一个重要协议,在设计之初要考虑到大量应用访问的效率问题。无状态意味着服务端可以把客户端的请求根据需要发送到集群中的任何一个节点,HTTP的无状态设计对负载均衡有明显的好处,由于没有状态,用户请求可以被分发到任意一个服务器,应用也可以在靠近用户的网络边缘部署缓存服务器。对于不需要身份认证的服务,例如浏览新闻网页等,这是没有任何问题的。但HTTP成为企业应用的一个事实标准后,企业应用需要保存用户的登录状态和身份以进行更严格的权限控制。因此需要在HTTP协议基础上采用一种方式保存用户的登录状态,避免用户每发起一次请求都需要进行验证。 + +传统方式是在服务器端采用Cookie来保存用户状态,由于在服务器是有状态的,对服务器的水平扩展有影响。在微服务架构下建议采用Token来记录用户登录状态。 + +Token和Seesion主要的不同点是存储的地方不同。Session是集中存储在服务器中的;而Token是用户自己持有的,一般以cookie的形式存储在浏览器中。Token中保存了用户的身份信息,每次请求都会发送给服务器,服务器因此可以判断访问者的身份,并判断其对请求的资源有没有访问权限。 + +Token用于表明用户身份,因此需要对其内容进行加密,避免被请求方或者第三者篡改。[JWT(Json Web Token)](https://jwt.io)是一个定义Token格式的开放标准(RFC 7519),定义了Token的内容,加密方式,并提供了各种语言的lib。 + +JWT Token的结构非常简单,包括三部分: +* Header<BR> +头部包含类型,为固定值JWT。然后是JWT使用的Hash算法。 +``` +{ + "alg": "HS256", + "typ": "JWT" +} +``` +* Payload<BR> +包含发布者,过期时间,用户名等标准信息,也可以添加用户角色,用户自定义的信息。 +``` +{ + "sub": "1234567890", + "name": "John Doe", + "admin": true +} +``` +* Signature<BR> +Token颁发方的签名,用于客户端验证Token颁发方的身份,也用于服务器防止Token被篡改。 +签名算法 +``` +HMACSHA256( + base64UrlEncode(header) + "." + + base64UrlEncode(payload), + secret) +``` + +这三部分使用Base64编码后组合在一起,成为最终返回给客户端的Token串,每部分之间采用"."分隔。下图是上面例子最终形成的Token + +采用Token进行用户认证,服务器端不再保存用户状态,客户端每次请求时都需要将Token发送到服务器端进行身份验证。Token发送的方式[rfc6750](https://tools.ietf.org/html/rfc6750)进行了规定,采用一个 Authorization: Bearer HHTP Header进行发送。 +``` +Authorization: Bearer mF_9.B5f-4.1JqM +``` +采用Token方式进行用户认证的基本流程如下图所示: +1. 用户输入用户名,密码等验证信息,向服务器发起登录请求 +1. 服务器端验证用户登录信息,生成JWT token +1. 服务器端将Token返回给客户端,客户端保存在本地(一般以Cookie的方式保存) +1. 客户端向服务器端发送访问请求,请求中携带之前颁发的Token +1. 服务器端验证Token,确认用户的身份和对资源的访问权限,并进行相应的处理(拒绝或者允许访问) + +<center>采用Token进行用户认证的流程图</center> + +### 实现单点登录 +单点登录的理念很简单,即用户只需要登录应用一次,就可以访问应用中所有的微服务。API Gateway提供了客户端访问微服务应用的入口,Token实现了无状态的用户认证。结合这两种技术,可以为微服务应用实现一个单点登录方案。 + +用户的认证流程和采用Token方式认证的基本流程类似,不同之处是加入了API Gateway作为外部请求的入口。 + +用户登录 +1. 客户端发送登录请求到API Gateway +2. API Gateway将登录请求转发到Security Service +3. Security Service验证用户身份,并颁发Token + +用户请求 +1. 客户端请求发送到API Gateway +1. API Gateway调用的Security Service对请求中的Token进行验证,检查用户的身份 +2. 如果请求中没有Token,Token过期或者Token验证非法,则拒绝用户请求。 +3. Security Service检查用户是否具有该操作权(可选,参见下一小节) +4. 如果用户具有该操作权限,则把请求发送到后端的Business Service,否则拒绝用户请求 + +<center>采用API Gateway和Token实现微服务应用的单点登录</center> + +### 用户权限控制 +用户权限控制有两种做法,在API Gateway处统一处理,或者在各个微服务中单独处理。 +#### API Gateway处进行统一的权限控制 +客户端发送的HTTP请求中包含有请求的Resource及HTTP Method。如果系统遵循REST规范,以URI资源方式对访问对象进行建模,则API Gateway可以从请求中直接截取到访问的资源及需要进行的操作,然后调用Security Service进行权限判断,根据判断结果决定用户是否有权限对该资源进行操作,并转发到后端的Business Service。 + +假设系统中有三个角色: +* order_manager,可以查看,创建,修改,删除订单 +* order_editor, 可以查看,创建,修改订单 +* order_inspector,只能查看订单 + +这些角色对资源的操作权限都可以映射到HTTP Verb上,如下表所示。 + +| Role | Resource | Verbs | +|-----------------|----------|------------------------------------| +| order_manager | /orders | 'GET' 'POST' 'PUT' 'DELETE' | +| order_editor | /orders | 'GET' 'POST' 'PUT' | +| order_inspector | /orders | 'GET' | + +这种实现方式在API Gateway处统一处理鉴权逻辑,各个微服务不需要考虑用户鉴权,只需要处理业务逻辑,简化了各微服务的实现。 +#### 由各个微服务单独进行权限控制 +如果微服务未严格遵循REST规范对访问对象进行建模,或者应用需要进行更细粒度的权限控制,则需要在微服务中单独对用户权限进行判断和处理。这种情况下微服务的权限控制更为灵活,但各个微服务需要单独维护用户的授权数据,实现更复杂。 + +由于微服务进行权限判断时需要用户身份信息,该方案需要处理的另一个问题是如何把登录用户的信息从API Gateway传递到微服务中。如果是基于Http,可以采用Http header实现,如果是其他协议,则需要在消息体中增加用户身份相关的字段。 + + diff --git a/exampleSite/content/post/2018-05-23-external_system_auth.md b/exampleSite/content/post/2018-05-23-external_system_auth.md new file mode 100644 index 0000000..97cf923 --- /dev/null +++ b/exampleSite/content/post/2018-05-23-external_system_auth.md @@ -0,0 +1,88 @@ +--- +layout: post +title: "微服务安全沉思录之三" +subtitle: "外部系统访问控制" +description: "一些外部的第三方系统可能需要访问系统内部的微服务。例如在网上商店的例子中,外部的推荐服务可能需要接入系统,以获取商店的商品目录信息。相对于内部服务之间的访问而言,外部系统的访问需要进行严格的安全控制。" +excerpt: "一些外部的第三方系统也可能需要访问系统内部的微服务。例如在网上商店的例子中,外部的推荐服务可能需要接入系统,以获取商店的商品目录信息。相对于内部服务之间的访问而言,外部系统的访问需要进行严格的安全控制。" +date: 2018-05-23T18:00:00 +author: "赵化冰" +image: "https://img.zhaohuabing.com/in-post/2018-05-23-external_system_auth/background.jpg" +published: true +tags: + - Microservice + - Security +URL: "/2018/05/23/external_system_auth/" +categories: [ "Tech" ] +--- + +## 外部系统访问控制 +除用户访问和微服务之间的相互访问外,外部的第三方系统也可能需要访问系统内部的微服务。例如在上一篇博客的网上商店例子中,外部的推荐服务可能需要接入系统,以获取商店的商品目录信息。相对于内部服务之间的访问而言,外部系统的访问需要进行严格的安全控制。 + +### 使用账号进行控制 +可以为外部系统创建一个用户账号,类似普通用户一样对外部系统的账号进行管理,并使用该账号对外部系统进行认证和权限控制。 + +采用这种方式的问题是难以处理用户相关的敏感数据。因为外部系统自身也是微服务系统中的一个用户账号,因此该外部系统只能访问该账号自身的数据和一些不敏感的公共数据,而不能访问和用户相关的数据。例如在网上商店的例子中,外部系统可以采用该方式访问商品目录信息,但不应允许访问用户历史购买记录,用户余额等信息。 + +### API Token +是一个API Token(又称API Key)可以控制对用户敏感数据的访问。微服务应用提供一个API Token的生成界面,用户登录后可以生成自己的API Token,并在第三方应用使用该API Token访问微服务的API。在这种情况下,一般只允许第三方应用访问该Token所属用户自身的数据,而不能访问其他用户的敏感私有数据。 + +例如Github就提供了Personal API Token功能,用户可以在[Github的开发者设置界面](https://github.com/settings/tokens)中创建Token,然后使用该Token来访问Github的API。在创建Token时,可以设置该Token可以访问用户的哪些数据,如查看Repo信息,删除Repo,查看用户信息,更新用户信息等。 + +使用API Token来访问Github API +``` +curl -u zhaohuabing:fbdf8e8862252ed0f3ba9dba4e328c01ac93aeec https://api.github.com/user + +``` +> 不用试了,这不是我的真实API Token, just for demonstration :-) + +使用API Token而不是直接使用用户名/密码来访问API的好处是降低了用户密码暴露的风险,并且可以随时收回Token的权限而不用修改密码。 + + +由于API Token只能访问指定用户的数据,因此适合于用户自己开发一些脚本或小程序对应用中自己的数据进行操作。 +### OAuth +某些第三方应用需要访问不同用户的数据,或者对多个用户的数据进行整合处理,则可以考虑采用OAuth。采用OAuth,当第三方应用访问服务时,应用会提示用户授权第三方应用相应的访问权限,根据用户的授权操作结果生成用于访问的Token,以对第三方应用的操作请求进行访问控制。 + +同样以Github为例,一些第三方应用如Travis CI,GitBook等就是通过OAuth和Github进行集成的。 +OAuth针对不同场景有不同的认证流程,一个典型的认证流程如下图所示: +* 用户向OAuth客户端程序发起一个请求,OAuth客户端程序在处理该请求时发现需要访问用户在资源服务器中的数据。 +* 客户端程序将用户请求重定向到认证服务器,该请求中包含一个callback的URL。 +* 认证服务器返回授权页面,要求用户对OAuth客户端的资源请求进行授权。 +* 用户对该操作进行授权后,认证服务器将请求重定向到客户端程序的callback url,将授权码返回给客户端程序。 +* 客户端程序将授权码发送给认证服务器,请求token。 +* 认证服务器验证授权码后将token颁发给客户端程序。 +* 客户端程序采用颁发的token访问资源,完成用户请求。 + +>备注: +>1. OAuth中按照功能区分了资源服务器和认证服务器这两个角色,在实现时这两个角色常常是同一个应用。将该流程图中的各个角色对应到Github的例子中,资源服务器和认证服务器都是Github,客户端程序是Travis CI或者GitBook,用户则是使用Travis CI或者GitBook的直接用户。 +> +>2. 有人可能会疑惑在该流程中为何要使用一个授权码(Authorization Code)来申请Token,而不是由认证服务器直接返回Token给客户端。OAuth这样设计的原因是在重定向到客户端Callback URL的过程中会经过用户代理(浏览器),如果直接传递Token存在被窃取的风险。采用授权码的方式,申请Token时客户端直接和认证服务器进行交互,并且认证服务期在处理客户端的Token申请请求时还会对客户端进行身份认证,避免其他人伪造客户端身份来使用认证码申请Token。 +>下面是一个客户端程序采用Authorization Code来申请Token的示例,client_id和client_secret被用来验证客户端的身份。 +> +>``` +>POST /oauth/token HTTP/1.1 +>Host: authorization-server.com +> +>grant_type=authorization_code +>&code=xxxxxxxxxxx +>&redirect_uri=https://example-app.com/redirect +>&client_id=xxxxxxxxxx +>&client_secret=xxxxxxxxxx +>``` + + + +<center>OAuth认证流程</center> + + +另外在谈及OAuth时,我们需要注意微服务应用作为OAuth客户端和OAuth服务器的两种不同场景: + +在实现微服务自身的用户认证时,也可以采用OAuth将微服务的用户认证委托给一个第三方的认证服务提供商,例如很多应用都将用户登录和微信或者QQ的OAuth服务进行了集成。 + +第三方应用接入和微服务自身用户认证采用OAuth的目的是不同的,前者是为了将微服务中用户的私有数据访问权限授权给第三方应用,微服务在OAuth架构中是认证和资源服务器的角色;而后者的目的是集成并利用知名认证提供服务商提供的OAuth认证服务,简化繁琐的注册操作,微服务在OAuth架构中是客户端的角色。 + +因此在我们需要区分这两种不同的场景,以免造成误解。 + +## 后记 + +前两篇文章在在公众号发布后,有朋友提到还要注意登录密码明文问题、防止重放攻击、防止时间差攻击、防止脱裤后的彩虹表攻击...。的确,安全是一个庞大的话题,本系列文章只阐述了我关于微服务架构对应用安全带来的影响的一点小小思考。在产品开发和运维中,还需要对安全进行全方面的考虑,最好遵循一些业界的最佳实践,如采用完善的防火墙对外部流量进行隔离,采用加盐hash对用户密码进行存储,采用tls进行加密传输,对用户输入进行严格检查防止sql注入,采用经过验证的通用加密算法等等。 + diff --git a/exampleSite/content/post/2018-05-23-istio-auto-injection-with-webhook.md b/exampleSite/content/post/2018-05-23-istio-auto-injection-with-webhook.md new file mode 100644 index 0000000..c461753 --- /dev/null +++ b/exampleSite/content/post/2018-05-23-istio-auto-injection-with-webhook.md @@ -0,0 +1,111 @@ +--- +layout: post + +title: "Istio Sidecar自动注入原理" +subtitle: "Kubernetes webhook扩展机制解析" +description: "Kubernets 1.9版本引入了Admission Webhook(web 回调)扩展机制,通过Webhook,开发者可以非常灵活地对Kubernets API Server的功能进行扩展,在API Server创建资源时对资源进行验证或者修改。 Istio 0.7版本就利用了Kubernets webhook实现了sidecar的自动注入。" +excerpt: "Kubernets 1.9版本引入了Admission Webhook(web 回调)扩展机制,通过Webhook,开发者可以非常灵活地对Kubernets API Server的功能进行扩展,在API Server创建资源时对资源进行验证或者修改。 Istio 0.7版本就利用了Kubernets webhook实现了sidecar的自动注入。" +date: 2018-05-23 +author: "赵化冰" +image: "https://img.zhaohuabing.com/in-post/2018-4-25-istio-auto-injection-with-webhook/lion.jpg" +published: true +tags: + - Kubernetes + - Istio +URL: "/2018/05/23/istio-auto-injection-with-webhook/" +categories: [ Tech ] +--- + +## 前言 +- - - +Kubernets 1.9版本引入了Admission Webhook(web 回调)扩展机制,通过Webhook,开发者可以非常灵活地对Kubernets API Server的功能进行扩展,在API Server创建资源时对资源进行验证或者修改。 + +使用webhook的优势是不需要对API Server的源码进行修改和重新编译就可以扩展其功能。插入的逻辑实现为一个独立的web进程,通过参数方式传入到kubernets中,由kubernets在进行自身逻辑处理时对扩展逻辑进行回调。 + +Istio 0.7版本就利用了Kubernets webhook实现了sidecar的自动注入。 +<!--more--> +## 什么是Admission +--- +Admission是Kubernets中的一个术语,指的是Kubernets API Server资源请求过程中的一个阶段。如下图所示,在API Server接收到资源创建请求时,首先会对请求进行认证和鉴权,然后经过Admission处理,最后再保存到etcd。 + +从图中看到,Admission中有两个重要的阶段,Mutation和Validation,这两个阶段中执行的逻辑如下: +* Mutation + + Mutation是英文“突变”的意思,从字面上可以知道在Mutation阶段可以对请求内容进行修改。 +* Validation + + 在Validation阶段不允许修改请求内容,但可以根据请求的内容判断是继续执行该请求还是拒绝该请求。 + +## Admission webhook +--- +通过Admission webhook,可以加入Mutation和Validation两种类型的webhook插件,这些插件和Kubernets提供的预编译的Admission插件具有相同的能力。可以想到的用途包括: +* 修改资源。例如Istio就通过Admin Webhook在Pod资源中增加了Envoy sidecar容器。 +* 自定义校验逻辑,例如对资源名称有一些特殊要求。或者对自定义资源的合法性进行校验。 + +## 采用Webhook自动注入Istio Sidecar +--- +### Kubernets版本要求 +webhook支持需要Kubernets1.9或者更高的版本,使用下面的命令确认kube-apiserver的Admin webhook功能已启用。 + +``` +kubectl api-versions | grep admissionregistration + +admissionregistration.k8s.io/v1beta1 +``` +### 生成sidecar injection webhook的密钥和证书 +Webhook使用数字证书向kube-apiserver进行身份认证,因此需要先使用工具生成密钥对,并向Istio CA申请数字证书。 + +``` +./install/kubernetes/webhook-create-signed-cert.sh / + --service istio-sidecar-injector / + --namespace istio-system / + --secret sidecar-injector-certs +``` + +### 将生成的数字证书配置到webhook中 + +``` +cat install/kubernetes/istio-sidecar-injector.yaml | / + ./install/kubernetes/webhook-patch-ca-bundle.sh > / + install/kubernetes/istio-sidecar-injector-with-ca-bundle.yaml +``` + +### 创建sidecar injection configmap + +``` +kubectl apply -f install/kubernetes/istio-sidecar-injector-configmap-release.yaml +``` + +### 部署sidecar injection webhook + +``` +kubectl apply -f install/kubernetes/istio-sidecar-injector-with-ca-bundle.yaml +``` + +通过命令查看部署好的webhook injector + +```` +kubectl -n istio-system get deployment -listio=sidecar-injector +Copy +NAME DESIRED CURRENT UP-TO-DATE AVAILABLE AGE +istio-sidecar-injector 1 1 1 1 1d +``` + +### 开启需要自动注入sidecar的namespace + +``` +kubectl label namespace default istio-injection=enabled + +kubectl get namespace -L istio-injection + +NAME STATUS AGE ISTIO-INJECTION +default Active 1h enabled +istio-system Active 1h +kube-public Active 1h +kube-system Active 1h +``` + +## 参考 + +* [Extensible Admission is Beta](https://kubernetes.io/blog/2018/01/extensible-admission-is-beta) +* [Installing the Istio Sidecar](https://istio.io/docs/setup/kubernetes/sidecar-injection.html) diff --git a/exampleSite/content/post/2018-05-23-service_2_service_auth.md b/exampleSite/content/post/2018-05-23-service_2_service_auth.md new file mode 100644 index 0000000..430064e --- /dev/null +++ b/exampleSite/content/post/2018-05-23-service_2_service_auth.md @@ -0,0 +1,67 @@ +--- +layout: post + +title: "微服务安全沉思录之二" +subtitle: "服务间认证与鉴权" +description: "除来自用户的访问请求以外,微服务应用中的各个微服务相互之间还有大量的访问,根据应用系统数据敏感程度不同,对于系统内微服务的访问也需要进行相应的安全控制。" +showonlyimage: false +excerpt: "除来自用户的访问请求以外,微服务应用中的各个微服务相互之间还有大量的访问,根据应用系统数据敏感程度不同,对于系统内微服务的访问也需要进行相应的安全控制。" +author: "赵化冰" +date: 2018-05-23T15:00:00 +image: "https://img.zhaohuabing.com/in-post/2018-05-23-service_2_service_auth/background.jpg" +published: true +tags: + - Microservice + - Security +URL: "/2018/05/23/service_2_service_auth/" +categories: [ Tech ] +--- + + +## 服务间认证与鉴权 + +除来自用户的访问请求以外,微服务应用中的各个微服务相互之间还有大量的访问,包括下述场景: +* 用户间接触发的微服务之间的相互访问<BR> + 例如在一个网上商店应用中,用户访问购物车微服务进行结算时,购物车微服务可能需要访问用户评级微服务获取用户的会员级别,以得到用户可以享受购物折扣。 +* 非用户触发的微服务之间的相互访问<BR> + 例如数据同步或者后台定时任务导致的微服务之间的相互访问。 + +根据应用系统的数据敏感程度的不同,对于系统内微服务的相互访问可能有不同的安全要求。 +<!--more--> +### 对微服务之间的相互访问不进行安全控制 +在某些场景下,可以假设同一应用中微服务之间的相互访问都是可信的。在这种情况下,应用依赖于内部网络的防火墙及其他网络安全措施来保证安全性。在这种情况对入侵者攻击进入内部网络后没有保护措施。入侵者可以对微服务间的通信进行典型的中间人攻击,例如窃听通信内容,伪造和修改通信数据,甚至假装为一个合法的微服务进行通信。 + +### 采用Service Account(服务账号)进行安全控制 +“内部网络中微服务之间的所有通信都是可信的”这个假设在某些场景下是不成立的,特别是在微服务中保存有用户信息这种非常重要的数据的情况下。将敏感信息直接暴露在内部攻击下的做法是非常危险的。 解决该问题的一种方案是使用服务账号来对微服务之间的相互访问进行控制。 + +用户权限控制的一个普遍方法是使用”用户账号(User Account)”来标识一个系统用户,并对其进行身份认证和操作鉴权。类似地,可以为系统中每一个服务也创建一个账号,称为”服务账号(Service Accout)“。 该服务账号表示了微服务的身份,以用于控制该微服务对系统中其它微服务的访问权限,如可以对哪些微服务的哪些资源进行何种操作。当一个微服务访问另一个微服务时,被访问的微服务需要验证访问者的服务账号,以确定其身份和资源操作权限。 + +#### SPIFEE标准 +[Secure Production Identity Framework For Everyone (SPIFFE)](https://spiffe.io/)是一套服务之间相互进行身份识别的标准,主要包含以下内容: +* SPIFFE ID标准,SPIFFE ID是服务的唯一标识,实现为统一资源标识"Uniform Resource Identifier (URI)”符。 +* SVID(SPIFFE Verifiable Identity Document)标准,将SPIFFE ID编码到一个加密的可验证文档中。 +* 颁发/撤销 SVID的一套API标准。 + +SPIFFE SVID目前支持的实现方式是X.509数字证书,在x.509 SVID中,采用X.509数字证书的SAN(Subject Alternative Name)扩展字段来保存SPIFFE ID。 + +#### Istio Auth开源实现 +Istio服务网格项目的Auth组件实现了SPIFFE标准,可以为网格中服务颁发符合SPIFFE SVID标准的证书,并为服务提供身份认证,细粒度的操作鉴权以及通信加密。Istio的架构如下图所示: + + +Istio Auth采用了Kubernetes的service account来作为服务标识,其SPIFFE ID的格式为spiffe://<domain>/ns/<namespace>/sa/<serviceaccount>,其中各组成部分如下: +* domain 域名 +* namspace kubernetes service account所在的Namespace +* serviceaccout kubernetes中定义的service account名 + +Istio Auth提供了一个用于颁发证书的CA。在服务部署时,CA监听Kubernetes API Server, 为集群中的每一个Service Account创建一对密钥和证书。当Pod创建时,Kubernetes根据该Pod关联的Service Account将密钥和证书以Kubernetes Secrets资源的方式加载为Pod的Volume,以供Envoy使用。 + +在服务运行时,服务间的通信被Envoy接管,Envoy使用证书在服务间进行双向SSL握手验证通信双方服务的身份,并提供加密的通信通道。 + +### 采用用户身份进行安全控制 +采用服务账号进行服务间交互的鉴权不能控制到用户粒度的访问权限,这在某些场景下可能出现数据泄露问题。 + +例如在网上商店应用中,用户访问购物车微服务进行结算时,购物车微服务需要访问另一个微服务中的用户历史购物数据。如果只采用服务账号对购物车微服务进行安全控制,存在用户A通过购物车微服务向后端微服务发起一个获取用户B历史购物数据请求的风险。因为后端的微服务并不能得知发起请求的是哪一个用户,因此会不加判断地返回购物车微服务请求的用户历史购物数据。 + +解决方案是将用户信息从用户直接访问的第一个微服务向后传递到调用链上的每一个微服务,调用链上的每一个微服务都使用该用户信息对用户能访问的资源进行判断。在一个大型的微服务系统中,一个调用链可能会非常长,导致该方案的实现比较复杂。 + +我们需要根据应用的使用场景,每个微服务中数据的敏感程度来决定选择哪一种服务间安全的实施方式。 diff --git a/exampleSite/content/post/2018-05-24-set_up_my_ubuntu_desktop.md b/exampleSite/content/post/2018-05-24-set_up_my_ubuntu_desktop.md new file mode 100644 index 0000000..608ee69 --- /dev/null +++ b/exampleSite/content/post/2018-05-24-set_up_my_ubuntu_desktop.md @@ -0,0 +1,85 @@ +--- +layout: post +title: "Everything about Setting Up My Ubuntu Desktop" +description: "Everything about setting up my own ubuntu desktop, it's just a Note in case I need it later" +excerpt: "Everything about setting up my own ubuntu desktop, it's just a Note in case I need it later" +date: 2018-05-24 +author: "赵化冰" +image: "https://img.zhaohuabing.com/in-post/2018-05-23-service_2_service_auth/background.jpg" +published: true +tags: + - ubuntu +URL: "/2018/05/24/set_up_my_ubuntu_desktop/" +categories: [ "Tips" ] +--- + +## Generate SSH Key Pair + +``` +ssh-keygen -C "zhaohuabing@gmail.com" +``` + +## Shadowsocks + +Install shadowsokcs + +``` +sudo apt-get install python3-pip + +sudo pip3 install shadowsocks +``` + +Create config at ```config/shadowsocks.json```, with the following content: + +``` +{ + "server":"remote-shadowsocks-server-ip-addr", + "server_port":443, + "local_address":"127.0.0.1", + "local_port":1080, + "password":"your-passwd", + "timeout":300, + "method":"aes-256-cfb", + "fast_open":false, + "workers":1 +} +``` + +Start a local socks proxy + +``` +sudo sslocal -c config/shadowsocks.json -d start +``` + +In case there is an openssl error, modify shadowsocks source file. + +``` +sudo vi /usr/local/lib/python3.6/dist-packages/shadowsocks/crypto/openssl.py + +:%s/cleanup/reset/gc +``` + +Convert shadowsocks socks proxy to http proxy + +``` +sudo apt-get install polipo + +echo "socksParentProxy = localhost:1080" | sudo tee -a /etc/polipo/config +sudo service polipo restart +``` + +Http proxy now is available at port 8123 + +# Set bing wallpaper as desktop background + +``` +sudo add-apt-repository ppa:whizzzkid/bingwallpaper +sudo apt-get update +sudo apt-get install bingwallpaper +``` + +# Use vim mode in bash + +``` +echo 'set -o vi'>> ~/.bashrc +``` diff --git a/exampleSite/content/post/2018-05-27-cryptocurrency_week2_distributed_consenus.md b/exampleSite/content/post/2018-05-27-cryptocurrency_week2_distributed_consenus.md new file mode 100644 index 0000000..7a6a73a --- /dev/null +++ b/exampleSite/content/post/2018-05-27-cryptocurrency_week2_distributed_consenus.md @@ -0,0 +1,60 @@ +--- +layout: post +title: "Distributed Consensus" +subtitle: "Bitcoin and Cryptocurrency Technologies-Week 2" +excerpt: "Distributed Consensus" +date: 2018-05-27 +author: "赵化冰" +image: "https://img.zhaohuabing.com/in-post/2018-05-06-cryptocurrency_week1/bitcoin_consensus.jpg" +description: "How the nodes in the bitcoin network reach consensus on the transactions?" +published: true +tags: + - Cryptocurrency + - Blockchain + - Bitcoin + - Digital Signature +categories: [ "Note" ] +URL: "/2018/05/26/cryptocurrency_week2_distributed_consenus/" +--- + +> This series of articles are my notes of "Bitcoin and Cryptocurrency Technologies" online course. +<!--more--> +## Decentralize ScroogeCoin: Distributed Consensus +Bitcoin is a peer to peer network. When Alice wants to pay Bob: +She broadcasts the transaction to all Bitcoin nodes + +The consensus of Bitcoin network: +* The content of transactions +* The order in which these transactions happened + +Transactions are put into blocks, and these blocks are linked one by one as a blockchain. +## Consensus algorithm +* New transactions are broadcast to all nodes in Bitcoin network +* Each node collects transactions into a block +* In each round a random node gets to broadcasts its block +Actually, It's the node first figure out the mathematical problem of Bitcoin +* Other nodes accept the new block only if all transactions in it are valid(unspent, valid signature) +* Nodes express their acceptance of the block by including its hash in the next block they create, in another word, put the block in their local copy of the blockchain + +## Potential attacks +### Steal other user's Bitcoin +It's impossible because attackers can't forge other user's signature, so he can't propose a valid transaction to transfer other user's coins to himself. It's the security feature of cryptographic technology Bitcoin depends on. +### Denying Services +The attacker rejects any transactions originate from a specific user. It's not a good attack because other honest nodes will propose these transactions. +### Double spending +The attacker creates two transactions, which transfer the same coins to two different addresses. In theory, these two transactions have no difference from the technology point of view. Which one is valid is only a human moral judgement. + +Solution: The rule of Bitcoin is that honest nodes always chose the longest valid branch and append the next block to that branch when there is more than one branch. So the more blocks are appended to the branch which your transaction is in, more likely this branch will be ultimately recognized by the Bitcoin network. + +The suggested number is 6, experience shows that after 6 blocks have been appended to the block which your transaction is in, you can almost be sure this branch will not become an orphan branch in the future. So if you're selling something to someone,after receiving the payment by Bitcoin, you can wait until 6 more blocks are appended next to your block, then you complete this transaction and send the payer the product. + +> There is no guarantee that a transaction is in consensus branch, but we assume the probability is almost 100% after 6 confirmation. + +I'm wondering: Does this means to avoid the potential risk of double spending attack, we always have to wait about one hour to complete a transaction? + +It seems like that, more information can be found at these two links. I think it's a big issue for Bitcoin, an hour is too long compared with nearly real-time confirmation of a traditional "centralized bank transaction". + + + +* [How long does it take for a Bitcoin transaction to be confirmed?](https://coincenter.org/entry/how-long-does-it-take-for-a-bitcoin-transaction-to-be-confirmed) +* [Average Confirmation Time of Bitcoin](https://blockchain.info/charts/avg-confirmation-time?timespan=30days) diff --git a/exampleSite/content/post/2018-05-27-cryptocurrency_week2_incentives_and_proof_of_work.md b/exampleSite/content/post/2018-05-27-cryptocurrency_week2_incentives_and_proof_of_work.md new file mode 100644 index 0000000..cfb7479 --- /dev/null +++ b/exampleSite/content/post/2018-05-27-cryptocurrency_week2_incentives_and_proof_of_work.md @@ -0,0 +1,69 @@ +--- +layout: post + +title: "Incentives and Proof of Work" +subtitle: "Bitcoin and Cryptocurrency Technologies-Week 2" +excerpt: "Incentives and Proof of Work" +description: "How bitcoin system implements the mechanism to motivate the participants and how the participants prove their work?" +date: 2018-05-26 +author: "赵化冰" +image: "https://img.zhaohuabing.com/in-post/2018-05-06-cryptocurrency_week1/bitcoin_mining.jpg" +published: true +tags: + - Cryptocurrency + - Blockchain + - Bitcoin + - Digital Signature +categories: [ "Note" ] +URL: "/2018/05/26/cryptocurrency_week2_incentives_and_proof_of_work/" +--- + +> This series of articles are my notes of "Bitcoin and Cryptocurrency Technologies" online course. + +## Incentive +The mechanism to motivate nodes join the Bitcoin network and create blocks. +### Incentive 1: Block Reward +Creator of block gets to +* include special coin-creation transaction in the block +* choose reciptient address of this transaction (Of course, it is the miner's address) + +Explanation: Because the coin-creation transaction is just like other transaction in that block, it will only be valid if the created block ends up in the consensus chain, it's the incentive which encourages the nodes to be honest, otherwise they can't get their rewards. + +The value of the created coin is fixed in a period of 4 years, and it halves every 4 years. +The reward of the first block(the Genesis block) was 50 BTC. Because the Genesis was created on 03/Jan/2009, now 9 years past, so the reward halved twice, the current reward is 12.5 BTC. +The total number of BTC is 21 million, at the current rate, all the BTC will be mined out around 2140. + +I would have the chance be a miner if I started this lesson in 2009, what a shame! :-( + + + +[Genesis Block](https://en.bitcoin.it/wiki/Genesis_block) +[Bitcoin Block Reward Halving Countdown](https://www.bitcoinblockhalf.com/) + +### Incentive 2: Transaction Fees +* Transaction creator can choose to make the output value less than the input value +* Remainder is a transaction fee and it goes to the block creator +Right now it's purely voluntary, like a tip. But after all the Bitcoins are mined out after 2140, it might become mandatory. + +## Proof of Work +### Why Bitcoin network needs proof of work? + +To select node who gets to propose the block based on their computing power(the proportion of computing power in the whole Bitcoin network), so the adversary can't simply create a lot of civil nodes to try to get more rewards. + +### How to prove the work? + +A hash puzzle needs computing power to solve: find a nonce to get a hash output falling into a small target space. + + + +### PoW properties +* Difficult to Compute +In Aug 2014, a node needs to try about 10^20 times to find a hash in the target space. +* parameterizable cost +Nodes automatically re-calculate the target every 2 weeks to keep the average time between blocks = 10 minutes. +It means if a miner invests a fixed amount of hardware into Bitcoin mining, as time goes by, the BTC he can find during a certain period will be less because the mining ecosystem is growing, his proportion of computing power is decreasing. +**probability(Alice wins the next block) = fraction of global hash power she controls** +Why keep the time as 10 minutes: for efficiency, this allows to keep a certain number of transactions into one block + +## Key Security Assumption +Attacks are infeasible if the majority of the miners weighted by hash power follows the protocol because the competition of hash power can ensure the probability of the next block proposing by an honest node is higher than 50%. diff --git a/exampleSite/content/post/2018-06-02-istio08.md b/exampleSite/content/post/2018-06-02-istio08.md new file mode 100644 index 0000000..8aa473a --- /dev/null +++ b/exampleSite/content/post/2018-06-02-istio08.md @@ -0,0 +1,126 @@ +--- +layout: post + +title: "Istio 0.8 Release发布" +subtitle: "来自Istio的儿童节礼物" +excerpt: "Istio 0.8 Release新特性" +author: "赵化冰" +date: 2018-06-02 +description: "在6月1日这一天的早上,Istio社区宣布发布0.8 Release,除了常规的故障修复和性能改进外,这个儿童节礼物里面还有什么值得期待内容呢?让我们来看一看:" +image: "https://img.zhaohuabing.com/in-post/2018-06-02-istio08/background.jpg" +published: true +tags: + - Istio + +categories: [ Tech ] +URL: "/2018/06/02/istio08/" +--- + +> 在6月1日这一天的早上,Istio社区宣布发布0.8 Release,除了常规的故障修复和性能改进外,这个儿童节礼物里面还有什么值得期待内容呢?让我们来看一看: +<!--more--> +## Networking + +### 改进的流量管理模型 +0.8版本采用了新的流量管理配置模型[v1alpha3 Route API](https://istio.io/blog/2018/v1alpha3-routing/)。新版本的模型添加了一些新的特性,并改善了之前版本模型中的可用性问题。主要的改动包括: + +#### Gateway +新版本中不再使用K8s中的Ingress,转而采用Gateway来统一配置Service Mesh中的各个HTTP/TCP负载均衡器。Gateway可以是处理入口流量的Ingress Gateway,负责Service Mesh内部各个服务间通信的Sidecar Proxy,也可以是负责出口流量的Egress Gateway。 + +Mesh中涉及到的三类Gateway: + + +该变化的原因是K8s中的Ingress对象功能过于简单,不能满足Istio灵活的路由规则需求。在0.8版本中,L4-L6的配置和L7的配置被分别处理,Gateway中只配置L4-L6的功能,例如暴露的端口,TLS设置。然后用户可以采用VirtualService来配置标准的Istio规则,并和Gateway进行绑定。 + + +#### VirtualService + +采用VirtualService代替了alpha2模型中的RouteRule。采用VirtualService有两个优势: + +**可以把一个服务相关的规则放在一起管理** + +例如下面的路由规则,发向reviews的请求流量缺省destination为v1,如果user为jason则路由到v2。在v1模型中需要采用两条规则来实现,采用VirtualService后放到一个规则下就可以实现。 +``` +apiVersion: networking.istio.io/v1alpha3 +kind: VirtualService +metadata: + name: reviews +spec: + hosts: + - reviews + http: + - match: + - headers: + cookie: + regex: "^(.*?;)?(user=jason)(;.*)?$" + route: + - destination: + host: reviews + subset: v2 + - route: + - destination: + host: reviews + subset: v1 +``` + +**可以对外暴露一个并不存在的“虚拟服务”,然后将该“虚拟服务”映射到Istio中的Service上** + +下面规则中的bookinfo.com是对外暴露的“虚拟服务”,bookinfo.com/reviews被映射到了reviews服务,bookinfo.com/ratings被映射到了ratings服务。通过采用VirtualService,极大地增强了Istio路由规则的灵活性,有利于Legacy系统和Istio的集成。 +``` +apiVersion: networking.istio.io/v1alpha3 +kind: VirtualService +metadata: + name: bookinfo +spec: + hosts: + - bookinfo.com + http: + - match: + - uri: + prefix: /reviews + route: + - destination: + host: reviews + - match: + - uri: + prefix: /ratings + route: + - destination: + host: ratings + ... +``` + +### Envoy V2 +控制面和数据面标准接口支持Envoy + +### 用Gateway代替 Ingress/Engress +前面已经介绍到,新的版本中不再支持将Kubernetes的Ingress和Istio路由规则一起使用。Istio 0.8支持平台无关的 Ingress/Egress Gateway,可以在Kubernetes,Cloud Foundry中和Istio路由规则无缝集成。 + +### 对入站端口进行限制 +0.8版本只允许访问Pod内已声明端口的入站流量。 + +## Security +### 安全组件Citadel +将Istio的安全组件Istio-Auth/Istio-CA正式命名为Citadel(堡垒)。 + +### 跨集群支持 +部署在多个Cluster中的Citadel可以共享同一Root Certificate,以支持不同Cluster内的服务可以跨Cluster进行认证。 + +### 认证策略 +认证策略既支持Service-to-Service认证,也支持对终端用户进行认证。 + +## 遥测 +Mixer和Pilot将上报自身的遥测数据,其上报的流程和Mesh中的普通服务相同。 + +## 安装 +按需安装部分组件:支持只安装所需的组件,如果只需要使用Istio的路由规则,可以选择只安装Pilot,而不安装Mixer和Citadel。 + +## Mixer +CloudWatch:增加了一个CloudWatch插件,可以向AWS CloudWatch上报度量数据。 + +## 已知故障: +* 如果Gateway绑定的VirtualService指向的是headless service,则该规则不能正常工作。 +* 0.8版本和Kubernetes1.10.2存在兼容问题,目前建议采用1.9版本。 +* convert-networking-config工具存在故障,一个其它的namespace可能会被修改为istio-system namespace。可以在允许转换工具后手动修改文件来避免。 + +## 总结 +0.8版本带来的最大变化是流量配置模型的重构,重构后的模型整合了外部Gateway和内部Sidecar Proxy的路由配置。同时VirtualService的引入使路由规则的配置更为集中和灵活。 diff --git a/exampleSite/content/post/2018-06-03-cryptocurrency_week3_bitcoin_script.md b/exampleSite/content/post/2018-06-03-cryptocurrency_week3_bitcoin_script.md new file mode 100644 index 0000000..bab54a5 --- /dev/null +++ b/exampleSite/content/post/2018-06-03-cryptocurrency_week3_bitcoin_script.md @@ -0,0 +1,38 @@ +--- +layout: post + +title: "Bitcoin Script" +subtitle: "Bitcoin and Cryptocurrency Technologies-Week 3" +description: "Bitcoin Script is using to transfer coins instead of just signature and public key address, which allows more flexibilities for Bitcoin transactions" +author: "赵化冰" +date: 2018-06-03 +image: "https://img.zhaohuabing.com/in-post/2018-05-06-cryptocurrency_week1/bitcoin_2.jpg" +published: true +tags: + - Cryptocurrency + - Blockchain + - Bitcoin + - Digital Signature +categories: [ Note ] +URL: "/2018/06/03/cryptocurrency_week3_bitcoin_script/" +--- + +> This series of articles are my notes of "Bitcoin and Cryptocurrency Technologies" online course. + +Bitcoin Script is using to transfer coins instead of just signature and public key address, which allows more flexibilities for Bitcoin transactions. + +## A Standard Transaction +Let's say Alice wants to spend some coins she received from a previous transaction, this is how the procedure looks like. +* Alice receives some coins from a previous transaction. One of the outputs of that transaction specifies the public key of Alice to indicate that the coins in that output are transferred to Alice. +> Actually, it's the cryptographic hash of the public key in order to lower the risk that attacker might figure out the private key by the public key. +* Besides the public key hash, there's also some bitcoin script code in the output, which is called scriptPubkey. +* In transaction 2, Alice wants to spend her coin, so she gives her signature to prove that she approve this transaction. She also specifies her full public key to prove her ownership of these coins. This combination is called scriptSig. +* SctiptPubkey and ScriptSig are concatenated to form a single, completed script. This script will run on Bitcoin nodes, if the output is true, then the transaction is valid and will proceed, otherwise, it's considered as invalid and will be abandoned. + +* The most simple, standard script essentially does two things when it is executed: first, the script checks if the given public key in ScriptSig matches the public key hash in ScriptPubkey, then it validates the signature with the public key. The below table shows how the script is processed. + + +## Check Multi-Signatures +Specifies N public keys, if T out of N signatures are verified as valid, the coins can be redeemed.(T<=N) +## Reference +* https://en.bitcoin.it/wiki/Script diff --git a/exampleSite/content/post/2018-06-04-introducing-the-istio-v1alpha3-routing-api.md b/exampleSite/content/post/2018-06-04-introducing-the-istio-v1alpha3-routing-api.md new file mode 100644 index 0000000..65f65e5 --- /dev/null +++ b/exampleSite/content/post/2018-06-04-introducing-the-istio-v1alpha3-routing-api.md @@ -0,0 +1,316 @@ +--- +showonlyimage: true +title: "Istio v1aplha3 routing API介绍(译文)" +subtitle: "" +excerpt: "介绍Istio v1alpha3 routing API及其设计原则" +description: "介绍Istio v1alpha3 routing API及其设计原则" +date: 2018-06-04 +author: "赵化冰" +image: "https://img.zhaohuabing.com/in-post/2018-06-04-introducing-the-istio-v1alpha3-routing-api/background.jpg" +published: true +tags: + - Istio + +categories: [ Tech ] +URL: "/2018/06/04/introducing-the-istio-v1alpha3-routing-api/" +--- + +到目前为止,Istio提供了一个简单的API来进行流量管理,该API包括了四种资源:RouteRule,DestinationPolicy,EgressRule和Ingress(直接使用了Kubernets的Ingress资源)。借助此API,用户可以轻松管理Istio服务网格中的流量。该API允许用户将请求路由到特定版本的服务,为弹性测试注入延迟和失败,添加超时和断路器等等,所有这些功能都不必更改应用程序本身的代码。 + +<!--more--> +虽然目前API的功能已被证明是Istio非常引人注目的一部分,但用户的反馈也表明,这个API确实有一些缺点,尤其是在使用它来管理包含数千个服务的非常大的应用程序,以及使用HTTP以外的协议时。 此外,使用Kubernetes Ingress资源来配置外部流量的方式已被证明不能满足需求。 + +为了解决上述缺陷和其他的一些问题,Istio引入了新的流量管理API v1alpha3,新版本的API将完全取代之前的API。 尽管v1alpha3和之前的模型在本质上是基本相同的,但它并不向后兼容的,基于旧API的模型需要进行手动转换。 Istio接下来的几个版本中会提供一个新旧模型的转换工具。 + + +为了证明该非兼容升级的必要性,v1alpha3 API经历了漫长而艰苦的社区评估过程,以希望新的API能够大幅改进,并经得起时间考验。 在本文中,我们将介绍新的配置模型,并试图解释其后面的一些动机和设计原则。 + +## 设计原则 +路由模型的重构过程中遵循了一些关键的设计原则: + +* 除支持声明式(意图)配置外,也支持显式指定模型依赖的基础设施。例如,除了配置入口网关(的功能特性)之外,负责实现 入口网关功能的组件(Controller)也可以在模型指定。 +* 编写模型时应该“生产者导向”和“以Host为中心”,而不是通过组合多个规则来编写模型。 例如,所有与特定Host关联的规则被配置在一起,而不是单独配置。 +* 将路由与路由后行为清晰分开。 + +## v1alpha3中的配置资源 + +在一个典型的网格中,通常有一个或多个用于终结外部TLS链接,将流量引入网格的负载均衡器(我们称之为gateway)。 然后流量通过边车网关(sidecar gateway)流经内部服务。 应用程序使用外部服务的情况也很常见(例如访问Google Maps API),一些情况下,这些外部服务可能被直接调用;但在某些部署中,网格中所有访问外部服务的流量可能被要求强制通过专用的出口网关(Egress gateway)。 下图描绘了网关在网格中的使用情况。 + + + +考虑到上述因素,`v1alpha3`引入了以下这些新的配置资源来控制进入网格,网格内部和离开网格的流量路由。 + +1. `Gateway` +1. `VirtualService` +1. `DestinationRule` +1. `ServiceEntry` + +`VirtualService`,`DestinationRule`和`ServiceEntry`分别替换了原API中的`RouteRule`,`DestinationPolicy`和`EgressRule`。 `Gateway`是一个独立于平台的抽象,用于对流入专用中间设备的流量进行建模。 + +下图描述了跨多个配置资源的控制流程。 + + +### Gateway +[Gateway](https://istio.io/docs/reference/config/istio.networking.v1alpha3/#Gateway)用于为HTTP / TCP流量配置负载均衡器,并不管该负载均衡器将在哪里运行。 网格中可以存在任意数量的Gateway,并且多个不同的Gateway实现可以共存。 实际上,通过在配置中指定一组工作负载(Pod)标签,可以将Gateway配置绑定到特定的工作负载,从而允许用户通过编写简单的Gateway Controller来重用现成的网络设备。 + +对于入口流量管理,您可能会问: 为什么不直接使用Kubernetes Ingress API ? 原因是Ingress API无法表达Istio的路由需求。 Ingress试图在不同的HTTP代理之间取一个公共的交集,因此只能支持最基本的HTTP路由,最终导致需要将代理的其他高级功能放入到注解(annotation)中,而注解的方式在多个代理之间是不兼容的,无法移植。 + +Istio `Gateway` 通过将L4-L6配置与L7配置分离的方式克服了`Ingress`的这些缺点。 `Gateway`只用于配置L4-L6功能(例如,对外公开的端口,TLS配置),所有主流的L7代理均以统一的方式实现了这些功能。 然后,通过在`Gateway`上绑定`VirtualService`的方式,可以使用标准的Istio规则来控制进入`Gateway`的HTTP和TCP流量。 + +例如,下面这个简单的`Gateway`配置了一个Load Balancer,以允许访问host bookinfo.com的https外部流量入mesh中: + +```yaml +apiVersion: networking.istio.io/v1alpha3 +kind: Gateway +metadata: + name: bookinfo-gateway +spec: + servers: + - port: + number: 443 + name: https + protocol: HTTPS + hosts: + - bookinfo.com + tls: + mode: SIMPLE + serverCertificate: /tmp/tls.crt + privateKey: /tmp/tls.key +``` + +要为进入上面的Gateway的流量配置相应的路由,必须为同一个host定义一个`VirtualService`(在下一节中描述),并使用配置中的`gateways`字段绑定到前面定义的`Gateway` 上: +```yaml +apiVersion: networking.istio.io/v1alpha3 +kind: VirtualService +metadata: + name: bookinfo +spec: + hosts: + - bookinfo.com + gateways: + - bookinfo-gateway # <---- bind to gateway + http: + - match: + - uri: + prefix: /reviews + route: + ... +``` +Gateway可以用于建模边缘代理或纯粹的内部代理,如第一张图所示。 无论在哪个位置,所有网关都可以用相同的方式进行配置和控制。 + +### VirtualService +用一种叫做“Virtual services”的东西代替路由规则可能看起来有点奇怪,但对于它配置的内容而言,这事实上是一个更好的名称,特别是在重新设计API以解决先前模型的可扩展性问题之后。 + +实际上,发生的变化是:在之前的模型中,需要用一组相互独立的配置规则来为特定的目的服务设置路由规则,并通过precedence字段来控制这些规则的顺序;在新的API中,则直接对(虚拟)服务进行配置,该虚拟服务的所有规则以一个有序列表的方式配置在对应的[VirtualService](/docs/reference/config/istio.networking.v1alpha3/#VirtualService) 资源中。 + +例如,之前在[Bookinfo](/docs/guides/bookinfo/) 应用程序的reviews服务中有两个RouteRule资源,如下所示: + +```yaml +apiVersion: config.istio.io/v1alpha2 +kind: RouteRule +metadata: + name: reviews-default +spec: + destination: + name: reviews + precedence: 1 + route: + - labels: + version: v1 +--- +apiVersion: config.istio.io/v1alpha2 +kind: RouteRule +metadata: + name: reviews-test-v2 +spec: + destination: + name: reviews + precedence: 2 + match: + request: + headers: + cookie: + regex: "^(.*?;)?(user=jason)(;.*)?$" + route: + - labels: + version: v2 +``` + +在`v1alph3`,可以在单个`VirtualService`资源中提供相同的配置: + +```yaml +apiVersion: networking.istio.io/v1alpha3 +kind: VirtualService +metadata: + name: reviews +spec: + hosts: + - reviews + http: + - match: + - headers: + cookie: + regex: "^(.*?;)?(user=jason)(;.*)?$" + route: + - destination: + host: reviews + subset: v2 + - route: + - destination: + host: reviews + subset: v1 +``` +正如你所看到的, 和reviews服务相关的两个规则集中写在了一个地方。这个改变乍一看可能觉得并没有什么特别的优势, 然而,如果仔细观察这个新模型,会发现它和之前的API之间存在着根本的差异,这使得v1alpha3功能更加强大。 + +首先,请注意`VirtualService`的目标服务是使用`hosts`字段(实际上是重复字段)指定的,然后再在每个路由的`destination`字段中指定。 这是与以前模型的重要区别。 + +`VirtualService`描述了一个或多个用户可寻址目标到网格内实际工作负载之间的映射。在上面的示例中,这两个地址是相同的,但实际上用户可寻址目标可以是任何用于定位服务的,具有可选通配符前缀或CIDR前缀的DNS名称。 +这对于应用从单体架构到微服务架构的迁移过程特别有用,单体应用被拆分为多个独立的微服务后,采用VirtaulService可以继续把多个微服务对外暴露为同一个目标地址,而不需要服务消费者进行修改以适应该变化。 + +例如,以下规则允许服务消费者访问Bookinfo应用程序的reviews和ratings服务,就好像它们是`http://bookinfo.com/`(虚拟)服务的一部分: + +```yaml +apiVersion: networking.istio.io/v1alpha3 +kind: VirtualService +metadata: + name: bookinfo +spec: + hosts: + - bookinfo.com + http: + - match: + - uri: + prefix: /reviews + route: + - destination: + host: reviews + - match: + - uri: + prefix: /ratings + route: + - destination: + host: ratings + ... +``` +实际上在`VirtualService`中hosts部分设置只是虚拟的目的地,因此不一定是已在网格中注册的服务。这允许用户为在网格内没有可路由条目的虚拟主机的流量进行建模。 通过将`VirtualService`绑定到同一Host的`Gateway`配置(如前一节所述 ),可向网格外部暴露这些Host。 + +除了这个重大的重构之外, `VirtualService`还包括其他一些重要的改变: + +1. 可以在`VirtualService`配置中表示多个匹配条件,从而减少对冗余的规则设置。 + +1. 每个服务版本都有一个名称(称为服务子集)。 属于某个子集的一组Pod/VM在`DestinationRule`定义,具体定义参见下节。 + +1. 通过使用带通配符前缀的DNS来指定`VirtualService`的host,可以创建单个规则以作用于所有匹配的服务。 例如,在Kubernetes中,在'VirtualService'中使用*.foo.svc.cluster.local作为host,可以对`foo`命名空间中的所有服务应用相同的重写规则。 + +### DestinationRule + +[DestinationRule](https://istio.io/docs/reference/config/istio.networking.v1alpha3/#DestinationRule)配置将流量转发到服务时应用的策略集。 这些策略应由由服务提供者撰写,用于描述断路器,负载均衡设置,TLS设置等。 +除了下述改变外,`DestinationRule`与其前身`DestinationPolicy`大致相同。 + +1. [DestinationRule](https://istio.io/docs/reference/config/istio.networking.v1alpha3/#DestinationRule)的`host`可以包含通配符前缀,以允许单个规则应用于多个服务。 +1. `DestinationRule`定义了目的host的子集`subsets` (例如:命名版本)。 这些subset用于`VirtualService`的路由规则设置中,可以将流量导向服务的某些特定版本。 通过这种方式为版本命名后,可以在不同的virtual service中明确地引用这些命名版本的ubset,简化Istio代理发出的统计数据,并可以将subsets编码到SNI头中。 +为reviews服务配置策略和subsets的`DestinationRule`可能如下所示: + +```yaml +apiVersion: networking.istio.io/v1alpha3 +kind: DestinationRule +metadata: + name: reviews +spec: + host: reviews + trafficPolicy: + loadBalancer: + simple: RANDOM + subsets: + - name: v1 + labels: + version: v1 + - name: v2 + labels: + version: v2 + trafficPolicy: + loadBalancer: + simple: ROUND_ROBIN + - name: v3 + labels: + version: v3 +``` + +注意,与`DestinationPolicy`不同的是,可在单个`DestinationRule`中指定多个策略(例如上面实例中的缺省策略和v2版本特定的策略)。 +### ServiceEntry + +[ServiceEntry](https://istio.io/docs/reference/config/istio.networking.v1alpha3/#ServiceEntry)用于将附加条目添加到Istio内部维护的服务注册表中。 +它最常用于对访问网格外部依赖的流量进行建模,例如访问Web上的API或遗留基础设施中的服务。 + +所有以前使用`EgressRule`进行配置的内容都可以通过`ServiceEntry`轻松完成。 例如,可以使用类似这样的配置来允许从网格内部访问一个简单的外部服务: +```yaml +apiVersion: networking.istio.io/v1alpha3 +kind: ServiceEntry +metadata: + name: foo-ext +spec: + hosts: + - foo.com + ports: + - number: 80 + name: http + protocol: HTTP +``` +也就是说,`ServiceEntry`比它的前身具有更多的功能。首先,`ServiceEntry`不限于外部服务配置,它可以有两种类型:网格内部或网格外部。网格内部条目只是用于向网格显式添加服务,添加的服务与其他内部服务一样。采用网格内部条目,可以把原本未被网格管理的基础设施也纳入到网格中(例如,把虚机中的服务添加到基于Kubernetes的服务网格中)。网格外部条目则代表了网格外部的服务。对于这些外部服务来说,mTLS身份验证是禁用的,并且策略是在客户端执行的,而不是在像内部服务请求一样在服务器端执行策略。 + +由于`ServiceEntry`配置只是将服务添加到网格内部的服务注册表中,因此它可以像注册表中的任何其他服务一样,与`VirtualService`和/或`DestinationRule`一起使用。例如,以下`DestinationRule`可用于启动外部服务的mTLS连接: +```yaml +apiVersion: networking.istio.io/v1alpha3 +kind: DestinationRule +metadata: + name: foo-ext +spec: + name: foo.com + trafficPolicy: + tls: + mode: MUTUAL + clientCertificate: /etc/certs/myclientcert.pem + privateKey: /etc/certs/client_private_key.pem + caCertificates: /etc/certs/rootcacerts.pem +``` +除了扩展通用性以外,`ServiceEntry`还提供了其他一些有关`EgressRule`改进,其中包括: + +1. 一个`ServiceEntry`可以配置多个服务端点,这在之前需要采用多个`EgressRules`来实现。 +1. 现在可以配置服务端点的解析模式(`NONE`,`STATIC`或`DNS`)。 +1. 此外,我们正在努力解决另一个难题:目前需要通过纯文本端口访问安全的外部服务(例如`http://google.com:443`)。该问题将会在未来几周内得到解决,届时将允许从应用程序直接访问`https://google.com`。请继续关注解决此限制的Istio补丁版本(0.8.x)。 + +## 创建和删除v1alpha3路由规则 +由于一个特定目的地的所有路由规则现在都存储在单个`VirtualService`资源的一个有序列表中,因此为该目的地添加新的规则不需要再创建新的`RouteRule`,而是通过更新该目的地的`VirtualService`资源来实现。 + +旧的路由规则: +```command +$ istioctl create -f my-second-rule-for-destination-abc.yaml +``` +`v1alpha3`路由规则: +```command +$ istioctl replace -f my-updated-rules-for-destination-abc.yaml +``` + +删除路由规则也使用istioctl replace完成,当然删除最后一个路由规则除外(删除最后一个路由规则需要删除`VirtualService`)。 + +在添加或删除引用服务版本的路由时,需要在该服务相应的`DestinationRule`更新subsets 。 正如你可能猜到的,这也是使用`istioctl replace`完成的。 + +## 总结 +Istio `v1alpha3`路由API具有比其前身更多的功能,但不幸的是新的API并不向后兼容,旧的模型升级需要一次手动转换。 Istio 0.9以后将不再支持`RouteRule`,`DesintationPolicy`和`EgressRule`这些以前的配置资源 。Kubernetes用户可以继续使用`Ingress`配置边缘负载均衡器来实现基本的路由。 但是,高级路由功能(例如,跨两个版本的流量分割)则需要使`用Gateway` ,这是一种功能更强大,Istio推荐的`Ingress`替代品。 + +## 致谢 +感谢以下人员为新版本的路由模型重构和实现工作做出的贡献(按字母顺序) + +* Frank Budinsky (IBM) +* Zack Butcher (Google) +* Greg Hanson (IBM) +* Costin Manolache (Google) +* Martin Ostrowski (Google) +* Shriram Rajagopalan (VMware) +* Louis Ryan (Google) +* Isaiah Snell-Feikema (IBM) +* Kuat Yessenov (Google) + +## 原文 + +* [Introducing the Istio v1alpha3 routing API](https://kubernetes.io/blog/2018/01/extensible-admission-is-beta) diff --git a/exampleSite/content/search/placeholder.md b/exampleSite/content/search/placeholder.md new file mode 100644 index 0000000..e69de29 --- /dev/null +++ b/exampleSite/content/search/placeholder.md diff --git a/exampleSite/deploy.sh b/exampleSite/deploy.sh new file mode 100755 index 0000000..59dc8cf --- /dev/null +++ b/exampleSite/deploy.sh @@ -0,0 +1,24 @@ +#!/bin/bash + +echo -e "\033[0;32mDeploying updates to GitHub...\033[0m" + +# Build the project. +hugo # if using a theme, replace with `hugo -t <YOURTHEME>` + +# Go To Public folder +cd public +# Add changes to git. +git add . + +# Commit changes. +msg="rebuilding site `date`" +if [ $# -eq 1 ] + then msg="$1" +fi +git commit -m "$msg" + +# Push source and build repos. +git push origin master + +# Come Back up to the Project Root +cd .. diff --git a/exampleSite/static/img/404-bg.jpg b/exampleSite/static/img/404-bg.jpg Binary files differnew file mode 100644 index 0000000..0f22234 --- /dev/null +++ b/exampleSite/static/img/404-bg.jpg diff --git a/exampleSite/static/img/avatar-zhaohuabing.jpg b/exampleSite/static/img/avatar-zhaohuabing.jpg Binary files differnew file mode 100644 index 0000000..5b5e79c --- /dev/null +++ b/exampleSite/static/img/avatar-zhaohuabing.jpg diff --git a/exampleSite/static/img/avatar-zhaohuabing1.jpg b/exampleSite/static/img/avatar-zhaohuabing1.jpg Binary files differnew file mode 100644 index 0000000..a7ea933 --- /dev/null +++ b/exampleSite/static/img/avatar-zhaohuabing1.jpg diff --git a/exampleSite/static/img/contact-bg.jpg b/exampleSite/static/img/contact-bg.jpg Binary files differnew file mode 100644 index 0000000..1e0facc --- /dev/null +++ b/exampleSite/static/img/contact-bg.jpg diff --git a/exampleSite/static/img/favicon.ico b/exampleSite/static/img/favicon.ico Binary files differnew file mode 100644 index 0000000..d209261 --- /dev/null +++ b/exampleSite/static/img/favicon.ico diff --git a/exampleSite/static/img/favicon.png b/exampleSite/static/img/favicon.png Binary files differnew file mode 100644 index 0000000..ba87d91 --- /dev/null +++ b/exampleSite/static/img/favicon.png diff --git a/exampleSite/static/img/home-bg-jeep.jpg b/exampleSite/static/img/home-bg-jeep.jpg Binary files differnew file mode 100644 index 0000000..aab6c0f --- /dev/null +++ b/exampleSite/static/img/home-bg-jeep.jpg diff --git a/exampleSite/static/img/post-bg-coffee.jpeg b/exampleSite/static/img/post-bg-coffee.jpeg Binary files differnew file mode 100644 index 0000000..5530b05 --- /dev/null +++ b/exampleSite/static/img/post-bg-coffee.jpeg diff --git a/exampleSite/static/img/post-bg-unix-linux.jpg b/exampleSite/static/img/post-bg-unix-linux.jpg Binary files differnew file mode 100644 index 0000000..a89467c --- /dev/null +++ b/exampleSite/static/img/post-bg-unix-linux.jpg diff --git a/exampleSite/static/img/search.png b/exampleSite/static/img/search.png Binary files differnew file mode 100644 index 0000000..4fc4576 --- /dev/null +++ b/exampleSite/static/img/search.png diff --git a/exampleSite/static/img/tag-bg.jpg b/exampleSite/static/img/tag-bg.jpg Binary files differnew file mode 100644 index 0000000..4737c01 --- /dev/null +++ b/exampleSite/static/img/tag-bg.jpg diff --git a/exampleSite/static/img/wechat_qrcode.jpg b/exampleSite/static/img/wechat_qrcode.jpg Binary files differnew file mode 100644 index 0000000..f810ee0 --- /dev/null +++ b/exampleSite/static/img/wechat_qrcode.jpg |